background image

© 2017 JCM Global Corporation

19

Part No. 960-000194R_Rev. A

GEN5™ Printer

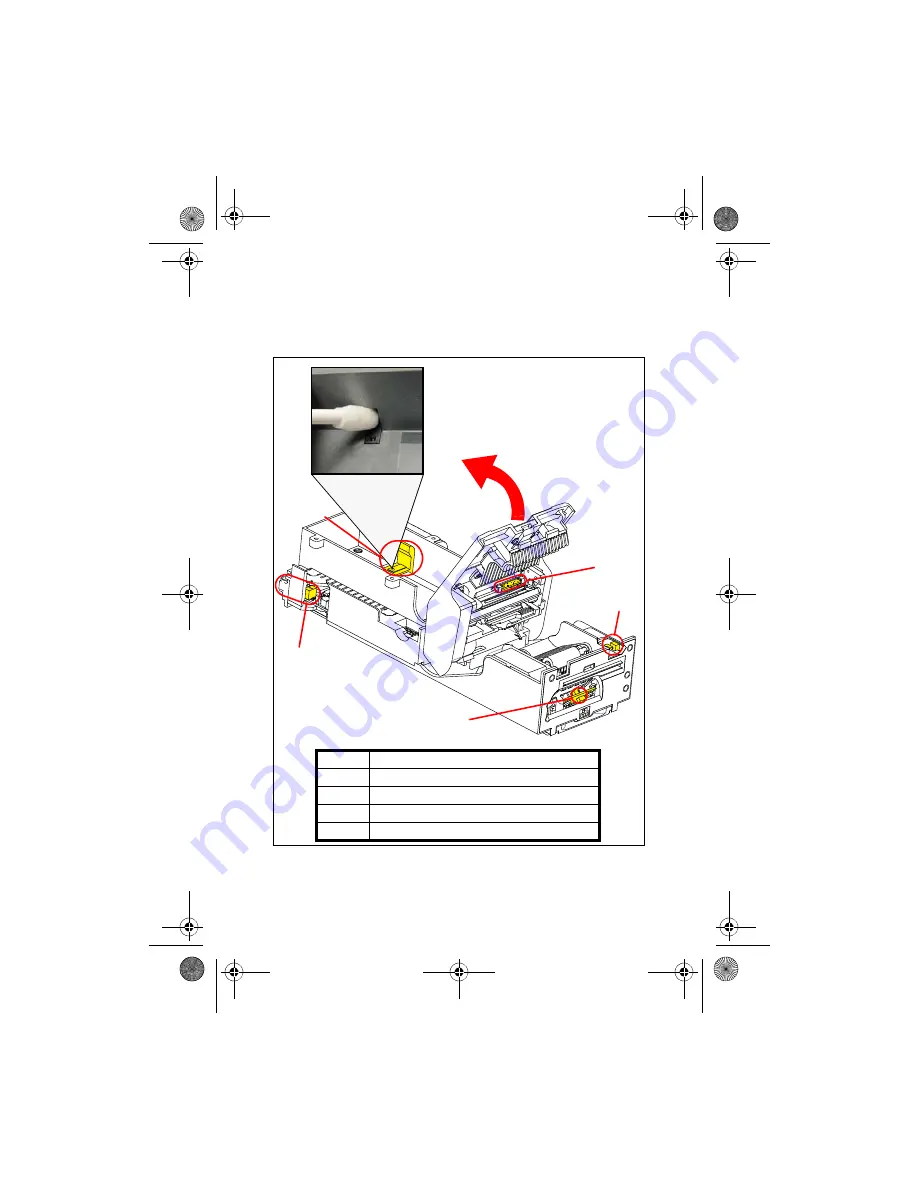
8. Clean each of the Sensors using a clean Cleaning Swab (Figure 14).

a

d

e

Cleaning Paper 
Low Sensor (

b

) with 

Cleaning Swab

b

c

b

 Figure 14 

Sensor Locations


a

Printer Tray (Drawer Open) Sensor

b

Ticket Low (Paper Low) Sensor

c

Paper Out (Index Mark) Sensor

d

Lid Open Sensor

e

Ticket Taken (Paper Taken) Sensor

GEN5_FlipBookRevA_v15.fm  Page 19  Friday, June 30, 2017  9:20 AM

Summary of Contents for GEN5 Series

Page 1: ...echnical Support Division of Customer Service via the email addresses listed below Americas support jcmglobal com Europe Middle East Africa Russia UK support jcmglobal eu Asia Oceania asiasupport jcmg...

Page 2: ...TROUBLESHOOTING GUIDE Introduction This Quick Reference Guide is designed for use with the GEN5 line of Printers Figure 1 This Guide covers the set up and use of the following Printer PSA 66 ST5 Figur...

Page 3: ...and the four 4 Keypad LEDs Refer to Table 1 below for GEN5 Keypad LED Status Codes Bezel LED Connector Figure 2 GEN5 Printer Keypad LEDs and FEED Button Table 1 GEN5 Keypad LED Status Codes Condition...

Page 4: ...lashes three 3 times When the Paper Low Sensor is disabled the RED FAULT LED flashes three 3 times GEN5 DIP SWITCH SETTINGS The GEN5 Printer has a bank of DIP Switches The functionality of the DIP Swi...

Page 5: ...Ticket can be used to check print quality To print a Configura tion Ticket Figure 3 press the FEED button twice Model Number System Communications Setup Print Control Parameters Amount of Memory Resid...

Page 6: ...indicates that paper is not loaded in the GEN5 Printer Paper Low Located in the Paper Tray Paper Low indicates that less than two 2 Tickets are detected in the GEN5 Printer Paper Taken Located in the...

Page 7: ...e the Printer Lid Temperature Operating Temperature exceeds limits Determine cause of high temperature let unit cool down Voltage Power Supply voltage exceeds acceptable range Check cabling apply corr...

Page 8: ...e JCM Device Firmware Upgrade Downloader JCM DFU Figure 4 2 Make sure the GEN5 Printer is powered ON 3 Connect a USB cable from the PC to the Printer s USB port right side Figure 4 JCM Device Firmware...

Page 9: ...e Firmware Upgrade Application look for the Printer Detected indicator Figure 5 a in the window 5 Click the Select FIRMWARE button to select the desired Firmware Upgrade file to be downloaded Figure 6...

Page 10: ...Firmware Upgrade window Figure 7 click on the desired Firmware update file Figure 7 a to be downloaded to the Printer Then click the Open button Figure 7 b to con tinue a b Figure 7 Select the Firmwa...

Page 11: ...Printer using the BlueWaveDX Tool perform the following steps 1 Create a folder in the root directory of the SD Card named GEN5 System 2 Place the Firmware file for the GEN5 Printer into this new fol...

Page 12: ...IG OPTION Using the BlueWaveDX Tool the Bar Code format printed by the GEN5 Printer can be changed To do so 1 Connect the BlueWaveDX Tool to the GEN5 Printer with a USB Cable 2 Using the UP and DOWN A...

Page 13: ...ick the Start Button on the PC Desktop then click on Programs 2 Scroll down to JCM then click the JCM Printer Basic Driver icon The JCM PRINTER BASIC DRIVER Opening Screen appears Figure 9 3 Select th...

Page 14: ...Basic Driver Main Screen Figure 10 displays three main sections 1 PRINTER CONFIGURATION Figure 10 a 2 COMMANDS Figure 10 b 3 PRINTER STATUS Figure 10 c a c b d Figure 10 JCM Printer Basic Driver Main...

Page 15: ...Deletes the Firmware on the Printer Feed Feeds one blank Ticket Print Ticket Information Prints a Test Ticket with Printer Information Printer Communication Settings Character Set and a Test Barcode...

Page 16: ...Cleaning Card will feed into the Slot up to the loading point 6 Press the FEED button to feed the Cleaning Card through the Paper Path 7 Remove the Cleaning Card from the Printer 8 Turn the Cleaning C...

Page 17: ...ed by the red arrow Figure 11 c and Figure 12 a on page 18 to access the Printer interior 5 Use Non Flammable Compressed Air to blow out excessive dust and dirt from the following areas within the Pri...

Page 18: ...he Print Head Release Lever Figure 13 a 7 Clean the Print Head Figure 13 b using a Cleaning Swab a b Figure 12 Presenter Assembly a b Figure 13 Print Head Release Lever Print Head Clean Print Head b w...

Page 19: ...eaning Swab Figure 14 a d e Cleaning Paper Low Sensor b with Cleaning Swab b c b Figure 14 Sensor Locations a Printer Tray Drawer Open Sensor b Ticket Low Paper Low Sensor c Paper Out Index Mark Senso...

Page 20: ...circumference 10 Close the Print Head Release Lever refer to Figure 13 a on page 18 11 Use a Cleaning Wipe to wipe and clean the Feed Roller Figure 15 b 12 Use a clean dry Micro fiber cloth to wipe ex...

Page 21: ...g 60 D 40472 D sseldorf Germany Phone 49 211 530 645 60 Fax 49 211 530 645 85 E mail support jcmglobal eu UK Ireland JCM Europe UK Office Unit B Third Avenue Denbigh West Business Park Bletchley Milto...

Page 22: ...t jcmglobal com Asia and Oceania JCM Gold HK Ltd Unit 1 7 3 F Favor Industrial Centre 2 6 Kin Hong Street Kwai Chung N T Hong Kong Phone 852 2429 7187 Fax 852 2929 7003 E mail asiasupport jcmglobal co...

Reviews: