background image

15

21-18ID
Instruction & User Manual


m

Press the ON/OFF Trigger to start 
tightening.

To loosen fixings:


m

Set the rotation selector switch to 
anticlockwise rotation.


m

Press the ON/OFF Trigger to start 
loosening.

When the fixing does not resist the action 
of the impact driver it works like a normal 
screwdriver. When the fixing resists, the 
percussion function will automatically 
commence.

NOTE

The tightening torque varies according to a 
wide range of different factors. For critical 
applications, the torque can be checked with 
a torque wrench after after initial tightening 
with the impact driver.

NOTE

AUTOMATIC LED LIGHT


m

The impact driver is fitted with an LED 
working light to assist the user during 
operation.


m

The LED light will illuminate immediately the 
ON/OFF Trigger is pressed.


m

The LED light will automatically extinguish 
several seconds after the ON/OFF Trigger is 
released”


m

Do not look directly at the LED.

Overload protection


m

When the power tool is overloaded 
(abnormal high current), the integral 
electronic control system will automatically 
protect the motor by switching off the 
power supply.


m

Release the ON/OFF Trigger and wait one 
or two seconds for the electronics to reset, 
then restart the power tool.

Maintenance

Switch off the power tool and disconnect 
the power (remove battery/unplug) before 
cleaning and maintenance. This helps avoid 
the risk of electric shocks and accidental 
starting.

WARNING!


m

Wipe the power tool with a dry or damp 
cloth. 

Do not use a wet cloth.


Do not 

use detergent that contains solvent 
or corrosive, abrasive additives.

 This 

risks damaging the surfaces of the tool.


m

Clear the power tool vents and the bit 
holder chuck of dust and dirt after each 
use. 

Do not clean ventilation holes by 

inserting sharp objects in them, such 
as screwdrivers and other similar 
objects.


m

Stubborn contamination in areas hard to 
access can be removed with compressed air 
(max 3. bar).


m

Regularly check all fasteners, screws and 
bolts to make sure that they are tight. 
Tighten any loose screws immediately or 
serious injury could occur.

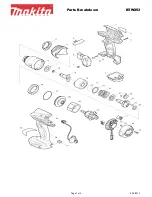
Never open the power tool. The power tool 
has no internal parts that the user can service 
or repair. Never try to repair the tool yourself. 
Take to an authorised service centre.

WARNING!

Do not hold the workpiece with your hands!

WARNING!

21-18ID Impact Driver Manual 2021.indd   15

17/06/2021   12:03

Summary of Contents for 21-18ID

Page 1: ...POWER TOOL INSTRUCTION USER MANUAL EN 21 18ID Original Instructions IM 18ID EN Iss 06 2021 21 18ID Impact Driver Manual 2021 indd 1 17 06 2021 12 03...

Page 2: ...electronic waste The product should not be discarded with household waste but must be returned to a collection system which conforms to the European Directive 2012 19 EU It will then be recycled or di...

Page 3: ...n using hammer mode 7 CHARGER SAFETY 8 COMPONENT LIST 9 TOOL TECHNICAL DATA 10 BATTERY TECHNICAL DATA 10 CHARGER TECHNICAL DATA 10 NOISE INFORMATION 11 VIBRATION INFORMATION 12 OPERATING INSTRUCTIONS...

Page 4: ...power tool will increase the risk of electric shock m Do not abuse the cord Never use the cord for carrying pulling or unplugging the power tool Keep the cord away from heat oil sharp edges or moving...

Page 5: ...or storing power tools Such preventive safety measures reduce the risk of starting the power tool accidentally m Store idle power tools out of the reach of children and do not allow persons unfamiliar...

Page 6: ...xhibit unpredictable behaviour resulting in fire an explosion or risk of injury m Do not expose a battery pack or tool to fire or excessive temperature Exposure to fire or temperature above 130 C may...

Page 7: ...r speed than the maximum speed rating of the drill bit At higher speeds the bit is likely to bend if allowed to rotate freely without contacting the workpiece resulting in personal injury m Use a dete...

Page 8: ...ndard household supply voltages Check the rating plate of the charger matches your local supply voltage Note the dual charger can additionally operate on worldwide 100 240V AC 50 60Hz input voltage Do...

Page 9: ...gers available 6 BATTERY RELEASE BUTTON 7 BELT CLIP 8 CHARGER refer to page 10 for further information 9 BATTERY PACK refer to page 10 for further information 10 BATTERY TEST BUTTON AND CHARGE INDICAT...

Page 10: ...rge Time Dual Charger 21 20LI Small 5 18V 2 0Ah 45 mins 30 mins 35 mins 21 30LI Large 10 18V 3 0Ah 65 mins 40 mins 45 mins 21 40LI Large 10 18V 4 0Ah 90 mins 55 mins 60 mins 21 50LI Large 10 18V 5 0Ah...

Page 11: ...tioned noise emission values can also be used for the preliminary assessment of exposure WARNING The noise emissions during the actual use of the power tool may differ from the above mentioned values...

Page 12: ...mation of exposure level in the actual conditions of use should also take account of all parts of the operating cycle These include times when the tool is switched off and when it is running idle but...

Page 13: ...4 to 5 times to ensure battery is correctly conditioned WARNING m Place the battery charger on a level and stable surface Plug the charger into a suitable power point m Connect the battery to the cha...

Page 14: ...irection Selector Switch with the arrows facing towards the chuck inwards to select clockwise rotation of the chuck i e screwing in m Press the Direction Selector Switch with the arrows facing away fr...

Page 15: ...r by switching off the power supply m Release the ON OFF Trigger and wait one or two seconds for the electronics to reset then restart the power tool Maintenance Switch off the power tool and disconne...

Page 16: ...arts Transport and Storage m If the power tool will remain unused for any length of time it should be stored in the original packaging m Store the power tool in a dry frost free well ventilated place...

Page 17: ...17 21 18ID Instruction User Manual 21 18ID Impact Driver Manual 2021 indd 17 17 06 2021 12 03...

Page 18: ...be available to download print or save as a PDF document The relevant warranty certificate together with the original sales receipt will be required in the event of any claim within the warranty peri...

Page 19: ...nd consumable items m Cases and tool storage products If your product develops a fault within 30 days of purchase return it to the retailer where it was purchased together with your sales receipt If a...

Page 20: ...IS DECLARATION 4 IDENTIFICATION DETAILS OF MANUFACTURER 1 6 REFERENCES TO THE RELEVANT HARMONISED SAFETY STANDARDS USED OR REFERENCES TO THE OTHER TECHNICAL SPECIFICATIONS IN RELATION TO WHICH CONFORM...

Page 21: ...21 21 18ID Instruction User Manual 21 18ID Impact Driver Manual 2021 indd 21 17 06 2021 12 03...

Reviews: