


ENGLISH
OPERATION MANUAL
JB SYSTEMS
®
7/78
USB1.1
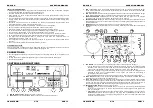
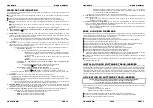
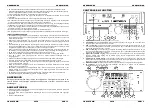
12. RANDOM:
Is lit while the player is set to “total random” mode, blinks while the player is set to “directory
random” mode.
13. AUTO CUE:
appears when the “auto cue” function is active.
14. RELOOP/RELOOP:
LOOP shows when a loop is programmed. When a loop is programmed and
currently playing, the RELOOP indicator is flashing.
15. PITCH DISPLAY:
shows the actual percentage of speed change, selected with the SPEED slider (21).
16. Padlock:
is shown when the pitch lock function (Master Tempo) is active.
17. BPM DISPLAY:
shows the output of automatic beat-counter, measured in beats per minute.
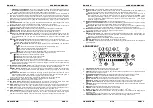
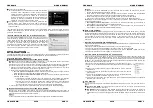
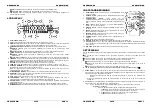
IR-REMOTE CONTROLLER
1.
OPEN/CLOSE-button:
same functionality as the OPEN/CLOSE-
button (24) on the player.
2.
SOURCE-buttons:
same functionality as the SOURCE SELECT-
button (25) on the player.
3.
CUE/STOP/PLAY-buttons:
same
functionality
as
the
CUE/PLAY/PAUSE-buttons (13+14) on the player. STOP-button
stops completely, also track/folder navigation is reset.
4.
LOOP-buttons:
same
functionality
as
the
LOOP
IN/OUT/RELOOP-buttons (10+11+12) on the player.
5.
SEARCH-buttons:
same functionality as the SEARCH-buttons
(18) on the player.
6.
TRACK-buttons:
same functionality as the TRACK-knob (16) on
the player with folder switch off.
7.
FOLDER-buttons:
same functionality as the TRACK-knob (16) on
the player with folder switch on.
8.
VOLUME-buttons:
used to change the output volume.
9.
MUTE-button:
switches the output volume on/off.
10. SGL/CTN-button:
same functionality as the single/continuous option in the setup menu.
11. PITCH-buttons:
with the +/-buttons you can change playback speed, maximum speed change is set
with the PITCH-button (20) on the player: one of the speed range LEDs on the player must be lit!
12. KEY LOCK-button:
same functionality as the KEY LOCK-button (19) on the player.
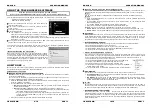
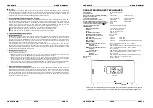
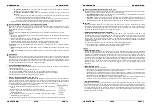
SETUP MENU
To increase flexibility some parameters of the USB1.1 can be changed in the setup menu.
To enter the SETUP menu, press the TIME button (26) for about 3seconds.
Use the TRACK knob (16) to browse the different menu options of the main menu.
Press the TRACK knob (16) to select the menu option you want to change:
Use the TRACK knob (16) to change the parameters of the selected menu option.
If the menu option has submenus, use the JOG-WHEEL (9) to browse these.
Press the TRACK knob (16) again to return to the main menu.
To save your settings: choose menu option 7 (EXIT & SAVE) and press the TRACK knob (16)
1. SLEEP TIME:
to extend the lifetime of the laser, the unit goes automatically to sleep mode while not used
for 15 minutes (default). In this menu option you can change, the time it takes to enter sleep mode:
Turn the TRACK knob (16) to select the desired time: “No SLEEP”
120 minutes.
Press the TRACK knob (16) to save the new value and return to the main menu.
2. Line Setup:
you can configure how the text line shows information that is longer than 10 characters. You
can choose 3 different modes + some extra fine-tuning:
There are 3 submenus: turn the JOG-WHEEL (9) to select a submenu.
o
Submenu 1 - L1 Mode:
Turn the TRACK knob (16) to select the desired setting:
L1 Mode = 1:
text line scrolls and waits for a certain time before scrolling
starts again. You can set the waiting time in submenu2.
L1 Mode = 2:
text line scrolls only one time, then stops.
L1 Mode = 3:
text line scrolls continuously.
o
Submenu 2 – start/stop waiting time for scrolling:
Turn the TRACK knob (16) to select the desired value:
ENGLISH
OPERATION MANUAL
JB SYSTEMS
®
8/78
USB1.1
Dis. = 0.5s
12.0s:
waiting time in seconds.
o
Submenu 3 – scrolling speed:
Turn the TRACK knob (16) to select the desired value:
Run = 50
2000ms:
50ms = fast speed / 2000ms = slow speed
Press the TRACK knob (16) to save the new values and return to the main menu.
3. SGL/CONT:
You can choose between “single track mode” and “continuous play”.
Continuous play: the complete CD/USB-drive will be played without interruption. (used in pubs)
Single track: player stops at the end of each track and waits at the beginning of the next track.
(mostly used by deejays)
Turn the TRACK knob (16) to select the desired mode. Press the TRACK knob (16) to save the
new value and return to the main menu.
4. AUTOCUE MODE:
while switched on the player stops at the end of each track and waits at the first
music note of the next track. This means that badly indexed CDs will not interfere with the instant start
capabilities of the player, a very useful feature for deejays!
5. Firmware version / upgrading:
use this option to check and/or upgrade the firmware versions.
Turn the TRACK knob (16) to select the 3 firmware parts:
o
CON: xx:
shows the version of the control firmware
o
DSP: xx:
shows the version of the DSP firmware
o
SER: xx:
shows the version of the servo firmware
o
Upgrade:
blinks when the unit is ready to check if there are new firmware versions
available. See “FIRMWARE UPGRADING” for more information.
Press the TRACK knob (16) to return to the main menu.
6. Load defaults:
If you really messed up things, you can still reload the default setting!
While “Load Defaults” is shown on the display: press the TRACK knob (16) to load the defaults.
7. Exit & Save:
if you want your changes to the setup menu to be permanently saved (also after switching
the unit off) you MUST use this option!
Press the TRACK knob (16) : the display shows “Saving” and exits the setup menu.
FIRMWARE UPGRADING
We strongly suggest to regularly check the USB1.1 product page on
www.jbsystems.be
to see if new
firmware updates are available. Upgrading firmware should always be done very carefully!
Download the file containing the upgrade file(s)
Read the instructions and follow them strictly, otherwise you could damage your equipment…
Put the files on an EMPTY
(important!)
USB-stick.
Press the TIME button (26) for about 3seconds to enter the setup menu.
Use the TRACK knob (16) to browse to menu option “
5. Version
”.
Turn the TRACK knob (16) until the display shows “Upgrade”.
Use the SOURCE SELECT button (25) to select USB1 input (3).
Insert the USB-stick with firmware files in USB1-input (3)
Upgrading will start automatically:
WAIT (!)
until the upgrading process is finished.
NEVER
turn the
player off while upgrading the software!!!
If the display asks you to turn off the unit: turn the unit off, wait 3seconds and turn it back on.
Check if the software version corresponds to the version marked in the readme file that came with the
update.
INSTALLING THE TRACK-INDEXER SOFTWARE
The USB1.1 works perfectly without the Track-Indexer database files but if you want to search your tracks
easily and lightning fast than you should install the Track-Indexer software on your computer! Please note
that the program currently only works under Windows (XP, Vista, Win7).
To be sure that you always have
the latest version, you can download the software from the USB1.1 product page on our website.
Installing the program is very easy: just double-click the file and follow the instructions on your screen.
Summary of Contents for USB 1.1 - V1.0
Page 1: ......