


26
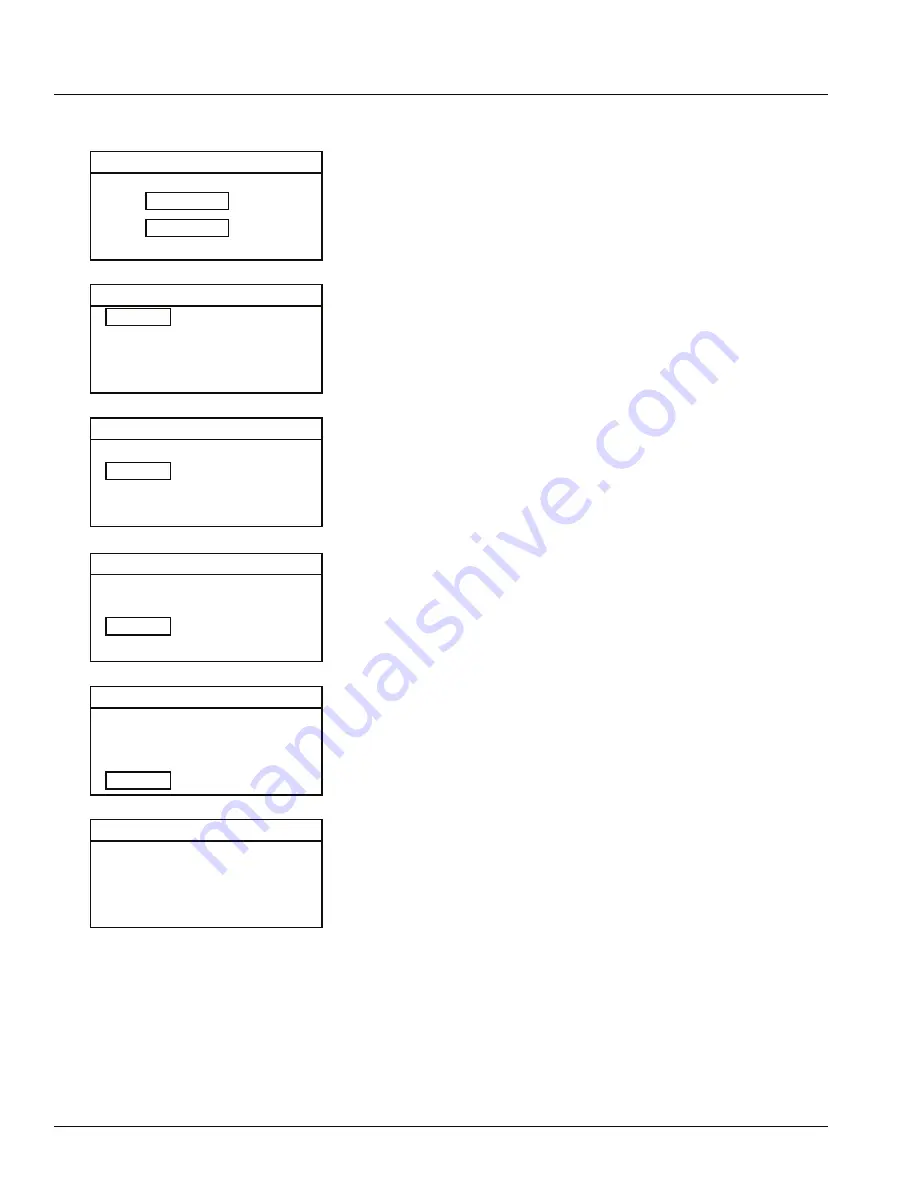
network MENU
IP
SUBNET
HIQNET
DHCP
169.254.155.248
255.255.0.0
1
ON
NETWORK MENU 2 - SUBNET
network MENU
IP
SUBNET
HIQNET
DHCP
169.254.155.248
255.255.0.0
1
ON
NETWORK MENU 3 - HIQNET
network MENU
IP
SUBNET
HIQNET
DHCP
169.254.155.248
255.255.0.0
1
ON
NETWORK MENU 4 - DHCP
input MEters
CH1
CH2
INPUT METERS
INFORMATION
MODEL
VERSION
MAC
JBL SRX815P
0.0.3.4
00:0A:40:10:05:C5
INFORMATION
network MENU
IP
SUBNET
HIQNET
DHCP
169.254.155.248
255.255.0.0
1
ON
NETWORK MENU 1 - IP
Meters
From the Main Menu, turn the Master Encoder until “Meters” is highlighted. Press the
Master Encoder to access Meters. Input Meters for both channels will be displayed. Press
the Back Button to return to the Main Menu or wait one minute to be returned to the
Home Screen.
Network Menu
From the Main Menu, turn the Master Encoder until “Network Menu” is highlighted. Press
the Master Encoder to access the Network Menu.
Adjustments to the systems IP address, Subnet Address, and HiQNet Address can be
made from the Network Menu. Please note that “DHCP” must be set to “Off,” in order to
manually adjust the IP or Subnet addresses.
1.
IP.
In the Network Menu, turn the Master Encoder until “IP” is highlighted. Press the
Master Encoder to access the IP address. Turn the Master Encoder to adjust each
digit string of the IP address. Once a digit string is set to its desired value, press the
Master Encoder to move to the next string. Once the entire IP address is set, press
the Master Encoder to save changes. Pressing the Back Button at any time will
cancel changes and return you to the Network Menu.
2.
SUBNET.
In the Network Menu, turn the Master Encoder until “SUBNET” is highlighted. Press
the Master Encoder to access the SUBNET address. Turn the Master Encoder to
adjust each digit string of the SUBNET address. Once a digit string is set to its
desired value, press the Master Encoder to move to the next string . Once the entire
SUBNET address is set, press the Master Encoder to save changes. Pressing the
Back Button at any time will cancel changes and return you to the Network Menu.
3.
HiQNet
In the Network Menu, turn the Master Encoder until “HiQNet” is highlighted. Press
the master encoder to access the HiQNet address. Turn the Master Encoder to scroll
to the desired HiQNet address. Once the desired HiQNet address is displayed, press
the Master Encoder to select that address and return to the Network Menu.
4.
DHCP
In the Network Menu, turn the Master Encoder until “DHCP” is highlighted. Press the
Master Encoder to access DHCP. Turn the Master Encoder to toggle between “On”
and “Off.”Once the desired setting is displayed, press the master encoder to select
that setting; you will be returned to the Network Menu. Hitting the Back Button at any
time will also return you to the Network Menu. NOTE: “DHCP” must be set to “Off,”
in order to manually adjust the IP or Subnet addresses.
Information
From the Main Menu, turn the Master Encoder until “Information” is highlighted. Press
the Master Encoder to access Information. The Model Number of the system, software
version, and MAC address are displayed in this screen. Press the Back Button to return to
the Main Menu.
BACK PANEL LCD
Summary of Contents for SRX812P
Page 1: ...SRX812P SRX815P SRX835P SRX818SP SRX828SP USER S GUIDE...
Page 2: ...2...
Page 15: ...15 3 4 0 6 1 6 1 35 6 76 1 0 67 5 6 1 0 7 63 1 1 287 287 SRX818SP BLOCK DIAGRAM...
Page 16: ...16 3 3 4 0 6 1 6 1 35 6 76 1 0 67 5 6 1 0 7 63 1 1 287 287 SRX828SP BLOCK DIAGRAM...
Page 37: ...Part Number 5032132 03 15 8500 Balboa Boulevard Northridge CA 91329 USA www jblpro com...
Page 44: ...MPDL JBHSBN SRX835P 15 Three Way Bass Re ex Self Powered System...


