27
9
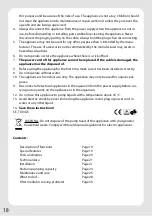
Cleaning the hoses
Bacteria settle in the hoses producing slime, which can significantly obstruct the flow of
water. Algae growth only occurs in strong light. The hoses should therefore be cleaned reg-
ularly with a cleaning brush (e.g. JBL Cleany). Simply rinsing with tap water is not enough!
10
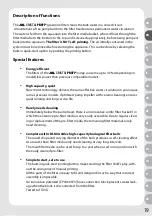
Cleaning the impeller and casing
Turn the cover of the impeller casing anti-clockwise towards “Open” and remove the cover
by pulling gently.
Pull the impeller out of the casing. CAUTION: the impeller is held in the casing by magnetic
force. Take appropriate care when removing the impeller, making sure to avoid injuring your
fingers.
The ceramic shaft is held by two rubber bearings, which remain either on the shaft or on
the bottom of the impeller casing, or in the middle of the casing cover, when the impeller is
removed.
Clean the impeller casing, impeller and shaft with a suitable cleaning brush, then rinse in
clean water. Limescale can be easily removed by soaking in JBL Clean A (available at your
specialist retailer). Never dip the pump head in water or other liquid to clean it. Use a damp
cloth (e.g. JBL WishWash) to clean the surface of the casing.
Place the ceramic shaft and impeller back in the casing. Check that both rubber bearings are
present and correctly positioned for the ceramic shaft. Put the impeller cover back in and,
pressing gently, turn the cover towards “CLOSE” until the stop point.
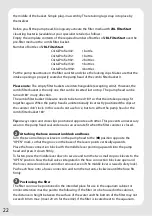
Please note: If the impeller has to be replaced due to wear and tear, the complete set com-
prising the impeller with the shaft and 2 rubber bearings must be replaced. Only this way
can flawless operation and quiet running be guaranteed. When the impeller and shaft are
removed, a rubber bearing often adheres to the base of the impeller casing where it is very
difficult to remove. JBL has produced a special tool for this purpose which is available at
specialist pet shops under the name “Extraction tool for impeller bearing”. A useful clean-
ing brush for the impeller casing comes with the tool.
11
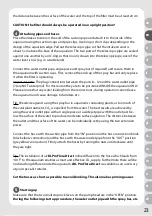
Re-starting the filter
Place the pump head back on the filter canister and close the locking clips as described in
(1). Place the hose connection block with the attached hoses back in position as described
in (2). Then turn the right-hand stopcock lever towards “OPEN” until the stop point. Repeat
with the left-hand lever a few seconds later.
If the water does not begin to run into the filter automatically, start the filter as described
in (5).
Connect the filter to the mains power supply.
de
en
fr
nl
it
sv
es
pt
pl
cs
ru
ro
tr
el
zh
Summary of Contents for CRISTAL PROFI e402 greenline
Page 164: ...160 8 8 4 5 6 7 8 9 10 11 12 35 C 13 14 CE T V GS 161 161 162 163 163 167 167 170 173...
Page 169: ...165 OPEN 3 180 e402 120 20 4 5 c 8 12 7 CO2 IN de en fr nl it sv es pt pl cs ru ro tr el zh...
Page 174: ...170 JBL WishWash CLOSE JBL Zughilfe f r Rotorlager 11 1 2 OPEN 5 II II 180...
Page 176: ...172 10 5 UV C 5 c 20 c IN OUT JBL MicroMec JBL SintoMec JBL CristalProfi D...
Page 210: ...206 3 8 8 4 5 6 7 8 9 10 11 12 35 C 13 14 CE T V GS 207 207 208 209 209 212 213 216 219...
Page 220: ...216 JBL Clean A JBL WishWash CLOSE 2 JBL 11 1 2 OPEN 5 II II 180...
Page 221: ...217 5 OPEN OPEN de en fr nl it sv es pt pl cs ru ro tr el zh...
Page 222: ...218 JBL MicroMec JBL SintoMec JBL CristalProfi D 10 5 UV C 5 cm 20 cm IN OUT...
Page 226: ...222 http www jbl de en help desk...
Page 228: ...224 5 6 7 8 9 10 11 12 35 13 14 CE T V GS 224 225 226 227 227 230 230 233 235 JBL CRISTALPROFI...
Page 237: ...233 2 JBL 11 1 2 OPEN 2 II II 180 5 de en fr nl it sv es pt pl cs ru ro tr el zh...
Page 238: ...234 OPEN OPEN JBL MicroMec JBL SintoMec CristalProfi D 10 5 UV C 5 cm 20 cm IN OUT...
Page 242: ...238...

