


22
the middle of the basket. Simple plug-in assembly. The retaining lugs snap into place by
themselves.
Before you fit the pump head, biologically activate the filter media with JBL FilterStart
cleansing bacteria (available at your specialist retailer) as follows:
Empty the complete contents of the required number of bottles of JBL FilterStart over the
pre-filter media in the combi filter basket.
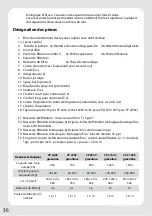
Number of bottles of JBL FilterStart:
CristalProfi e402:
1 bottle
CristalProfi e702:
1 bottle
CristalProfi e902:
2 bottles
CristalProfi e1502:
3 bottles
CristalProfi e1902:
4 bottles
Put the pump head back on the filter canister and close the locking clips. Make sure that the
intake opening is properly seated at the pump head of the combi filter basket II.
Please note: The empty filter baskets are interchangeable (excepting e402). However, the
combi filter basket is the only one that can be inserted last on top. The pump head can be
turned 180° in any direction.
The combi filter basket II likewise needs to be turned 180° so that the intake openings fit
together again. When the pump head is unintentionally incorrectly positioned the clips at
the canister don’t lock. In this case do not use force, but turn either the pump head or the
combi filter basket 180°.
Tip: Always open and close clips positioned opposite each other. This prevents unnecessary
wear on the pump head seal and ensures an accurate fit when the filter canister is closed.
2
Attaching the hose connection block and hoses
Turn the two small stopcock levers on the pump head to the (
●
) position opposite the
“OPEN” mark, so that the groove in the base of the levers points vertically upwards.
Place the hose connection block with the middle lever pointing upwards into the pump
head and press it down firmly.
To fasten, press the middle lever down to secure and turn the two small stopcock levers to the
“OPEN” position. Now the ball valves integrated in the hose connection block are open and
the hose connection block cannot be removed, even if the middle lever is raised (safety lock).
Push each hose onto a hose connection and turn the nut anti-clockwise until the hose fits
firmly.
3
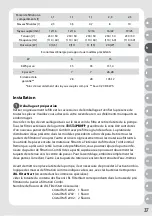
Positioning the filter
The filter can now be positioned in the intended place for use in the aquarium cabinet or
similar. Attention must be paid to the following: If the filter is to be housed in the cabinet,
the distance in height between the surface of the water and the bottom of the filter may not
exceed 180 cm max. (max.120 cm for the e402). If the filter is located next to the aquarium,
Summary of Contents for CRISTAL PROFI e402 greenline
Page 164: ...160 8 8 4 5 6 7 8 9 10 11 12 35 C 13 14 CE T V GS 161 161 162 163 163 167 167 170 173...
Page 169: ...165 OPEN 3 180 e402 120 20 4 5 c 8 12 7 CO2 IN de en fr nl it sv es pt pl cs ru ro tr el zh...
Page 174: ...170 JBL WishWash CLOSE JBL Zughilfe f r Rotorlager 11 1 2 OPEN 5 II II 180...
Page 176: ...172 10 5 UV C 5 c 20 c IN OUT JBL MicroMec JBL SintoMec JBL CristalProfi D...
Page 210: ...206 3 8 8 4 5 6 7 8 9 10 11 12 35 C 13 14 CE T V GS 207 207 208 209 209 212 213 216 219...
Page 220: ...216 JBL Clean A JBL WishWash CLOSE 2 JBL 11 1 2 OPEN 5 II II 180...
Page 221: ...217 5 OPEN OPEN de en fr nl it sv es pt pl cs ru ro tr el zh...
Page 222: ...218 JBL MicroMec JBL SintoMec JBL CristalProfi D 10 5 UV C 5 cm 20 cm IN OUT...
Page 226: ...222 http www jbl de en help desk...
Page 228: ...224 5 6 7 8 9 10 11 12 35 13 14 CE T V GS 224 225 226 227 227 230 230 233 235 JBL CRISTALPROFI...
Page 237: ...233 2 JBL 11 1 2 OPEN 2 II II 180 5 de en fr nl it sv es pt pl cs ru ro tr el zh...
Page 238: ...234 OPEN OPEN JBL MicroMec JBL SintoMec CristalProfi D 10 5 UV C 5 cm 20 cm IN OUT...
Page 242: ...238...