background image

ENGLISH 


USER MANUAL 


JB SYSTEMS

®


4/54 

SPACE-4 LASER 

3.  DMX  INPUT:

  3pin  male  XLR-connector  used  to  connect  universal  DMX-cables.  This  input  receives 

instructions from a DMX-controller.  

4.  HANGING  BRACKET:

  with  2  knobs  on  both  sides  to  fasten  the  unit  and  a  mounting  hole  to  fix  a 

mounting hook. 

5.  SAFETY EYEBOLT:

 used to attach a safety cable when the unit 

is rigged (see paragraph “overhead rigging” 

6.  INTERNAL  MICROPHONE: 

The  built-in  microphone  is  used  to 

synchronize the laser show to the beat of the music. 

7.  DISPLAY:

  shows  the  selected  DMX  address  when  the  unit  is  in 

DMX-mode.  Apart  from  DMX-mode  you  can  also  select  4  other 
working modes, see further to learn more about these modes. 

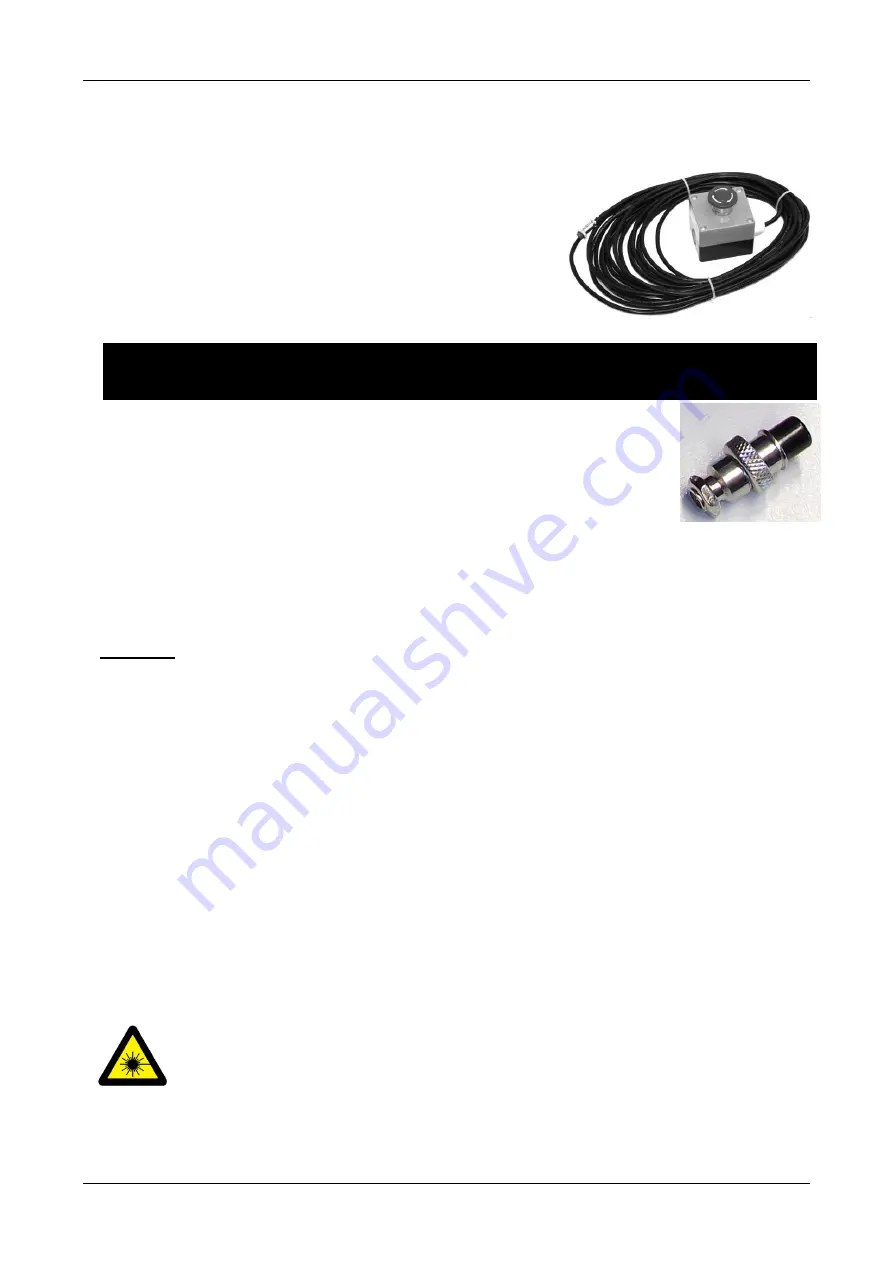
8.  INTERLOCK input:

 used to connect the optional emergency stop 

switch  (see  picture).  When  you  push  this  switch  the  laser  beam 
will disappear immediately. 


IMPORTANT! For your own safety we strongly recommend to connect this optional switch! 

THERE WILL BE NO LASER OUTPUT WHEN THE INTERLOCK INPUT IS NOT USED! 

Temporary solution: install the spare connector on the laser. (see picture) 

9.  ON/OFF KEY  ACTIVATED SWITCH:

 used to switch the unit  on/off. Use the keys 

to make sure only a skilled operator is able to switch the laser on. 

10.  CONTROL PANEL:

 Used  to select the  different functions  of the  laser, see further 

to learn how to operate the unit. 

11.  LASER  OUTPUT:

  the  laser  beam  exits  the  enclosure,  make  sure  to  NEVER  look 

inside the unit through this opening while the laser effect is switched on! 

12.  POWER LED:

 indicates that the unit is switched on. 

13.  IR RECEIVER:

 used to control the unit by the wireless remote control. 


14.  SOUND LED:

 flashes to the sound of the music detected by the internal microphone. 

15.  COOLING  FAN:

  used  to  cool  the  components  inside  the  enclosure.  Make  sure  to never  cover  this  fan 

outlet! 


OVERHEAD RIGGING 


Important:


The  installation  must  be  carried  out  by  qualified  service  personal  only.  Improper 

installation  can  result  in  serious  injuries  and/or  damage  to  property.    Overhead  rigging  requires 
extensive  experience!  Working  load  limits  should  be  respected,  certified  installation  materials 
should be used, the installed device should be inspected regularly for safety.


  Make sure the area below  the installation place  is free from unwanted persons  during rigging, de-rigging 

and servicing. 

  Locate  the  fixture  in  a  well  ventilated  spot,  far  away  from  any  flammable  materials  and/or  liquids.  The 

fixture must be fixed 

at least 50cm

 from surrounding walls. 

  The device should be installed out of reach of people and outside areas where persons may walk by or be 

seated. 


Before rigging make sure that the installation area can hold a minimum point load of 10times the device’s 
weight. 

  Always use a certified safety cable that can hold 12 times the weight of the device when installing the unit. 

This  secondary  safety  attachment  should  be  installed  in  a  way  that  no  part  of  the  installation  can  drop 
more than 20cm if the main attachment fails. 

  The device should be well fixed; a free-swinging mounting is dangerous and may not be considered! 


Don’t cover any ventilation openings as this may result in overheating.  

  The operator has to make sure that the safety-relating and machine-technical installations are approved by 

an expert before using them for the first time. The installations should be inspected every year by a skilled 
person to be sure that safety is still optimal. 
 

CAUTION  EYE  DAMAGE:

  Always  position  the  laser  in  a  way  that  prevents  the 

audience from looking directly into the laser beams. The installation should assure that 
the beam will not strike the audience. 

Summary of Contents for Space-4 Laser

Page 1: ......

Page 2: ......

Page 3: ...te infrared remote control Master slave wonderful synchronized shows Built in microphone 3 digit LED display for easy menu navigation Key actuated on off switch and emergency switch interlock input fo...

Page 4: ...t cover any ventilation openings as this may result in overheating Prevent use in dusty environments and clean the unit regularly Keep the unit away from children Inexperienced persons should not ope...

Page 5: ...r light are potentially hazardous even at long distances Never look into the laser aperture or laser beams Never direct the laser beam to people or animals and never leave this device running unattend...

Page 6: ...LING FAN used to cool the components inside the enclosure Make sure to never cover this fan outlet OVERHEAD RIGGING Important The installation must be carried out by qualified service personal only Im...

Page 7: ...Slave mode display shows SLA to make them all work in perfect sync Note When no music is detected the laser output will be shut off blackout 2 FULL AUTOMATIC MODE The laser automatically runs a prepro...

Page 8: ...O SHOW MUSIC SHOW LASER ON OFF COLOR not used EFFECT PAUSE CHANGING PATTERN SOUND SENSIVITY FIXED PATTERN FROM 1 TO 48 PATTERN REPEATING Remote control details Button function Description ON OFF In RE...

Page 9: ...links when the unit is in DMX mode and no DMX signal is detected Some more information on DMX512 The DMX protocol is a widely used high speed signal to control intelligent light equipment You need to...

Page 10: ...ING 000 127 0 359 degree fixed Y axis rolled 128 191 Clockwise rolling 192 255 Anticlockwise rolling CH 5 X AXIS ROLLING 000 127 0 359 degree fixed X axis rolled 128 191 Clockwise rolling 192 255 Anti...

Page 11: ...ENGLISH USER MANUAL JB SYSTEMS 9 54 SPACE 4 LASER Pattern list...

Page 12: ...optical lenses and or mirrors must be carried out periodically to optimize light output Cleaning frequency depends on the environment in which the fixture operates damp smoky or particularly dirty sur...

Page 13: ...ntr le par t l commande infrarouge Ma tre Esclave des shows magnifiques synchronis s Microphone int gr Affichage LED 3 chiffres pour une navigation simple dans les menus Interrupteur Marche Arr t et i...

Page 14: ...re pays V rifiez que votre tension n est pas sup rieure celle indiqu e sur le panneau arri re de l appareil Le cordon d alimentation doit toujours tre en parfait tat Eteignez imm diatement l appareil...

Page 15: ...nstantan es surtout en br lant la r tine la partie l arri re de l il sensible la lumi re Un faisceau laser peut toujours vous br ler ou vous aveugler m me si vous ne sentez de chaleur M me de longues...

Page 16: ...pour connecter l interrupteur d arr t d urgence optionnel voir image Quand vous poussez cet interrupteur le faisceau laser dispara t imm diatement IMPORTANT Pour votre s curit nous vous conseillons d...

Page 17: ...n de s curit secondaire doit tre install de mani re ce qu aucune partie de l installation ne puisse tomber de plus de 20 cm si le support principal l che L appareil doit tre bien fix un montage balan...

Page 18: ...z les touches UP DOWN pour s lectionner Aut Appuyez sur la touche ENTER pour confirmer votre choix Le laser ex cute automatiquement une s quence pr programm e Vous pouvez connecter plusieurs SPACE 4 L...

Page 19: ...appuy e pendant 2 secondes pour activer le mode REM AUTO Show AUTO automatique MUSIC Show activ par le son Le t moin bleu de musique clignote lorsque le son est d tect Sensibilit au son En mode show...

Page 20: ...sur la touche ENTER pour confirmer votre choix Remarque l affichage clignote lorsque l appareil est en mode DMX et aucun signal DMX n est d tect Quelques informations suppl mentaires sur DMX512 Le pro...

Page 21: ...Zoom Avant 170 209 Zoom Arri re 210 255 Zoom Avant Arri re CH 4 ROULEMENT AXE Y 000 127 Position de roulement fixe sur l axe Y de 0 359 128 191 Roulement dans le sens horaire 192 255 Roulement dans l...

Page 22: ...FRANCAIS GUIDE D UTILISATION JB SYSTEMS 20 54 SPACE 4 LASER Liste des motifs...

Page 23: ...t ou miroirs internes et externes doit tre effectu p riodiquement pour optimiser le flux lumineux La fr quence de nettoyage d pend de l environnement dans lequel l appareil fonctionne des environnemen...

Page 24: ...tandsbediening Master Slave prachtige gesynchroniseerde shows Ingebouwde microfoon 3 cijferig LED display voor eenvoudige menunavigatie Sleutel bediende aan uitschakelaar en noodstop interlock ingang...

Page 25: ...de beschikbare spanning niet hoger is dan aangegeven op het achterpaneel van het apparaat Het netsnoer moet altijd in perfecte staat zijn Schakel het apparaat onmiddellijk uit als het netsnoer wordt...

Page 26: ...rect oogletsel leiden voornamelijk door het verbranden van het netvlies het lichtgevoelige gedeelte aan de achterkant van het oog Zelfs als u geen warmte van een laserstraal kunt voelen kan het nog st...

Page 27: ...r deze modi 8 INTERLOCK ingang Wordt gebruikt om de optionele noodstopschakelaar aan te sluiten zie foto Wanneer u op deze schakelaar drukt zal de laserstraal onmiddellijk verdwijnen BELANGRIJK we rad...

Page 28: ...idsbevestiging dient op een zodanige wijze te worden ge nstalleerd zodat geen enkel onderdeel van de installatie meer dan 20 cm kan vallen als de hoofdbevestiging het begeeft Het apparaat moet goed wo...

Page 29: ...ingedrukt totdat de display n van de volgende opties weergeeft Sou of Aut Gebruik de UP of DOWN knoppen om Aut te selecteren Druk op de ENTER knop om uw keuze te bevestigen De laser draait automatisc...

Page 30: ...us behalve de SLA modus druk 2 seconden in om de REM modus te activeren AUTO Automatische show MUSIC Geluidgestuurde show De blauwe LED muziekindicator knippert wanneer het geluid wordt waargenomen Ge...

Page 31: ...res Druk op de ENTER knop om uw keuze te bevestigen Opmerking de display knippert wanneer het apparaat in de DMX modus is geschakeld en geen DMX signaal wordt gedetecteerd Enige informatie meer over D...

Page 32: ...kanalen actief CH 2 MOTIEF 000 255 32 motieven Zie patroonlijst hieronder CH 3 ZOOM 0 127 Afmeting 100 5 128 169 Inzoomen 170 209 Uitzoomen 210 255 Afwisselend zoomen CH 4 Y AS ROL 000 127 Vast punt...

Page 33: ...NEDERLANDS GEBRUIKSHANDLEIDING JB SYSTEMS 31 54 SPACE 4 LASER Patroonlijst...

Page 34: ...optische lenzen en of spiegels moet regelmatig worden uitgevoerd om de lichtopbrengst te optimaliseren De frequentie van reiniging hangt af van de omgeving waarin de armatuur werkt een vochtige roker...

Page 35: ...olle synchronisierte Shows Eingebautes Mikrofon 3 stelliges LED Display f r einfache Navigation im Men Schl sselbet tigter Ein Ausschalter und Notschalter Verriegelung Eingang f r zus tzliche Sicherhe...

Page 36: ...Vergewissern Sie sich dass die Netzspannung nicht h her ist als auf dem Typenschild auf der Ger ter ckseite angegeben Das Ger t nicht mit einem besch digten Netzkabel in Betrieb nehmen Wenn das Netzka...

Page 37: ...chlich durch Einbrennen in die Netzhaut der lichtempfindliche Teil auf der R ckwand des Auges Selbst wenn Sie keine W rme vom Laserstrahl sp ren k nnen kann er Sie oder Ihr Publikum dennoch potentiell...

Page 38: ...r ber diese Betriebsarten 8 VERRIEGELUNGS Eingang Anschluss eines optionalen Not Ausschalters siehe Abbildung Wenn dieser Schalter gedr ckt wurde wird der Laserstrahl sofort ausgeschaltet WICHTIG Wir...

Page 39: ...e zweite Sicherungsaufh ngung muss angebracht werden die ein Absacken des Ger ts von mehr als 20 cm verhindert sollte die Befestigung brechen Das Ger t gut befestigen Eine freischwingende Aufh ngung i...

Page 40: ...isplay eine der folgenden Anzeigen zeigt Sou oder Aut W hlen Sie jetzt mit den Tasten UP und DOWN aus Aut Best tigen Sie Ihre Auswahl mit ENTER Der Laser l sst eine vorprogrammierte Sequenz automatisc...

Page 41: ...r cken um den REM Modus zu aktivieren AUTO Show AUTO ablaufen lassen MUSIC Musikgesteuerte Show Die blaue Musik LED blinkt wenn Musik erkannt wurde Musikempfindlichkeit Dr cken Sie in der musikgesteue...

Page 42: ...die DMX Adresse Best tigen Sie Ihre Auswahl mit ENTER Hinweis Wenn sich das Ger t im DMX Modus befindet und kein DMX Signal erkannt wurde blinkt das Display Weitere Informationen zu DMX512 Das DMX Pro...

Page 43: ...OMING 0 127 100 5 Gr e 128 169 Hereinzoomen 170 209 Herauszoomen 210 255 Abwechselndes Zoomen CH 4 Y AXIS ROLLING 000 127 0 359 Grad festes Rollen um die Y Achse 128 191 Im Uhrzeigersinn rollen 192 25...

Page 44: ...DEUTSCH BEDIENUNGSANLEITUNG JB SYSTEMS 42 54 SPACE 4 LASER Musterliste...

Page 45: ...egelm igen Abst nden zur Beibehaltung einer optimalen Lichtausbeute vorgenommen werden Die Reinigungsintervalle h ngen stark von der Umgebung ab Feuchte verrauchte und besonders verschmutzte Umgebung...

Page 46: ...ados Micr fono integrado Pantalla LED de 3 d gitos para una navegaci n sencilla por el men Interruptor activado con llave para encendido apagado y entrada de interruptor de emergencia Interlock para m...

Page 47: ...alificado de acuerdo con las regulaciones para la seguridad el ctrica y mec nica de su pa s Compruebe que la tensi n disponible no sea superior a la que se indica en el panel posterior de la unidad El...

Page 48: ...r otra fuente de luz Esta concentraci n de potencia luminosa puede causar lesiones oculares instant neas primeramente quemando la retina la parte sensible a la luz de la parte posterior del ojo Inclus...

Page 49: ...TRADA INTERLOCK se usa para conectar el interruptor opcional de emergencia vea la imagen Cuando presione este interruptor el haz de l ser desaparecer inmediatamente IMPORTANTE Por su propia seguridad...

Page 50: ...12 veces el peso del dispositivo Esta segunda fijaci n de seguridad debe instalarse de forma que ninguna parte de la instalaci n pueda caer m s de 20 cm si la fijaci n principal falla El dispositivo d...

Page 51: ...siguientes Sou o Aut Por favor consulte detenidamente la tabla de Men de arriba Ahora utilice los botones ARRIBA y ABAJO para seleccionar Aut Presione el bot n ENTER para confirmar su selecci n El l s...

Page 52: ...Sound Sensitivity Sensibilidad al sonido En modo activado por sonido pulsar M sica B 1 a 9 para cambiar el ajuste de sensibilidad CAMBIO DE COLOR Para cambiar el color no utilizado CAMBIAR PATR N Most...

Page 53: ...ena calidad Para evitar un comportamiento extra o de los efectos de luces debido a interferencias debe utilizar un terminador de 90 a 120 al final de la cadena Nunca utilice cables repartidores Y esto...

Page 54: ...En sentido contrario a las agujas del reloj CH 5 EJE X DESPLAZAMIENTO 000 127 Eje X fijo desplazado de 0 a 359 grados 128 191 En sentido de las agujas del reloj 192 255 En sentido contrario a las agu...

Page 55: ...ESPA OL MANUAL DE USUARIO JB SYSTEMS 53 54 SPACE 4 LASER Lista de Patrones DMX PATRONES DMX PATRONES PATRONES DMX PATRONES DMX...

Page 56: ...las lentes pticas y o espejos internos y externos debe efectuarse peri dicamente para optimizar la salida de la luz La frecuencia de limpieza depende del entorno en el que opera el aparato entornos h...

Page 57: ......

Page 58: ......

Page 59: ......

Page 60: ...WW BEGLEC COM Copyright 2012 by BEGLEC NV t Hofveld 2C B1702 Groot Bijgaarden Belgium Reproduction or publication of the content in any manner without express permission of the publisher is prohibited...

Reviews: