


ENGLISH
USER
MANUAL
JB SYSTEMS®
5/48
CD570
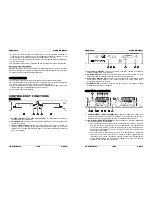
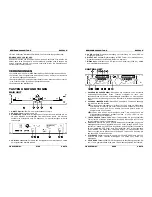
the “– button” is pressed and returns to the original pitch when the button is
released. These buttons can be used to synchronize the beats of 2 tracks.
7. PITCH button:
This button is used to turn the Pitch function on and off. If you
want to change the speed adjustment range (+/- 8%, +/- 12%, +/- 16%), press
and hold PITCH button then press the PITCH BEND+ to select.
8. PITCH slider:
Press the PITCH button, the PITCH LED is on. The speed can be
changed up to +/-16% by moving the sliding fader. The speed will not change if
the PITCH LED is off.
9. OPEN/CLOSE button
: press this button to open and close the disc tray in the
front of the main unit. This button is disabled during playback. If the tray is not
closed after 60sec. It will close automatically to prevent mechanical damage.
10. TIME Button:
The TIME button switches between elapsed playing time,
remaining time in a selection and total remaining time of the disc. (standard =
remaining/track)
11. SGL/CTN Button:
with this button you can choose between “single track mode”
and “continuous play”.
•
Continuous play:
the complete CD will be played without interruption.
(mostly used in pubs)
•
Single track:
player stops at the end of each track and waits at the beginning
of the next track. The player will wait at the first music note of each track.
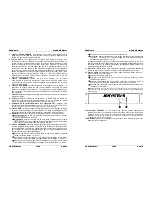
12. PROGRAM Button:
It is possible to program up to 20 tracks on each deck. After
programming the tracks will be played in the order you programmed. You can
also use the relay function to make a preprogrammed sequence on the 2 decks.
Follow the steps below for programming:
•
Press the PROGRAM button once, the led next to it turns on and the display
shows “-- P-01 00”.
•
Choose the first track in your sequence and press the PROGRAM button.
The first track is programmed, the display shows “-- P-02 01”
•
Choose the second track in your sequence and press the PROGRAM button.
The second track is programmed, the display shows “-- P-03 02”
•
Continue these steps until you are finished.
•
Now simply press the “play/pause button” to start the sequence. The first
track in your sequence starts playing while the display shows”** P-01”
The programmed sequence plays in an endless loop until you stop the program
mode by pressing the PROGRAM button for about 2 seconds”. The led next to
the PROGRAM button turns off and the program memory is cleared.
13. LCD DISPLAY:
Shows all important information needed during playback. Refer
to the next chapter for more information.
14. LOOP Button:
Used to make the music play in a loop, follow the steps below to
create a loop:
•
Make sure that the track is playing.
•
Press the LOOP button to set the beginning of the loop: led starts flashing.
•
Press the LOOP button again to set the end of the loop: led is on and the
music starts playing in loop mode.
•
Press the LOOP button again to stop the loop mode: the led turns off.
Note:
the loop is not seamless so when the loop starts again, you will hear a small pause. This is
normal while this CD-player doesn’t use a buffer memory.
ENGLISH
USER
MANUAL
JB SYSTEMS®
6/48
CD570
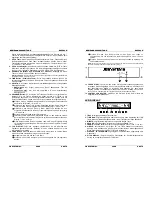
15. FADERSTART sockets:
If you are using a mixer with fader start function, use
the supplied mono mini jack/jack cable to connect the player with the fader start
of the mixer. Please note that this socket must never be connected with any
voltage.
Attention:
This remote control is only compatible with (Synq® or Pioneer® compatible) mixers.
16.
CONTROL connector:
Connect the main unit here, using the supplied mini-DIN8
cable.
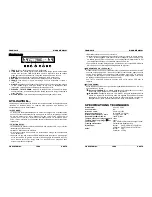
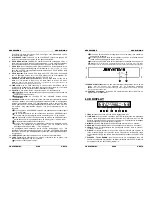
LCD DISPLAY
1. TRACK:
Shows current track number.
2. TIME BAR:
shows either time remaining or elapsed depending on the setting of
the TIME button. Starts flashing at the end of each track to alert the user to take
action.
3. MINUTE:
Shows “minutes” time information of current track.
4. SECOND:
Shows “seconds” time information of current track.
5. FRAME:
Shows “frame” time information of current track. (1 frame = 1/75
th
sec.)
6. SINGLE/CONTINUE:
“single” appears when the unit is set to play just one track
at a time. Otherwise the CD will play continuously through all tracks. This function
is controlled by the SGL/CTN button.
7. ELAPSED, TOTAL REMAIN:
indicates that the time shown on the display is the
track elapsed, remaining or total remaining time.
8. PITCH DISPLAY:
Shows the percentage change in pitch (speed) of the song.


