


ENGLISH
USER
MANUAL
JB SYSTEMS®
3/48
CD570
CLEANING THE CD-PLAYER:
Clean by wiping with a polished cloth slightly dipped with water. Avoid getting water
inside the unit. Do not use volatile liquids such as benzene or thinner which will
damage the unit.
CONNECTIONS
•
Connect the mini-DIN8 cable between the control unit and the main unit (CD
loader)
•
Use the supplied cinch cables to connect the audio outputs of the CD player with
the CD or line inputs on your mixing unit.
•
Also connect the fader start cables if your audio mixer has fader start inputs.
(Synq® or Pioneer® compatible)
•
Connect the mains cable.
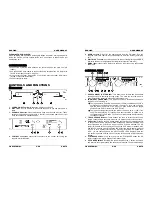
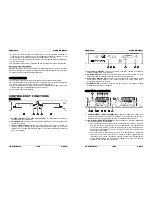
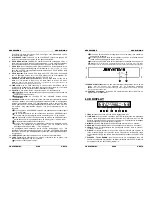
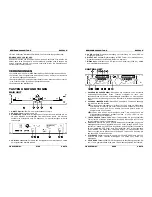
CONTROLS AND FUNCTIONS
MAIN UNIT
1. POWER ON/OFF switch:
switches the CD-player on and off.
2. DISC TRAY
: Use the OPEN/CLOSE buttons to open disc tray and put the CD in
place.
3. OPEN/CLOSE button
: press this button to open and close the disc tray. These
buttons are disabled during playback. If the tray is not closed after 60sec. It will
close automatically to prevent damage.
4. CONTROL connector:
connect this connector to the control unit, using the
supplied mini-DIN8 cable.
ENGLISH
USER
MANUAL
JB SYSTEMS®
4/48
CD570
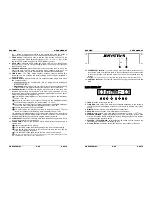
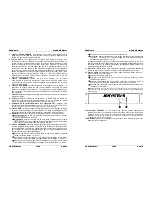
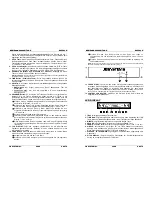
5. AUDIO outputs:
Output for the audio signals from the CD-player. Use the
supplied cinch/cinch cable to connect this output to a CD/line input of your mixing
unit.
6. DIGITAL OUT socket:
Use this connector to connect the digital signal (S/PDIF
format) to the input of a digital amplifier or digital recorder (ex. Mini disc)
7. MAINS input:
connect the CD player to the 220V AC mains, using the supplied
power-cord.
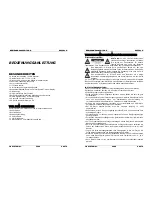
CONTROL UNIT
1. SEARCH WHEEL (OUTER RING):
This wheel has 4 forward and 4 backward
speed positions for searching through songs. The more you turn the wheel in
either direction the faster you will search through the music.
2. JOG WHEEL (INNER RING):
This jog wheel serves 2 functions depending on
the mode you are working in.
•
The jog wheel acts as a slow frame search (1/75sec) control when the CD is
not playing but either paused or set to a cue point. To set a new cue point,
spin the wheel and press PLAY when you have determined the proper
position. Press CUE to return to the “CUE POINT”.
•
The jog wheel temporarily bends the pitch of the music up to +/-16% if the
song is already playing by rotating the wheel clockwise to speed up or
counterclockwise to slow down. The amount of pitch change is determined by
the speed of rotation.
3. TRACK SEARCH Buttons:
These buttons are used to select the track to be
played. Forward skip & back skip. Press the +10 button to skip 10 tracks at once.
4. CUE button:
Pressing the CUE button during play provides an immediate return
to the position at which play was started. Playback is started immediately from
the programmed cue point for as long as the CUE button is pressed. The CD
player jumps back to the cue point as soon as the CUE button is released. Also
with the unit in pause mode (Play/Pause LED blinks) the search and/or jog wheel
is used to set a different start point. By pressing "PLAY/PAUSE" button then
"CUE", you can confirm this new cue point. The CUE LED will light up since the
cue button is pressed until the CD has returned to the position at which play was
started.
5. PLAY/PAUSE button:
every time you press the PLAY/PAUSE button the CD
player changes from play to pause or from pause to play.
6. PITCH BEND buttons (+/-16%):
The speed rises while the “+ button” is pressed
and return to the original pitch when the button is released. The pitch drops when


