background image

- 07 - 

P18

Never connect this device to a dimmer pack.
During first use, some smoke and odour may occur. This is normal and does not necessarily 
mean that the device is defective.
The device becomes hot during operation. Never touch the device with bare hands during 
operation!
When replacing fuses, only use the same types with identical values! Only have fuse replacement 
carried out by a qualified technician 

If the device has been exposed to strong temperature fluctuations (e.g. after transport), the device 
must not be switched on immediately. The resulting condensation can damage your device. 
Leave the device switched off until it has reached room temperature. 

If the P18 is operated below 0°, gobo/prism swapping and gobo/prism rotation are reduced 
in speed. This is a protective mechanism of the P18, as at low temperatures the lubricant 
is relatively viscous in the rotational mechanism and can therefore cause the effect to 
be slurred. From indoor temperatures of 1° and upwards, the spotlight runs normally! 
This temperature is quickly reached under normal operation (LED engine on).

Do not shake or knock the device. Avoid brute force during installation or operation.
This light was designed for indoor use only. Do not expose this device to rain or moisture.
When choosing a mounting location, make sure that the device is not exposed to extreme heat, 
moisture or dust.
Ventilation openings and slots in the head and foot of the spotlight are used for ventilation 
to ensure reliable operation of the device and to protect it from overheating, these openings must 
not be covered.
Never cover the front lens when the spotlight is in use.
The openings should never be covered with substances or other objects so that the airways are 
blocked.
This device must not be operated in an environment without adequate ventilation.
The device may only be operated when the housing is closed and all screws/Camlocs are firmly 
tightened.
The device must always be secured with an additional safety device.
Ensure that the area below the spotlight is clear during installation, alteration and removal.

ATTENTION: This light corresponds to protection class I. For this reason, this spotlight 
must be connected to a mains socket with earthing contact.

!

ATTENTION: DAMAGE TO EYES! Do not look into the light source for long periods 
during operation. This can be harmful to the eyes. Attention: potentially hazardous 
radiation - Risk group 2 per DIN EN 62471

Summary of Contents for P18

Page 1: ...Operating instructions Version 1 1 Software 1 00 P1 8...

Page 2: ...02 P1 8...

Page 3: ...11 5 1 Menu overview 12 5 2 FACTORY DEFAULTS Factory settings 14 5 3 USER DEFAULTS User settings 14 5 4 DMX ADDRESS DMX addressing 14 5 5 PERSONALITY Personal settings 14 5 6 STANDALONE operation 16 5...

Page 4: ...e Abmess Lichtanlagentechnik GmbH Sallersteig 15 89134 Blaustein 630 435 480 5 140 140 258 4 307 267 541 Name Erstellt Art Nr Datum Prisma Fax 07304 9617 99 Tel 07304 9617 0 P18 komplett_H lle 17 01 2...

Page 5: ...9617 0 P18 17 01 2018 Kuehngruen Allgemeintoleranzen ISO 2768 m Blechdicke Material Farbe Oberfl che Abmessung Lichtanlagentechnik GmbH Sallersteig 15 89134 Blaustein Head Front lens Tilt lock Arm Po...

Page 6: ...eplacing fuses or parts The mains plug must always be accessible after the spotlight has been installed Do not overload the sockets or extension cables as this could result in fire or electric shock D...

Page 7: ...ce Avoid brute force during installation or operation This light was designed for indoor use only Do not expose this device to rain or moisture When choosing a mounting location make sure that the dev...

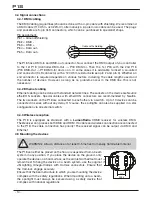
Page 8: ...sifthedeviceistobetransported When using the original packaging the locks must not be closed ATTENTION Only have plugs installed by a specialist The P18 spotlight is supplied with a partially assemble...

Page 9: ...ration is activated or a DMX signal is present Connection outside Europe The P18 may only be operated on the following power supply systems Mains P18 2 wires 1 phase L N L N PE 3 wires 1 phase L N L L...

Page 10: ...pended from a beam system in any position If you place the device on the ground only operate the device on a hard surface as the air inlets in the foot must remain free To hang the device on a beam sy...

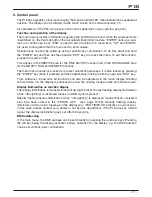
Page 11: ...also be locked to prevent unintentional access It is also locked by pressing the ENTER key keep it pressed and then additionally locking it with the opposite ESC key From software 1 5 onwards all fun...

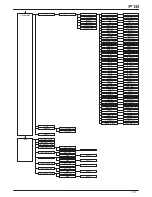
Page 12: ...X HOLD FADE OUT DMX HOLD SERVICE RESET FIXTURE SURE ERROR LIST LIST CLEAR FUNCTION TEST START TEST INIT PAN TILT TEST RUNNING SURE PAN TIMEOUT COUNT 1 CLEAR SURE DMX TEST DMX CHANNEL CH 001 DISPLAY CO...

Page 13: ...GOBO2 ROT GOBO2 ROT ANI ANI BL 1A BL 1B BL 2A BL 2B BL 3A BL 3B BL 4A BL 4B BL 1A BL 1B BL 2A BL 2B BL 3A BL 3B BL 4A BL 4B COLOR CYAN MAGENTA BL ROT BL ROT COLOR CYAN EFF MAGENTA TEMP HEAD DRV ACTUA...

Page 14: ...l is displayed A level indicator in the display informs about the current reception quality If the P18 is additionally connected via the DMX etherCON sockets this signal has priority over the radio li...

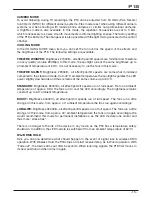
Page 15: ...speeds are minimal and therefore run very quietly volume 29dB a In this mode the spotlight runs at the same brightness up to an ambient temperature of 60 C It is not necessary to run the fans in this...

Page 16: ...AR ALL resets the complete standalone programming steps Under MODIFY you will find STEP1 1 again In the STANDALONE TIMEBASE menu item you have the possibility to change the Fade Time and Next Time fro...

Page 17: ...nder the menu item TOT OPERATE TIME the total operating time of the spotlight is displayed This cannot be deleted The following temperatures are also displayed TEMP BASE LCD the temperature on the dis...

Page 18: ...obo 1 Channel 18 Aperture 1b Gobo 2 Channel 19 Aperture 2a Gobo 2 rotation Channel 20 Aperture 2b Gobo 2 fine rotation Channel 21 Aperture 3a Animation wheel Channel 22 Aperture 3b Aperture 1a Channel...

Page 19: ...49 Sparkle Channel 50 Sparkle speed Channel 51 Prism 1 Channel 52 Prism 1 rotation Channel 53 Prism 1 fine rotation Channel 54 Prism 2 Channel 55 Prism 2 rotation Channel 56 Prism 2 fine rotation Cha...

Page 20: ...60Hz after 2 sec Camera Mode FLEX after 2 sec Camera Mode High FLEX after 2 sec Safety Reset after 2 sec Safety 000 007 032 039 064 071 096 103 128 135 160 160 161 161 162 162 163 163 164 164 208 215...

Page 21: ...001 002 255 11 14 Autofocus fine balancing Autofocus fine balancing 128 Middle position 000 255 12 15 Iris 0 100 open closed 000 255 16 Fine iris 16Bit 13 17 Gobo wheel 1 Gobo 0 Gobo 1 Gobo 2 Gobo 3...

Page 22: ...water effect middle position Stop faded water effect Faded water effect slow rapid Water effect switched middle position Stop switched water effect Switched water effect slow rapid Faded fire effect...

Page 23: ...er rotation 45 45 000 255 39 Fine aperture slider rotation 16 Bit 000 255 26 40 Colour wheel White White Red Red Red Yellow Yellow Yellow Magenta Magenta Magenta Green Green Green Orange Orange Orange...

Page 24: ...000 007 008 255 34 52 Prism 1 positioning rotation Prism positioning 0 540 Prism rotation right rapid slow Stop prism rotation Prism rotation left slow rapid 000 191 192 222 223 224 225 255 53 Prism...

Page 25: ...MX value must then be transmitted for 2 seconds DMX 160 62 8 THEATRE WHISPER cooling mode DMX 161 63 2 THEATRE SILENT cooling mode DMX 162 63 6 STANDARD cooling mode DMX 163 64 0 BOOST cooling mode DM...

Page 26: ...s takes about 3 4 minutes and ends with a reset of the spotlight DISPLAY CONTRAST The contrast of the LCD display may change when the temperature is too high In this menu item the contrast can be adju...

Page 27: ...ift off the cover open the four camlocks 4 by half a turn lift off the cover and unhook the safety lanyard Now open the two knurled screws 5 and remove the gobo insert The following figure 1 shows the...

Page 28: ...liding the focus carriage towards the lens Then you can clean the colour filters glass gobos and CMY panes with a soft cloth and a little window cleaner To clean the frost flaps prisms and zoom focus...

Page 29: ...nnectionsandfollowtheinstructionson thedisplay TheP18completesthesoftwareupdatewithareset Youwillfindthelatestsoftwareonour homepage 7 6 Testing of electrical equipment According to the German Social...

Page 30: ...ic Data Light source White light LED module 1000W Luminous intensity 34000 Lumen 20 C Effects Pan 561 0 Tilt 281 0 Zoom 7 56 Construction Colour black Housing PC ABS Protection class IP 20 Plug in tec...

Page 31: ...methods Limit value class A Radiation Information technology equipment radio interference characteristics EN 55022 2010 Limit values and measuring methods Limit value class A Harmonic currents Electro...

Page 32: ...JB Lighting Lichtanlagentechnik GmbH Sallersteig 15 89134 Blaustein Tel 49 7304 9617 0 Fax 49 7304 9617 99 info jb lighting de www jb lighting de...

Reviews: