background image

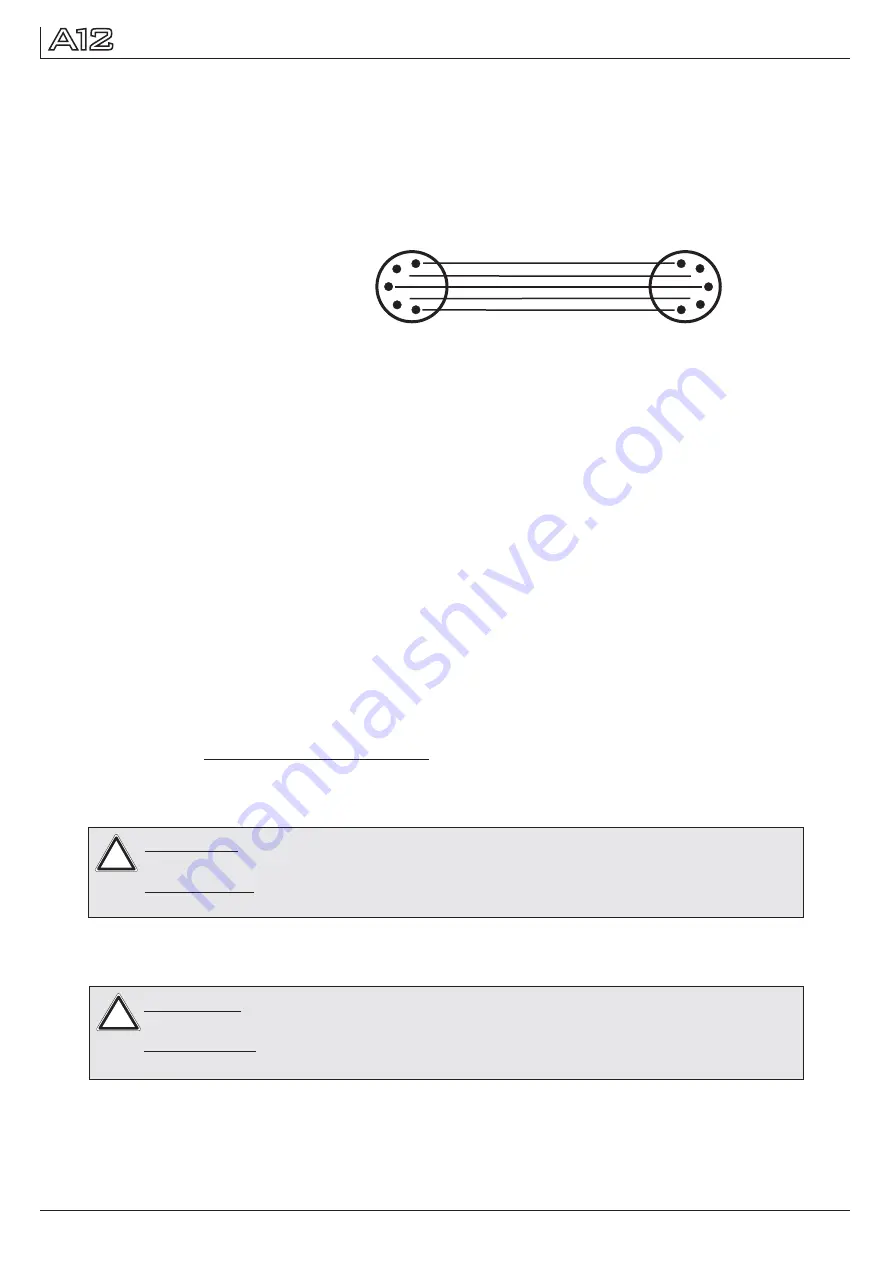
3.3 DMX wiring

4

2

3

4

2

3

5

1

5

1

Use a shielded twisted-pair cable with two pairs to connect the serial link. Connect all pins 

if you want to upgrade the software in crossload. If a microphone cable (or any other cable 

with only one pair) is used the software can not be updated via DMX line because pin 4 

and 5 are not connected.

Pin assignment
Pin 1 = shield
Pin 2 = data -
Pin 3 = data +
Pin 4 = data out -
Pin 5 = data out +

shielded signal cable

The


A12


has


3pin


and


5pin


XLR


connectors


for


DMX-in


and


DMX-out.

Do


not


connect


more


than


one


data


input


and


one


data


output


on


a


fixture.

Connect


the


DMX-out


of


the


control


desk


to


the


first


A12


in


line.


(lighting


control


desk


DMX


-Out


/


A12


DMX-In).


Connect


the


second


A12


to


the


first


in


line,


and


so


on


(A12


2


DMX-In

/


A12


1


DMX-Out).


All


3-pin


and


5-pin


connectors


are


wired


parallel.


Do


not


use


this


fixture

as


a


DMX


splitter!

The


DMX-Out


of


the


last


unit


in


line


is


not


occupied


unless


problems


occur.


Then


use


a

termination


plug


with


the


last


A12


in


line.(XLR-connector


with


a


120


Ohm


resistor


soldered

between


pin


2


and


pin


3).


Problems


might


occur


when


the


line


is


overloaded,


e.g.

34

3.4 Installing a plug on the power cord

Install a plug like described in chapter 3.1.
Connected load: Voltage 100-240 Volts, frequence 50 - 60 Hz, power max. 850 VA

Connect the fixture to a proper installed grounded system only. If any doubts on the
electrical installations occur, consult a qualified electrician. In case of damages occuring
due to a not proper installed electrical system, warranty claims will be invalidated. Don´t
use fixtures when top cover is not fixed properly. Contact with electronic parts can result
in risk for life.
Connect fixture only after assuring that the electrical installation fits your demands. If any
doubts occur consult a qualified technician!

(

)

Electrical shock 100-240 V

WARNING:

A12 might light up immediately if standalone mode is active

or DMX signal is connected!

ATTENTION: Le projecteur A12 peut s'illuminé directement, lorsque le

mode standalone et activé ou si un signal DMX est programmé!

!

WARNING:

To ensure propper installation of the plug consult a

qualified technician!

ATTENTION: Installation de la connexion au réseau doit être effectuée

par un professionnel!

!

3.5 Relaying power to other fixtures

Power


can


be


relayed


to


another


device


via


the


grey


PowerCon

 power-out 

socket


that


accepts


a


grey


PowerCon


NAC3FCB


cable


connector.


Note


that


blue


input


and


grey


power-out 

connectors


have


different


design:


one


type


cannot


be


connected


to


the


other.

Summary of Contents for A12

Page 1: ...Version 1 6 Software 1 21...

Page 2: ...wings Bedienfeld control panel Arm yoke Kopf head DMX in out PowerCon out Netzausgang AC mains out Sicherungs se Safety cable attachment point PowerCon in Netzanschlu AC mains in 308 8 417 536 226 208...

Page 3: ...ichnungen 2 Einleitung 3 Installation 4 Bedienfeld 5 6 Service 7 Konformit tserkl rung 8 Spezifikationen 2 1 Sicherheitshinweise 2 2 Auspacken der Ger te 3 1 Netzanschlu 3 2 Montage der Ger te 3 3 DMX...

Page 4: ...folgender EU Richt linien Niederspannungsrichtlinie 2014 35 EU Elektromagnetische Vertr glichkeit 2014 30 EU 4 Inhalt der Versandverpackung Dieser Scheinwerfer und zwei Omega B gel mit Bajonett Versc...

Page 5: ...et werden Damit ist jedoch kein Software Update m glich da Pin 4 und 5 nicht belegt sind Bei den Steckern und Buchsen handelt es sich um 5 polige oder 3 polige XLR Verbinder die im Fachhandel erworben...

Page 6: ...HTUNG Nur von einem Fachmann durchf hren lassen EU Kabel US Kabel 3 5 Netzdurchgang Der A12 verf gt ber einen PowerCon out Netzausgang Entsprechend der rtlichen Ge gebenheiten k nnen mehrere Ger te du...

Page 7: ...de Displaybeleuchtung bei der Anzeige bedeutet es liegt kein DMX Signal an Schnell blinkende Displaybeleuchtung bei der Anzeige bedeutet dass in der ERROR LIST ein Fehler abgespeichert ist der noch ni...

Page 8: ...L INVERS NORMAL INVERS CURVES DIMMER CURVE SQUARE LINEAR RGB CURVE SQUARE LINEAR SHORTEST DIST ON OFF CAMERA MODE 50 Hz 60 Hz FLEX COOLING MODE STANDARD SILENT HIGH POWER WLJB DMX HOLD FADE OUT DMX HO...

Page 9: ...UAL MAX RESET TEMP BASE PS ACTUAL MAX RESET TEMP HEAD DRV ACTUAL MAX RESET TEMP HEAD LED ACTUAL MAX RESET TEMP HEAD LED S 1 2 FADE TIME NEXT TIME PAN TILT CONTROL SHUTTER DIMMER ZOOM MAPPING PATTERN M...

Page 10: ...diese auf 16 Bit eingestellt In der 8 Bit Aufl sung l sst sich der A12 weniger exakt positionieren je nach Lichtkonsole jedoch schneller bedienen Die Men punkte PAN INVERS und erm glichen ein Invertie...

Page 11: ...Werte direkt am A12 ein und speichern diese ab oder Sie stellen die DMX Werte ber ein angeschlossenes DMX Pult ein und speichern diese anschlie end im A12 ab Die Men punkte MODIFY RUN k nnen nur mit H...

Page 12: ...gt Ihnen jetzt CAPTURE DMX 01 01 mit der bernahmetaste schalten Sie auf Nun reagiert der A12 auf die Signale des externen Pultes START CAPTURE Im Men punkt MODIFY Mit DELETE RESET STEP Mit CLEAR ALL S...

Page 13: ...brademulation Farbrademulation Farbrademulation Kanal 12 Pan Tilt Geschwindigkeit Pan Tilt Geschwindigkeit Rot Rot Kanal 13 Effekt Geschwindigkeit Effekt Geschwindigkeit Gr n Rot fein Kanal 14 Blackou...

Page 14: ...Kanal 14 Blackout Move Kanal 15 Rot Kanal 16 Gr n Kanal 17 Blau Kanal 18 Wei Kanal 19 Rot Kanal 20 Gr n Kanal 21 Blau Kanal 22 Wei Kanal 23 Rot Kanal 24 Gr n Kanal 25 Blau Kanal 26 Wei Kanal 27 Rot Ka...

Page 15: ...angsam schnell 100 Ausgangsleistung der LED Str nge Fade out ber Fader langsam schnell Grundabgleich RGB Fade out ber Fader langsam schnell Wei abgleich RGB Wei wie bei Farbrademulation Fade out ber F...

Page 16: ...8sec Shutter auf Shutter Zufall fade 100 0 6sec 4 8sec Shutter auf 000 015 016 095 096 110 111 111 112 125 126 126 127 126 128 142 143 143 144 158 159 159 160 174 175 175 176 190 191 191 192 206 207 2...

Page 17: ...i Farben stufenlos einstellbar Farbwechseleffekt schnell langsam Farbwechseleffekt stop Farbwechseleffekt langsam schnell 000 000 001 001 002 003 004 007 008 011 012 015 016 019 020 023 024 027 028 03...

Page 18: ...3 Rot 8 Bit 0 100 000 255 24 Gr n 8 Bit 0 100 000 255 25 Blau 8 Bit 0 100 000 255 26 Wei 8 Bit 0 100 000 255 27 Rot 8 Bit 0 100 000 255 28 Gr n 8 Bit 0 100 000 255 29 Blau 8 Bit 0 100 000 255 30 Wei 8...

Page 19: ...nal 13 Farb Spread Farb Spread Farb Spread Kanal 14 Sparkle Sparkle Sparkle Kanal 15 Sparkle Geschwindigkeit Sparkle Geschwindigkeit Sparkle Geschwindigkeit Kanal 16 CTC CTC CTC Kanal 17 Farbrademulat...

Page 20: ...sam schnell 100 Ausgangsleistung der LED Str nge Fade out ber Fader langsam schnell Grundabgleich RGBW Fade out ber Fader langsam schnell Wei abgleich RGBW Wei 5600K Fade out ber Fader langsam schnell...

Page 21: ...6sec 4 8sec Shutter zu Shutter Zufall fade 0 0 6sec 4 8sec Shutter auf Shutter Zufall fade 100 0 6sec 4 8sec Shutter auf 000 015 016 095 096 110 111 111 112 125 126 126 127 126 128 142 143 143 144 15...

Page 22: ...ber Crossfade Laufrichtung vorw rts Muster weiterschalten ber Crossfade Laufrichtung r ckw rts Pixel zuf llig flash schnell Pixel zuf llig snap open ramp close Pixel zuf llig flash langsam Pixel zuf l...

Page 23: ...kw rts Pixel zuf llig flash schnell Pixel zuf llig snap open ramp close Pixel zuf llig flash langsam Pixel zuf llig ramp open snap close Pixel zuf llig flash schnell Pixel zuf llig snap open ramp clos...

Page 24: ...t langsam schnell Sparkle Effekt feschaltet langsam schnell Wiederholung der Fade und Schaltbl cke 000 031 032 063 064 255 16 16 16 CTC 0 100 000 255 17 17 17 Vorprogrammierte Farben Inaktiv Farbmisch...

Page 25: ...immerfadezeit einstellbar von 5sec max 000 000 001 070 071 095 096 127 128 159 160 223 224 255 21 21 Rot 8 Bit 0 100 000 255 22 Rot fein 16 Bit 0 100 000 255 22 23 Gr n 8 Bit 0 100 000 255 24 Gr n fei...

Page 26: ...ademulationskanales Steuerkanal 5 ber den Steuerkanal Kanal 5 k nnen die RGBW Str nge zus tzlich abgeglichen wer den dabei werden die abgeglichenen Modi haupts chlich im Vermietbereich genutzt um bei...

Page 27: ...instellung ist der Wei ton gleich dem Wei ton der Farbrademulation hnlich eines HMI Entladungsleuchtmittels wenn alle RGBW Kan le auf 100 Intensit t eingestellt sind Im Bereich DMX 24 31 Abgleich wie...

Page 28: ...Displays ver ndern In diesem Men punkt l sst sich der Kontrast nachstellen 6 Service RESET FIXTURE Auf den Befehl Reset f hrt der A12 eine Initialisierung auf seine Startwerte aus Es ist der gleiche V...

Page 29: ...darauf achten da die Lufteinl sse sowie das Innere des A12 frei von Fusseln und Staub sind Hierzu ffnen Sie die L fterabdeckung am Kopf 3x Kreuzschlitzschraube mit Bajonettver schlu und die Bodenplat...

Page 30: ...chaften EN 55022 2010 Grenzwerte und Messverfahren Oberschwingungsstr me Elektromagnetische Vertr glichkeit EN 61000 3 2 2015 Teil 3 2 Grenzwerte Pr fung von Oberschwingungsstr men f r Ger te mit eine...

Page 31: ...English 31 Contains French warnings Comprend les avertissements en langue fran ais...

Page 32: ...yonnement LED Ne pas regarder le faisceau moins de 5m ou l aide d un instrument optiques LED classe 3 selon la norme DIN EN 62471 ATTENTION JB Lighting Lichtanlagentechnik GmbH n autorise pas l ut ili...

Page 33: ...ith 2 cond 1 phase with max 120V ATTENTION Le A12 peut tre utilis au Canada avec 2 conducteurs 1 phase et une tension maximal de 120V 33 3 2 Rigging the fixture WARNING Keep fixtures at least 0 5 m aw...

Page 34: ...r cord Install a plug like described in chapter 3 1 Connected load Voltage 100 240 Volts frequence 50 60 Hz power max 850 VA Connect the fixture to a proper installed grounded system only If any doubt...

Page 35: ...e displayed Press ENTER to enter a menu select a function or apply a selection Press keys DOWN and UP to scroll within a menu or set values To escape a function press key ESC A few functions can be en...

Page 36: ...NORMAL INVERS NORMAL INVERS CURVES DIMMER CURVE SQUARE LINEAR RGB CURVE SQUARE LINEAR SHORTEST DIST ON OFF CAMERA MODE 50 Hz 60 Hz FLEX COOLING MODE STANDARD SILENT HIGH POWER WLJB DMX HOLD FADE OUT...

Page 37: ...AL MAX RESET TEMP BASE PS ACTUAL MAX RESET TEMP HEAD DRV ACTUAL MAX RESET TEMP HEAD LED ACTUAL MAX RESET TEMP HEAD LED S 1 2 FADE TIME FADE TIME NEXT TIME NEXT TIME PAN PAN TILT TILT CONTROL CONTROL S...

Page 38: ...invert the direction of pan and tilt The PAN TILT SWAP command sets pan commands to tilt and vice versa RESOLUTION PAN INVERS and TILT INVERS CURVES Dimming curves can be adjusted for the dimmer chann...

Page 39: ...functions and enter DMX values Enter Enter during which the effects will move to the programmed position which will be the duration of the step Add a new step with The DMX values of the last step wil...

Page 40: ...ep it down and pressing ESC in addition All connected fixtures will repeat the steps synchronized to the master fixture To leave the menu press ESC keep it down and press ENTER in addition If you real...

Page 41: ...lors Channel 12 Pan Tilt speed Pan Tilt speed Red Red Channel 13 Effect speed Effect speed Green Red fine Channel 14 Blackout move Blackout move Blue Green Channel 15 Red Red White Green fine Channel...

Page 42: ...annel 16 Green Channel 17 Blue Channel 18 White Channel 19 Red Channel 20 Green Channel 21 Blue Channel 22 White Channel 23 Red Channel 24 Green Channel 25 Blue Channel 26 White Channel 27 Red Channel...

Page 43: ...slow fast Color balance for color picker function Fade out with fader slow fast Full output power on LED Fade out with fader slow fast Basic adjustment RGBW Fade out with fader slow fast White balance...

Page 44: ...110 111 111 112 125 126 126 127 126 128 142 143 143 144 158 159 159 160 174 175 175 176 190 191 191 192 206 207 207 208 222 223 223 224 238 239 239 240 254 255 255 7 7 7 7 7 Dimmer 0 100 000 255 8 8...

Page 45: ...effect slow fast 000 001 002 003 004 007 008 011 012 015 016 019 020 023 024 027 028 031 032 035 036 039 040 043 044 047 048 051 052 055 056 059 060 063 064 191 192 222 223 224 225 255 12 12 12 Pan T...

Page 46: ...000 255 25 Blue 8 Bit 0 100 000 255 26 White 8 Bit 0 100 000 255 27 Red 8 Bit 0 100 000 255 28 Green 8 Bit 0 100 000 255 29 Blue 8 Bit 0 100 000 255 30 White 8 Bit 0 100 000 255 31 Red 8 Bit 0 100 00...

Page 47: ...Color spread Color spread Color spread Channel 14 Sparkle Sparkle Sparkle Channel 15 Sparkle speed Sparkle speed Sparkle speed Channel 16 CTC CTC CTC Channel 17 Fixed colors Fixed colors Fixed colors...

Page 48: ...e out with fader slow fast Basic adjustment RGBW Fade out with fader slow fast White balance RGBW White 5600 K Fade out with fader slow fast Color balance for color picker function Fade out with fader...

Page 49: ...hutter random 0 0 6 sec 4 8 sec Shutter closed Shutter random fade 0 0 6 sec 4 8 sec Shutter open Shutter random fade 100 0 6 sec 4 8 sec Shutter open 000 015 016 095 096 110 111 111 112 125 126 126 1...

Page 50: ...e Pattern switch with crossfade anti clockwise Pixel random flash fast Pixel random snap open ramp close Pixel random flash slow Pixel random ramp open snap close Pixel random flash fast Pixel random...

Page 51: ...xel random flash fast Pixel random snap open ramp close Pixel random flash slow Pixel random ramp open snap close Pixel random flash fast Pixel random snap open ramp close Pixel random flash slow Pixe...

Page 52: ...16 CTC 0 100 000 255 17 17 17 Fixed colors Inactive colour mixing with RGB White White Red Red Red Yellow Yellow Yellow Magenta Magenta Magenta Green Green Green Amber Amber Amber Blue Blue Blue Cyan...

Page 53: ...55 22 Red fine 16 Bit 0 100 000 255 22 23 Green 8 Bit 0 100 000 255 24 Green fine 16 Bit 0 100 000 255 23 25 Blue 8 Bit 0 100 000 255 26 Blue fine 16 Bit 0 100 000 255 24 27 White 8 Bit 0 100 000 255...

Page 54: ...e when units are being used in rental business and a variety of fixtures are supposed to offer a even colour mixing DMX 000 007 No white balance active DMX 008 015 Basic adjustment on the RGBW channel...

Page 55: ...re working in linear mode so it is possible to use the color picker function of various lighting control desks Some lighting desks have a delay during DMX refreshing and DMX values get missed during a...

Page 56: ...reset the A12 and can be used as a first remedy if an error occurs 6 Service ERROR LIST The ERROR LIST command displays a list of any errors detected An error can simply be a harmless and isolated inc...

Page 57: ...important make sure that there is no dust or fluff covering the air inlets To clean the fixture open fan filter lid and the baseplate If the air filter in the head is full of dust clean or replace it...

Page 58: ...ibility EMC EN 61000 3 2 2015 part 3 2 Limits Limits for harmonic current emissions equipment input current 16A per phase Flicker Electromagnetic compatibility EMC EN 61000 3 3 part 3 3 Limits Limitat...

Page 59: ...uminous power 17500 lumen Zoom max Pan 433 6 Tilt 333 3 Zoom 4 48 4 33 1 2 peak 8 48 1 10 peak Farbtemperatur colour temperature CTC variable 12500K 2500K Farbe Colour schwarz black Geh use Housing PC...

Page 60: ......

Reviews: