background image


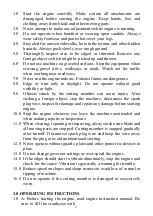
recommended oil SAE-15W-40. When starting the engine, move the 
blade control lever (Fig 1) on the handle to the top adjustment hole. 
This disengages the cutting blade  


Fig 1 

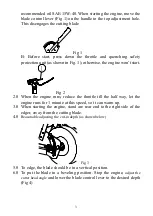
B:  Before  start,  press  down  the  throttle  and  quenching  safety 
protection unit (as shown in Fig. 1); otherwise, the engine won’t start. 


  Fig 2 

2.0


When  the  engine  runs,  reduce  the  throttle  till  the  half  way,  let  the 
engine runs for 1 minute at this speed, so it can warm up. 

3.0


When starting the engine, stand are rear end to the right side of the 
edger, away from the cutting blade. 
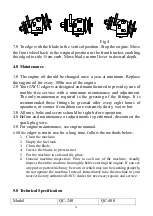
4.0


Reasonable adjusting the cut-in depth (as shown below)


    Fig 3 

5.0


To edge, the blade should be in a vertical position. 

6.0


To  put  the  blade  in  a  beveling  position.  Stop  the  engine,

  adjust  the 

cutter head angle

 and lower the blade control lever to the desired depth 

(Fig 4) 

Summary of Contents for QC-240

Page 1: ...articularly children and pets 5 Never operate on wet grass Keep both hands firmly on the handles when blade is rotating and walk never run Keep feet away from cutting area Watch what you are doing and use common sense 6 Do not attempt to remove cut material when engine is running or when cutting member is moving Shut engine off wait until blade comes to a complete stop and disconnect the spark plu...

Page 2: ...ck by the cutting member can cause injury After striking a foreign object stop the machine disconnect the spark plug wire inspect for damage and repair any damage before starting engine 10 0 Stop the engine whenever you leave the machine unattended and when making repairs or inspections 11 0 When cleaning repairing or inspecting always make sure blade and all moving parts are stopped Cutting membe...

Page 3: ... 2 0 When the engine runs reduce the throttle till the half way let the engine runs for 1 minute at this speed so it can warm up 3 0 When starting the engine stand are rear end to the right side of the edger away from the cutting blade 4 0 Reasonable adjusting the cut in depth as shown below Fig 3 5 0 To edge the blade should be in a vertical position 6 0 To put the blade in a beveling position St...

Page 4: ...nditions are extremely dusty wet or hot 3 0 All nuts bolts and screws should be tight before operation 4 0 Before and maintenance or adjustments is performed disconnect the spark plug wire 5 0 For engine maintenance see engine manual 6 0If the edger is not in use for a long time follow the methods below 1 Clean the machine 2 Empty the fuel tank 3 Clean the blade 4 Grease the blades to prevent rust...

Page 5: ...i CT240 Mitsubishi CT400 Power HP rpm 2 5 3600 4 3600 Displacement cc 80 126 Cooling type Air cooled 4 stroke Fuel tank capacity L 1 6 2 5 Working depth mm 30 40 Working width mm 250 Weight kg 28 6 31 8 6 0 Edger exploded view ...

Page 6: ...1 Upper handle 32 Mudguard block 2 Upper handle grip 33 Rubber mudguard 3 Throttle control switch 34 Press roller bent lever spring 4 Throttle line 35 Cutter head support 5 Cut height control handle 36 Front belt pulley ...

Page 7: ... Rear wheel sleeve 20 15 1 6 49 Fixture block spring 19 Rubber washer 37 5 12 2 2 50 Washer 20 Rear wheel sleeve 19 10 2 66 51 Nut M8 21 Bearing 52 Transport handle 22 Rear wheel 53 Front wheel support washer 40 12 5 6 23 Screw M10 54 Front wheel support 24 Rear wheel screw M10 55 Grease fitting 8 1 25 Grease fitting 6 1 56 Front wheel support screw M12 26 Press roller bent lever 57 Nut M12 27 Pre...

Reviews: