background image

SERVICE & REPAIR

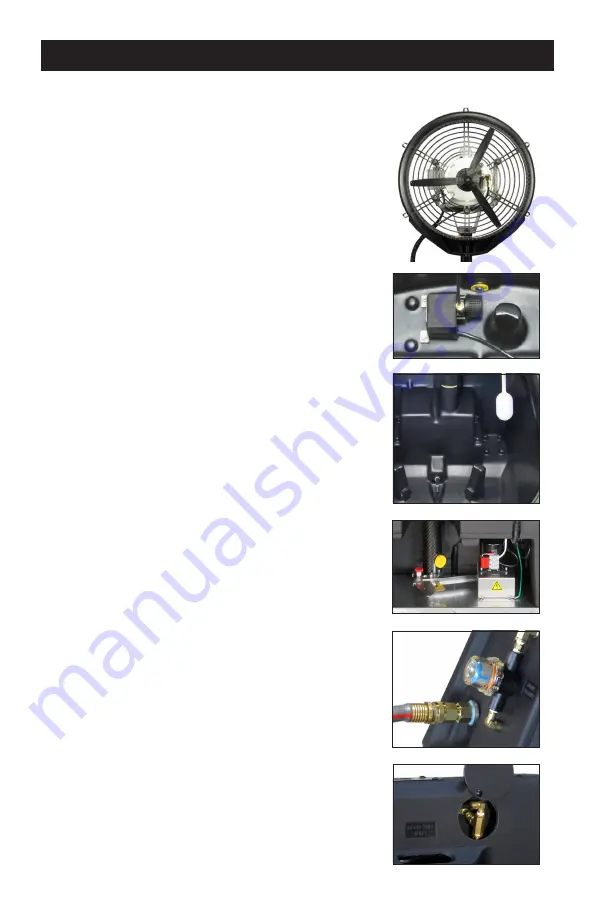
Fan Motor/Venturi/Blade

If you need to replace the fan motor, fan blade 

or pinned venturi. Use a 5/32” allen wrench to 

remove the housing. The blade can be removed 

using a 3/32” allen wrench and the venturi can 

be removed using a #2 phillips screwdriver.

Pump Service/Replacement

Unscrew and clean the pump’s sediment filter 

about twice a year. To replace the pump, un-wire 

the pump from inside the control box. Disconnect 

the 1/4” tubing and remove two 7/16” nuts to 

lift the pump out along with the stainless steel 

bracket. Re-attach components to the new pump 

and install in reverse sequence.

Float Valve & Fluid Level Switch

If replacing either part. Make sure to use thread 

tape in addition to pipe sealant to ensure a leak-

proof connection.

Oscillator

If replacing an oscillator motor or a major 

component. It’s best to remove the entire 

oscillator assembly and complete the task on a 

work bench. To remove the assembly: Un-wire 

the motor, remove the carbon fiber column, and 

unbolt the four 5/16-18 bolts underneath the 

stainless steel base plate.

Strainer

Inspect and/or clean the in-line strainer a few 

times a year. The clear cover unscrews counter-

clockwise (usually) by hand.

Service (peep hole)

If the atomizing fan head needs to be removed 

from the tank. The fans plumbing connection is 

accessible through the service (peep hole). This 

service hole is also convenient for other plumbing 

service procedures.

7

Summary of Contents for CoolAireMist COOL-101

Page 1: ...OPERATOR S MANUAL Read Understand Retain for Future Reference NOTICE Mobile Mist Cooler COOL 101 COOL 102...

Page 2: ...Notes Purchase Date Model ID Number Vendor Information...

Page 3: ...t would likely void the warranty and any manufacturer s responsibilities THE COOLAIRE MIST CAN BE AUTOMATED WHEN USED IN CONJUNCTION WITH A CONTROL THE FAN MAY NOT APPEAR POWERED BUT COULD SUDDENLY BE...

Page 4: ...st must be properly grounded as a precaution against possible electric shock Check for correct voltage supply Keep cord away from heat oil sharp edges and moving parts Replace damaged cords immediatel...

Page 5: ...A SKID WHEN AVAILABLE SETUP Carbon Fiber Column installed Lower Hand Hold Upper Hand Hold Atomizing Fan Head Set Up Locate your CoolAire unit on a level surface Secure the front wheel locks Install t...

Page 6: ...Connector Power Control Switches Sweep Adj Thumb Screw Oscillator Oscillator Control Box WARNING GROUND FAULT RECEPTACLES ARE RECOMMENDED AND MAY BE REQUIRED BY LOCAL AND OR NATIONAL CODE NOTICE ALWA...

Page 7: ...ates a clogged flow restrictor tube Remove clean or replace Sump pumps can go bad if operated for lenghty periods of time out of water If the pump has little to no output flow Replace as needed If the...

Page 8: ...t Valve Fluid Level Switch If replacing either part Make sure to use thread tape in addition to pipe sealant to ensure a leak proof connection Oscillator If replacing an oscillator motor or a major co...

Page 9: ...r detail Load In Load Out coil N coil 115 VAC Load ON AUTO Shut off 2 4 5 1 3 8 6 5 3 1 2 4 CoolAire Electrical Schematic 230 VAC 50 Hz 1 Ph 230V osc motor oscillator locking switch osc light 230 VAC...

Page 10: ...oat Valve 721 In line Strainer 748 1 4 Turn Ball Valve 400 016 SST Flow Restrictor Tube 823 Drain Plug 793 Tank Parts Part No Push Handle Carbon Fiber 824 Tank Lid 825 Tank prepped w holes 749 P Servi...

Page 11: ...nce or unauthorized repairs or alterations which affect the machine s performance or reliability LIMITATIONS OF LIABILITY TO THE EXTENT ALLOWABLE UNDER APPLICABLE LAW JAYBIRD MANUFACTURING INC S LIABI...

Reviews: