


13
2.
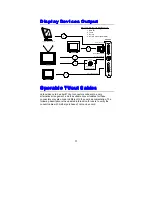
Disconnect the power cord and the monitor cable from the back of the
computer.
3.
Unfasten the cover mounting screws on your system and remove the
system cover. Refer to your system user manual for instructions to
determine the location of the mounting screws.
4.
Remove the retaining screw that holds the slot cover in place. Slide
the slot cover out and put the screw aside (you will need it to secure
the adapter).
5.
To install the adapter in AGP expansion slot, carefully line up the gold-
fingered edge connector on the adapter directly above the expansion
slot connector on the motherboard. Then press the adapter into place,
completely. Use the (remaining) screw you removed to secure the
adapter-retaining bracket in place.
6.
Replace the computer cover. Secure the cover with the mounting
screws you removed in Step 3.
You have now completed the installation of your new graphics adapter on your
system.
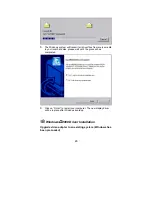
Upgrade Steps:
To add or change your video adapter in an existing system, you
may proceed a few steps before you install the new hardware
and software(video display driver). The following are some of the
considerations:
1. To change a new adapter, please remove the existing video
driver, or replace it with a SVGA driver from
Windows®98/Me system before you remove the existing
hardware.
2. To add a new adapter, ensure the mainboard that has
available IRQ for new devices, and there is no conflict
between the others.
3. If you try adding this video adapter to an ALL-IN-ONE
mainboard (which video port built-in already), then you must
disable that port first. Otherwise, that will be a problem for
the new video adapter setup.
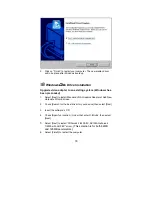
4. The driver installation for system upgrade is the same as
below, if an error occurs when you proceed step 1,2 or 3,
please consult with your system dealer or the existing
hardware manufacturers support.


