background image

8

• Do not use it without the frontal grid correctly assembled.

• Do not put the fingers or other objects into the fan to prevent

the engine block.

• If the cable were to deteriorate it must be changed by an

Authorised Service Centre.

ASSEMBLING INSTRUCTIONS

• Unscrew the nut to fix the propeller (8) clockwise and the nut to fix the grid (7) anticlockwise.

• Place the rear grid (4) into the motor shaft and fix it with the screw grid by turning it clockwise.

• Place the blade (1) into the shaft by pressing till the end and screw the nut to fix the propeller (8) into the

shaft anticlockwise.

• Insert the frontal grid (5) and be sure all the guard clips are closed and the lower part is screwed with the

screw.

INSTRUCTIONS OF USE

• Remember the fan always must be placed on a flat and stable surface. 

• Plug the appliance into the mains.

• Move the air flow by turning the head in the desired position.

• Push the oscillation knob to active the oscillation function.

• Raise the oscillation knob to stop this function.

• Press the speed selector (2) to:


-

Position 0 - Off.


-

Position 1 - Minimum speed.


-

Position 2 - Average speed.


-

Position 3 - Maximum Speedy.

MAINTENANCE AND CLEANING

• Before you proceed to cleaning, make sure the appliance is unplugged from the mains.

• Clean with a slightly damp cloth. 

• It is important to keep the frontal grid (5) and the back grid (4) clean of dust.

• You can disassemble the blades for cleaning by following the assembling reverse process.

• Do not use abrasive or chemical products, such as metallic scourers, which may deteriorate the surfaces of

the appliance.

ENVIRONMENT PROTECTION

• Dispose the appliance according to the local garbage regulations.

• Never throw it away to the rubbish. So you will help to the improvement of the environment.

FRANÇAIS

ATTENTION

• Avant de mettre en marche le ventilateur, veuillez lire

attentivement cette notice et conservez-la pour vous y reporter

au besoin.

• Cet appareil peut être utilisé par les enfants de plus de 8 ans

et les personnes handicapées physiques, sensorielles ou

mentales réduites ou sans expérience ni connaissance, si elles

ont reçu l’instruction ou la surveillance pertinentes concernant

Summary of Contents for VM3021

Page 1: ...Pol de La Serna calle D 31500 TUDELA Navarra Spain Tel 94 621 55 40 Fax 94 681 44 44 PORTUGAL Avenida Engenheiro Duarte Pacheco Torre 2 3 Sala 3 1070 102 Lisboa Tel 213 876 355 Fax 213 867 398 www jata es www jata pt Mod VM3023 Mod VM3021 VENTILADOR DE MESA VENTOINHA DE MESA TABLE FAN VENTILATEUR DE TABLE VENTILATORE DA TAVOLO TISCHVENTILATOR ...

Page 2: ...Hz 45 W Mod VM3023 220 240 V 50 60 Hz 50 W Los textos fotos colores figuras y datos corresponden al nivel técnico del momento en que se han impreso Nos reservamos el derecho a modificaciones motivadas por el desarrollo permanente de la técnica en nuestros productos 1 2 7 8 3 4 5 6 9 ...

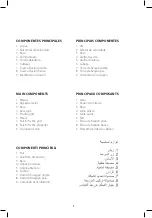
Page 3: ...OMPONENTI PRINCIPALI 1 Pale 2 Selettore di velocitá 3 Base 4 Griglia posteriore 5 Griglia anteriore 6 Testina 7 Dado di fissaggio griglia 8 Dado di fissaggio pala 9 Comando di oscillazione PRINCIPAIS COMPONENTES 1 Pás 2 Seletor de velocidade 3 Base 4 Grelha traseira 5 Grelha dianteira 6 Cabeça 7 Porca de fixação grelha 8 Porca de fixação pás 9 Comando de oscilação PRINCIPAUX COMPOSANTS 1 Pales 2 B...

Page 4: ...segurarse que el voltaje indicado en la placa de características del aparato y el de su casa coinciden MUY IMPORTANTE Nunca debe sumergir el ventilador en agua u otros líquidos Este aparato ha sido diseñado para uso exclusivamente doméstico Debe vigilarse que los niños no jueguen con el aparato Mantenga el ventilador fuera de su alcance Asegúrese de que ni el aparato ni el cable están en contacto ...

Page 5: ...nectado de la red Límpielo con un paño ligeramente humedecido Es importante mantener la rejilla delantera 5 y la rejilla trasera 4 limpias de polvo y pelusas que se le puedan adherir Puede desmontar las aspas para una mejor limpieza siguiendo el proceso inverso al montaje No emplee productos químicos o abrasivos estropajos metálicos etc que puedan deteriorar las superficies PROTECCION DEL MEDIO AM...

Page 6: ...sistênciaTécnica Autorizado INSTRUÇÕES DE MONTAGEM Desaperte a porca de fixação da hélice 8 no sentido horário e a porca da grelha 7 no sentido anti horário Coloque a grelha traseira 4 no eixo do motor e segure com a porca da grelha rodando a no sentido horário Colocar as pás 1 no eixo até sentir resistência e enroscar a porca de fixação da hélice 8 no eixo no sentido anti horário Coloque a grelha...

Page 7: ...refully read these instructions before using the fan for the first time and keep them for future enquiries This appliance can be used by children at the age of 8 or more and people with physical sensory or mental capabilities or lack of experience and knowledge if they have been given an appropriate supervision or instruction concerning the safety use of the appliances and understand the dangers i...

Page 8: ...ion knob to stop this function Press the speed selector 2 to Position 0 Off Position 1 Minimum speed Position 2 Average speed Position 3 Maximum Speedy MAINTENANCE AND CLEANING Before you proceed to cleaning make sure the appliance is unplugged from the mains Clean with a slightly damp cloth It is important to keep the frontal grid 5 and the back grid 4 clean of dust You can disassemble the blades...

Page 9: ...ble d alimentation se détériore il doit être remplacé par un ServiceTechnique Agréé INSTRUCTIONS DE MONTAGE Dévissez l écrou fixation hélice 8 dans le sens des aiguilles d une montre et l écrou de la grille 7 dans le sens contraire des aiguilles d une montre Placez la grille arrière 4 sur l axe du moteur et fixez la à l aide de l écrou de la grille le tourner dans le sens des aiguilles d une montr...

Page 10: ...lioration de l environnement ITALIANO ATTENZIONE Leggere attentamente le istruzioni prima di accendere il ventilatore e conservarle per eventuali future consultazioni Questo apparecchio puó essere utilizzato da bambini con etá uguale o maggiore a 8 anni persone con discapacitá fisiche sensoriali o mentali ridotte o mancanza di conoscenza tecnica se consci dei pericoli che comporta l apparecchio st...

Page 11: ...rienti il flusso d aria girando la testina nella posizione desiderata Per fare in modo che la testina non oscilli prema il comando di oscillazione Per fermare l oscillazione prema il comando di oscillazione Utilizzi il selettore di velocitá 2 Posizione 0 Spento Posizione 1 Velocitá minima Posizione 2 Velocitá media Posizione 3 Velocitá massima MANUTENZIONE E PULIZIA Prima di eseguire qualsiasi ope...

Page 12: ...12 ...

Page 13: ...13 ...

Page 14: ...the guarantee will enjoy all the rights that the current law of his country grants In case of any defect on your appliance consult your store or distributor GARANTIE FR Le titulaire de la garantie jouira de tous les droits que la loi en vigueur de son pays lui accorde En cas de panne consultez votre magasin ou distributeur habituel GARANZIA IT Il titolare della garanzia godrà di tutti i diritti ch...

Page 15: ...15 ...

Page 16: ...ESPAÑA Polígono La Serna calle D s n 31500 TUDELA Navarra Tel 94 621 55 40 PORTUGAL Avenida Engenheiro Duarte Pacheco Torre 2 3 Sala 3 10 1070 102 Lisboa Tel 213 876 355 Fax 213 867 398 www jata es ...

Reviews: