Jason International, Inc. •
501.771.4477
Page 2 of 8
Customer Service : 800.255.5766
Copyright © 2011 Jason International.
INSTALLATION
Remove the product from its packaging.
Read the entire
instructions prior to installing this product.
See USER MAINTENANCE INSTRUCTIONS section of this owner’s
manual for humidity and mold prevention suggestions prior to
Installation.
1.
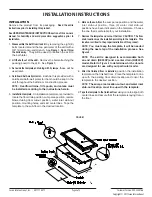
Disassemble the bath from its skirt
by removing the eight (8)
bolts located around the top perimeter of the skirt with a
3/8” [9 mm] open-end wrench. See
Figure 1.
Do not throw
the bolts away
. They will be used to reattach the skirt to
the bath later.
2.
lift the bath out of the skirt.
Remove the bolts attaching the
packing board to the skirt. See
Figure 1.
3.
Set aside the template and tubing with 2 clamps,
these will be
used later.
4.
Cardboard bath-well protector.
Each bath is provided with a
cardboard bath-well protector that should be kept in the
unit throughout the bathroom construction process.
NOTE:
Overflow drains, fill spouts, and valves must
be installed according to the instructions herein.
5.
Installation template.
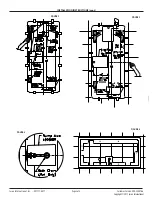
An installation template is provided to
locate the floor drain position, sump area position, remote
blower-tubing floor cutout position, water inlet stub-out
position, mounting holes, and skirt center lines. Tape the
template to the sub-floor in the desired location.
FIgURE 1
INSTALLATION INSTRUCTIONS
6.
Mark on the sub-floor
the sump area position and the water
inlet stub-out position, three (3) water inlet stub-out
positions have been indicated on the template. Choose
the one that is preferable for your installation.
7.
Remove the template and cut out the floor.
CAUTION:
The floor
drain location must be installed according to the template. This
location is critical to the proper installation of this product.
NOTE:
You must keep the template, it will be needed
during the next step of the installation process. See
Figure 2
.
NOTE:
The skirt is designed to accommodate both
an end drain (Re630P) and a center drain (RC630P)
model. Refer to
Figure 2
to determine which cut-outs
are designed for use with your particular model.
8.
After the finished floor is installed,
position the installation
template on the finished floor. Place the template to line
up with the existing floor drain location and orient the
template to the desired position.
NOTE:
The sump area location cutout, and water inlet
stub-out location must line up with the template.
9.
Tape the template to the finished floor
using care to align both
center lines and assure that the template is laying flat on
the floor.


