background image

Operation

Before starting any welding activity ensure that you have 
suitable eye protection and protective clothing. Also take 
the  necessary  steps  to  protect  any  persons  within  the 
area.

MMA

After connecting the welding leads as detailed you will need 
to switch on the machine. The power LED will be lit and the 
fan running.

Switch the MMA/MIG switch to MMA.

Set  the  amperage  on  the  machine  using  the  MMA  current 
control knob to a value suitable for the electrode being used. 
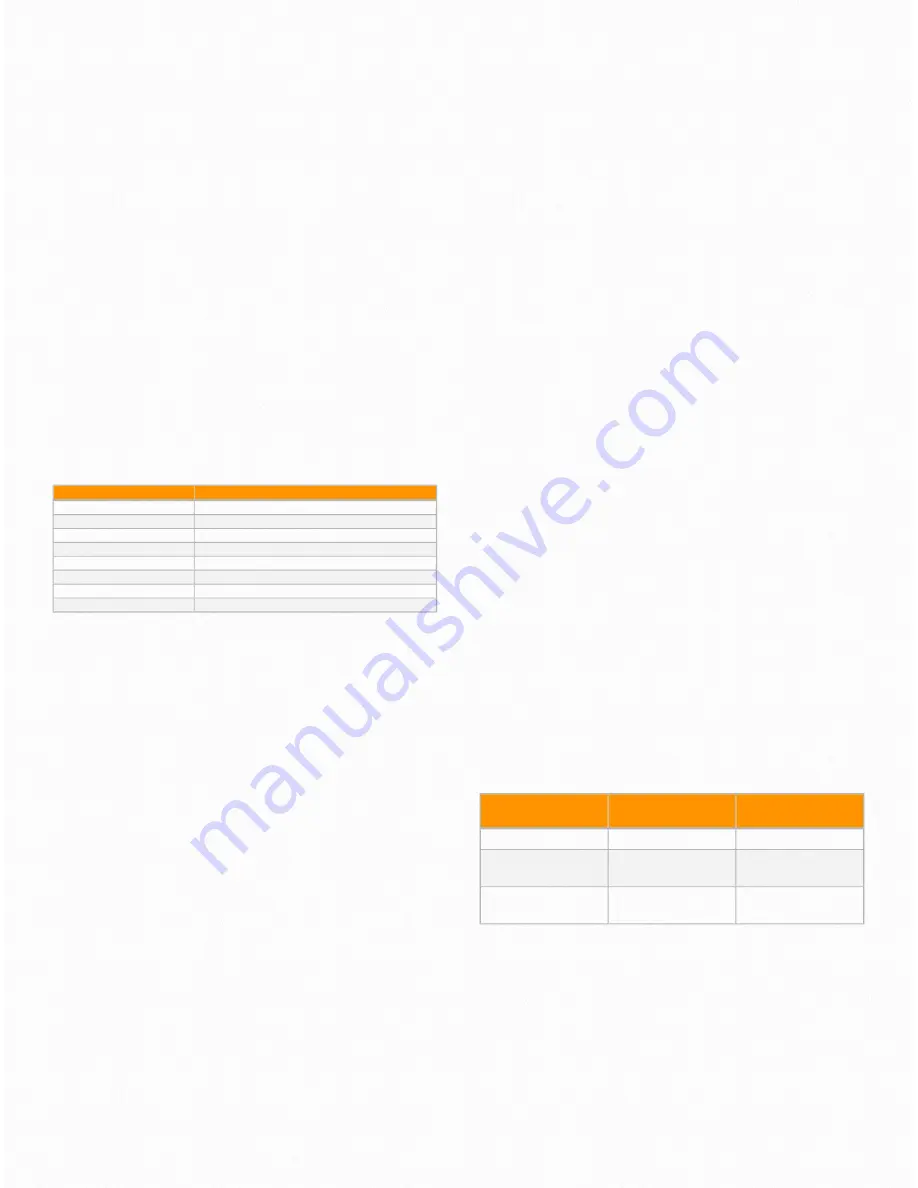
Please  see  below  a  guide  to  amperages  required.  Ensure 
you  check  that  you  have  the  electrode  polarity  correct. 
Inductance can be adjusted using the inductance control on 
the front panel of the machine

MIG/MAG

1)


After being installed as above, and the power switch 

on the back panel being switched on, the machine is started. 
At  this  time,  the  ammeter  displays  the  preset  wire  feed 
speed  value,  and  the  voltmeter  displays  the  preset  voltage 
value.  Open  the  cylinder  valve,  and  switch  the  gas  check 
switch  to  the  “GAS  CHECK”  position.  Adjust  the  gas 
regulator to get the correct gas flow. After setting, switch the 
gas check switch to the “Welding” position.

2)


Get  the  correct  arc  conditions  by  adjusting  the 

inductance control knob. Turn the knob counterclockwise to 
get lower inductance and harder arc; turn it clockwise to get 
higher inductance and softer arc. Generally, select harder arc 
at lower current, while select softer arc at higher currents.

3)


Select  the  correct  welding  current  and  welding 

voltage  by  adjusting  the  current  control  knob  and  voltage 
control knob on the wire feeder.

4


Select 2T or 4T operation mode. In 2T mode, the arc 

is  ignited  by  pushing  the  torch  trigger,  and  arc  stops  by 
releasing  the  torch  trigger.  In  4T  mode,  welding  can  be 
continued  when  releasing  the  torch  trigger  after  arc  is 
ignited, and at this time, welding instructions should be set 
by  adjusting  the  current  control  knob  and  voltage  control 

knob  on  the  wire  feeder.  When  pushing  the  torch  trigger 
again,  the  machine  enters  into  crater  welding,  and  at  this 
time.  Crater  parameters  should  be  set  by  adjusting  the 
crater/welding  current  control  knob  and  crater  voltage 
control knob on the front panel of the machine.

The  actual  current  and  voltage  values  are  displayed  on  the 
front  panel  of  the  machine.  When  the  torch  trigger  is 
released,  welding  ends.  2  seconds  after  welding  ends,  the 
gas supply will be cut o

.

Gas selection

Metal inert gas welding (MIG): Uses Argon (Ar), Helium (He) 
or  Ar-He  mixtures  as  the  shield  gas,  and  it  mainly  used  for 
welding aluminium and its alloys.

Metal active gas welding (MAG): Uses Argon (Ar) mixed with 
a certain amount of CO

2

 / O

2

 as the shield gas, and it usually 

used  in  short  circuit  transfer  and  spray  transfer.  It  can  be 
applicable to flat position welding, vertical position welding, 
overhead  position  welding  and  all-position  welding,  and  it 
mainly used for welding carbon steel, high strength low alloy 
steel  and  stainless  steel.  Welding  robots  mostly  use  the 
MAG process.

CO2  (carbon  dioxide)  gas  shielded  arc  welding  (CO2 
welding): It uses CO2 as the shield gas, and is usually used 
in  globular  transfer  and  short  circuit  transfer  to  implement 
welding.  It  can  be  used  to  weld  in  di

erent  positions.  As 

compared  with  other  welding  methods,  CO2  welding  has 
many  advantages,  though  it  produces  more  spatters,  CO2 
welding is widely used for general metal structure welding.

1) Welding current setting

Set  the  welding  current  after  the  above  preparation.  Short 

circuit  transfer  is  mainly  for  electrode  wires  of  diameter 
0.6~1.2mm.  As  a  guide  for  short  circuit  welding  set  the 
welding current according to the table below. 

2) Welding speed selection 

The  welding  quality  and  productivity  should  be  taken  into 
consideration for the selecting of welding speed. In the case 
that the welding speed increases, it weakens the protection 

11

Electrode Diameter (mm)

Recommended Welding Current (A)

1.0

20~60

1.6

44~84

2.0

60~100

2.5

80~120

3.2

108~148

4.0

140~180

5.0

180~220

6.0

220~260

Welding wire 

φ

(mm)

Applicable current (A)

Optimal current (A)

0.8

50~120

70~100

1.0

70~180

80~120

1.2

80~350

100~200

Summary of Contents for JM-250S MIG Series

Page 1: ...wilkinsonstar com MIG Series MIG MAG MMA Separate wire feed welding machine Order code JM 250S MIG 250S OPERATOR MANUAL ...

Page 2: ...upplier of equipment in the UK and our products are supported by our extensive service network Call your distributor in the unlikely event of a problem occurring Please record below the details from your product as these will be required for warranty purposes and to ensure you get the correct information should you require assistance or spare parts Date purchased __________________________________...

Page 3: ...ye protection Insulate yourself from work and ground using dry insulating mats or covers big enough to prevent any physical contact with the work ground Never touch the electrode if you are in contact with the work ground or another electrode from a different machine Do not wrap cables over your body Ensure that you take additional safety precautions when you are welding in electrically hazardous c...

Page 4: ... fan may cut fingers and hands and snag garments Protections and coverings may be removed for maintenance and controls only by qualified personnel after first disconnecting the power supply cable Replace the coverings and protections and close all doors when the intervention is finished and before starting the equipment Take care to avoid getting fingers trapped when loading and feeding wire durin...

Page 5: ...network at the public network connection point must be applied to these systems In this case the installer or the user is responsible for ensuring the equipment can be connected consulting the electricity provider if necessary Materials and their disposal The equipment is manufactured with materials which do not contain any toxic or poisonous materials dangerous to the operator When the equipment ...

Page 6: ...t welding characteristics A unique welding dynamic characteristic control circuit provides a stable arc low spatter high welding efficiency and excellent weld appearance Removing wire tip ball after welding high no load voltage and soft start wire feeding results in a excellent arc ignition Welds a wide range of wires from 0 6 1 6mm diameter Improved functional design With the wire feeder separate f...

Page 7: ...t A 12 1 Rated power supply capacity KVA 8 4 Output current range MMA 10 220A Welding current range A 35 250 Welding voltage range V 14 32 No load voltage V 52 Wire feed speed range m min 1 5 16 Wire diameter applicable mm 0 8 1 0 Rated duty cycle 400 C 250A 60 Efficiency 85 Power factor 0 93 Protection class IP21S Overall size mm 510 196 385 Weight kg 15 ...

Page 8: ...ng switch 2 MMA MIG switch 3 Voltmeter 4 Over current LED 5 Power LED 6 Overheating LED 7 Ammeter 8 Current control knob in MMA 9 Inductance control knob 10 output terminal 11 Connector for the wire feeder 12 output terminalConnector for the wire feeder 7 ...

Page 9: ...ower switch 14 Socket for the heater 15 Input power cord gland 16 Ground terminal Wire feed control 1 Welding current control knob 2 Manual wire feeding switch 3 Welding voltage control knob 4 2T 4T Selector switch 8 ...

Page 10: ...lding electrodes the electrode holder is connected the the positive terminal and the work return to the negative terminal Always consult the electrode manufacturer s data sheet if you have any doubts MMA welding Insert the cable plug with electrode holder into the socket on the front panel of the welding machine and tighten it clockwise Insert the cable plug of the work return lead into the socket...

Page 11: ...to thread the wire through the guide tube and into the drive roll groove Adjust the pressure arm ensuring no sliding of the wire Too high pressure will lead to wire distortion which will affect wire feeding Press the inch wire feeding button to thread the wire out of the torch head Installation of the cylinder Connect the cylinder equipped with a regulator to the gas inlet on the wire feeder with a...

Page 12: ...n pushing the torch trigger again the machine enters into crater welding and at this time Crater parameters should be set by adjusting the crater welding current control knob and crater voltage control knob on the front panel of the machine The actual current and voltage values are displayed on the front panel of the machine When the torch trigger is released welding ends 2 seconds after welding e...

Page 13: ...ng Generally the stick out should be 10 times as the welding wire diameter 4 Shield gas flow selection The protection effect is the primary consideration Besides the protection effect of inner angle welding is better than that of external angle welding so the gas flow in inner angle welding should be lower Less or no shield gas is needed in FCAW Refer to the table below for the recommended gas flow ...

Page 14: ...tion LED warnings 13 Period Maintenance item Daily examination Carry out a full visual inspection Check for any damage to the machine leads cables and connections Replace where necessary Switch on the machine and check for any warning Led s and general operation Monthly examination Using the dry compressed air to clean the inside of arc welding machine Especially check for build up of dust debris ...

Page 15: ...1 Check if the control cable of the wire feeder is broken 2 Check if the wire feeder is blocked 3 Check if the wire feed PCB of the welding machine fails 4 Check if the wire feeder is damaged Welding can be carried out when pushing the torch trigger but the current is too high the voltage can not be adjusted and the no load voltage is too high 1 Check if the control cable of the wire feeder is bro...

Page 16: ...Electrical schematic 7 15 ...

Page 17: ...Parts list 8 16 ...

Page 18: ...075 Main transformer 6 10001867 Fan 20 10014690 Front Panel 7 10013342 Back panel 21 10001577 Indicator Light 8 10021881 Square sockets 22 10006795 Digital Meter 9 10004955 Power switch 23 10004944 Transform switch 10 10021912 Line button 24 10006507 MMA Current Potentiometer 11 10001146 Silicon bridge 25 10006507 Inductance Potentiometer 12 10044596 Power adapter plate 26 10021855 Quick socket 13...

Page 19: ...3 10015217 Control Panel 4 10021855 Output Terminal 14 10044630 10044640 Potentiometer 5 10044600 Wire Feeding PCB Board 15 10015526 CS501B Remote Plastic Box 6 10045742 Bottom panel 16 10012376 Wire Feeder Cover 7 10003814 Wire Feeder 17 10016524 Door Catch 8 10003831 Central socket 18 10015767 Platen 9 10015216 Front Panel 19 10016681 Spool for wire feede 10 10044633 Inching button ...

Page 20: ...JM MIG Series MIG MAG MMA WELDING MACHINE Order code JM 250S MIG 250S Wilkinson Star Limited Issue 1 January 2014 Product is subject to change without notice xix ...

Reviews: