JAPANNEXT JN-T2822UHD User Manual Download Page 9

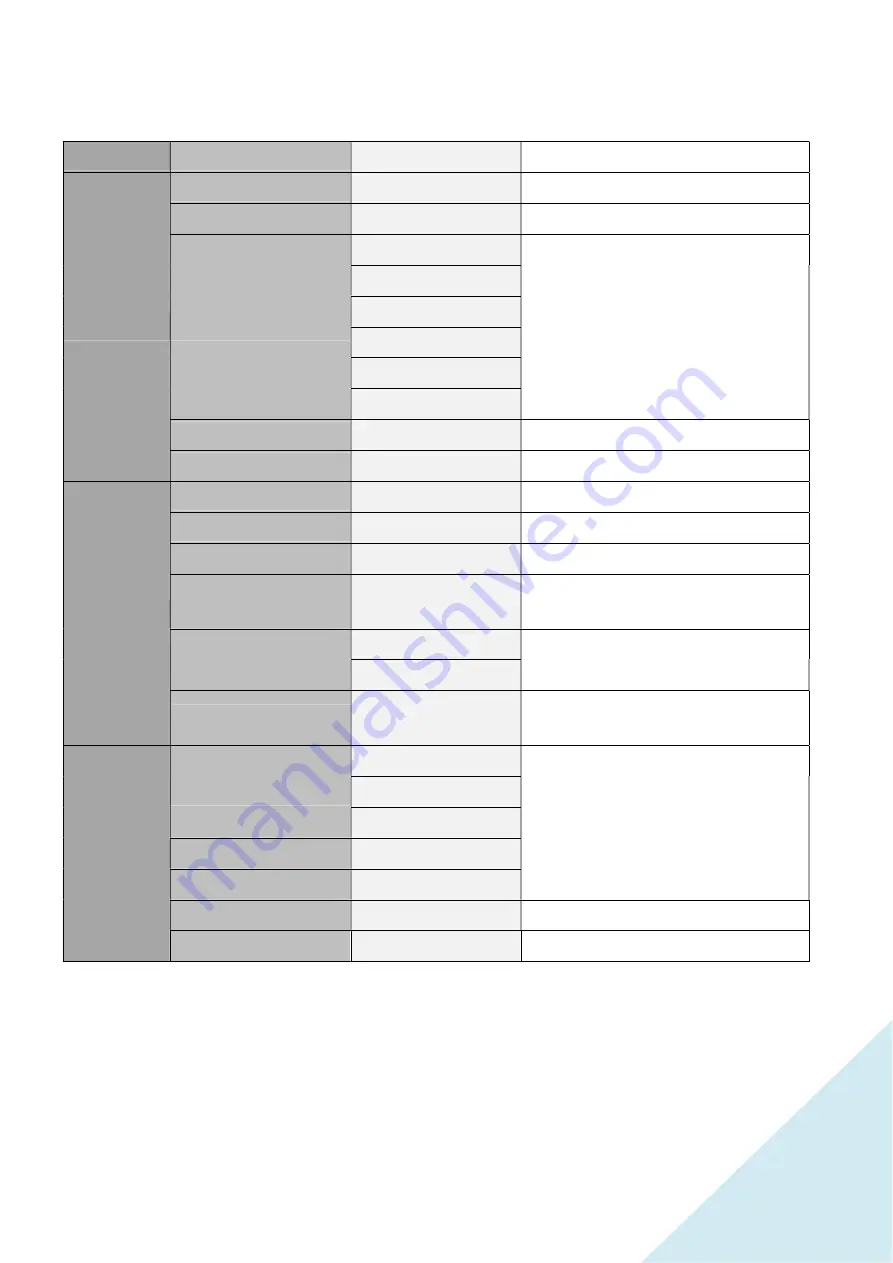
OSD MENU (monitor function control menu)


MENU 

SUBMENU 

FUNCTION 

NOTE 

PICTURE SET 

BRIGHTNESS 

0 - 100 

Adjust brightness from 0 to 100 

CONTRAST 

0 - 100 

Adjust contrast from 0 to 100 

PICTURE MODE 

SRGB 

Select picture mode 

ENERGY SAVE 

STANDARD 

TEXT 

MOVIE 

GAME 

DCR 

ON - OFF 

Set DCR function on or off 

GAMMA 

OFF - 1.8 - 2.0 - 2.2 - 2.4 

Adjust the gamma 

IMAGE 

H.POSITION

0 - 100 

Adjust horizontal position 

V.POSITION

0 - 100 

Adjust vertical position 

CLOCK 

0 - 60 

Adjust the pixel clock 

PHASE 

0 - 100 

It allows to reduce video distortion and 

instability components.


ASPECT 

WIDE 

It allows to change the video format of the 

images among “ WIDE - 4:3 “ 


4:3 

SHARPNESS 

0 - 1 - 2 - 3 - 4 

It allows to optimize image sharpness 

parameters according to ambient light 

COLOR TEMP. 

USER 

RED 0-100 

It allows to change the color settings 

GREEN0-100 

BLUE0-100 

WARM 

COOL 

SATURATION 

0 - 100 

It allows to change colors of the image 

HUE 

0 - 100 

Only used in NTSC system 

9

Summary of Contents for JN-T2822UHD

Page 1: ...lace for future reference FR Manuel d utilisation Ce manuel de l utilisateur contient les informations n cessaires l utilisation de votre moniteur prenez le temps de le lire avant d utiliser votre mon...

Page 2: ...l EMBALLAGE CONNECTEURS P17 BOUTONS DE REGLAGES P18 MENUS DE RELAGE OSD P19 A PROPOS DE FREESYNC P20 DEPANNAGE FAQ INTERNATIONAL P21 TECHNICAL SPECIFICATION P22 DIMENSIONS P23 COMPLIANT TIMING ENG Fo...

Page 3: ...n these specified may result in exposure to electrical and mechanicals hazards electrical shocks and may damage your monitor and or put yourself in danger If any sign of spark smoke noise or vibration...

Page 4: ...monitor is not designed for a 24 7 use Always use power cord provided with the monitor If the power cord is missing or damage please contact JAPANNEXT customer service or a technician Unplug the monit...

Page 5: ...ecommend positioning the screen below eye level at a distance of about 40 to 60 cm With prolonged use it is recommended to take a 10 minute break per hour of use Customer service assistance maintenanc...

Page 6: ...lacing it as shown in the picture below and use the 4 screws provided to fix it Screw without force 3 Clip the stand rounded side on the screen side on the underside of the neck 4 Make sure the stand...

Page 7: ...ptor Power Plug Shape CONNECTORS 1 DC Power Plug Please use only the power DC adaptor and power cord included in Package 2 and 3 HDMI 2 0 Connectors 60Hz Can be use with both monitor and a large varie...

Page 8: ...to select the OSD setting Shortcut key Decrease the volume Press this button move right to select the OSD setting Shortcut key Increase the volume Press this button move up to select the OSD setting...

Page 9: ...0 Adjust horizontal position V POSITION 0 100 Adjust vertical position CLOCK 0 60 Adjust the pixel clock PHASE 0 100 It allows to reduce video distortion and instability components ASPECT WIDE It allo...

Page 10: ...MER 0 60 Set the display time of the menu TRANSPARENCY 0 100 Adjust the transparency of the menu RESET IMAGE AUTO ADJUST It allows to auto adjust the image COLOR AUTO ADJUST It allows to auto adjust t...

Page 11: ...specification seems to be adequate unplug monitor immediately and contact JAPANNEXT customer service ASAP Image is blurring vibrating flickering is indistinct etc Make sure the computer signal timing...

Page 12: ...rt seulement par un technicien qualifi L ouverture du moniteur peut vous exposer des risques d incendie des chocs lectriques une mise en danger Il contient des l ments haute tension Ne jamais introdui...

Page 13: ...XT Maintenance Pour prot ger votre moniteur contre de possibles dommages n appuyez pas sur l cran LED Lorsque vous le d placez saisissez le par le cadre ne mettez pas vos mains ni vos doigts sur l cra...

Page 14: ...de positionner l cran au dessous du niveau des yeux une distance d environ 40 60 cm En cas d utilisation prolong e il est recommand de prendre une pause de 10 minutes par heure d utilisation Service S...

Page 15: ...is fournies pour le fixer Visser sans forcer 3 Clipser le socle du pied partie arrondie cot cran sur le dessous du cou du pied 4 V rifier que les pieds soient fermement attach s 5 Assurez vous que ni...

Page 16: ...URS 1 Connecteur d alimentation DC Veuillez utiliser uniquement le c ble et adaptateur DC fourni avec le moniteur Pri re d utiliser une prise secteur avec prise de terre 2 et 3 Port HDMI 2 0 60Hz Peut...

Page 17: ...Naviguer dans le menu vers la gauche Raccourci diminuer le volume Naviguer dans le menu vers la gauche Raccourci diminuer le volume Naviguer dans le menu vers le haut Naviguer dans le menu vers le ba...

Page 18: ...tion horizontale POSITION V 0 100 Ajustez la position verticale HORLOGE 0 60 Ajustez le pixel clock PHASE 0 100 Il permet de r duire les composants de distorsion vid o et d instabilit ASPECT WIDE Perm...

Page 19: ...ent POS V OSD 0 100 D placer l OSD verticalement TIMER OSD 0 60 S lectionnez le temps d affichage de l OSD TRANSPARENCE 0 100 S lectionnez la transparence de l OSD RESET AJUST AUTO IMAGE Ajuste automa...

Page 20: ...r glez la r solution de l image param tres de votre PC sur 3840x2160 L cran tremble ou met un bruit La tension d alimentation est elle compatible avec le moniteur et son adaptateur DC Si les sp cific...

Page 21: ...1 2 3840x2160 60Hz DP2 DP 1 2 3840x2160 60Hz Output Terminal Earphone YES Speaker Typical 2 x 5W Power Consumption Typical Max 39W Typ 29W Standby 0 3W AC Power Range AC 100 240V 50 60Hz Power Mode In...

Page 22: ...DIMENSIONS 22...

Page 23: ...COMPLIANT TIMING e mail europe cs japannext net Europe 24 Rue de la Plaine 75020 Paris Japannext SA Japan 1 3 1 JAPANNEXT 23...

Reviews: