background image

63

Eco Mode

Screen Saver

Touch Screen Calibration

Machine Info

1

first machine

Rename

A

Q

Y

2

3

4

5

6

7

8

9

Z

R

S

T

U

V

&

W

0

X

1

I

J

K

L

M

N O

P

B

C

D

E

F

G

H

2

A

Q

Y

2

3

4

5

6

7

8

9

Z

R

S

T

U

V

&

W

0

X

1

I

J

K

L

M

N O

P

B

C

D

E

F

G

H

2

ABC

Eco Mode

Screen Saver

Touch Screen Calibration

Machine Info

2

ABC

m

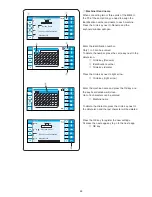
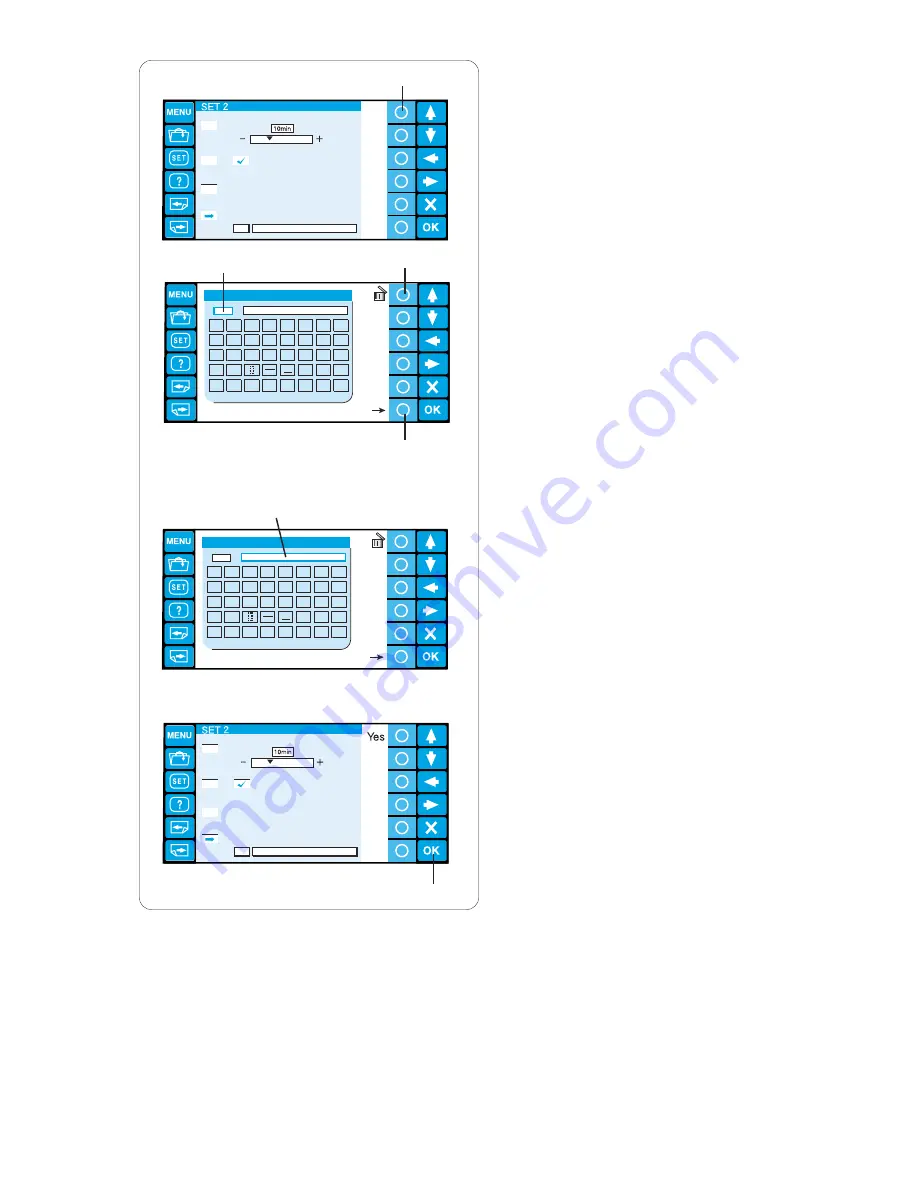
Machine ID and name

When connecting two or three units of the MB-4 to

the PC at the same time, you need to assign the

identification number and name to each machine.

Press the circle key next to Rename and the

keyboard window will open.

Enter the identification number.

Only 1 to 3 can be entered.

To delete the number, press the circle key next to the

delete icon.

q

Circle key (Rename)

w

Identification number

e

Circle key (delete)

Press the circle key next to right arrow.

r

Circle key (right arrow)

Enter the machine name and press the OK key and

the key board window will close.

Up to 16 characters can be entered.

t

Machine name

To delete the character, press the circle key next to

the delete icon and the last character will be deleted.

Press the OK key to register the new settings.

Or press the next page key to go to the next page.

y

OK key

q

w

e

r

y

m

t

Summary of Contents for MB-4

Page 1: ...Instruction Book MB 4...

Page 2: ...blocked Keep ventilation openings of this machine free from accumulation of lint dust and loose cloth 5 Never drop or insert any object into any opening 6 Do not use outdoors 7 Do not operate where ae...

Page 3: ...ith a qualified electrician or serviceman if the grounding instructions are not completely understood or if in doubt as to whether the product is properly grounded Do not modify the plug provided with...

Page 4: ...electing the Embroidery Patterns 36 Selecting the built in designs 37 Manual color assignment 39 Monogramming 40 Function keys 41 Entering the characters 42 Saving the monogram 42 Correcting the text...

Page 5: ...as a sturdy table that could withstand the machine s weight and vibration Place the machine on the flat and level surface Make sure that all the feet firmly contact the surface Provide a sufficient s...

Page 6: ...e surface without shaking q w e e e A B Removing the Head Stoppers To prevent the machine from a damage during transportation the machine is delivered with the head stoppers installed on the guide bar...

Page 7: ...se or store the machine near a heat radiator or in a place with dust or high humidity Do not expose the machine to direct sunlight or open air When transporting the machine be sure it is lifted by two...

Page 8: ...Start Stop button o Auto thread cutter button 0 Sub control panel 1 Spool pins 2 Spool stand q w e r t y u i o 0 1 2 3 4 5 6 7 8 9 2 3 Machine socket 4 Power switch 5 Bobbin winder button 6 Bobbin win...

Page 9: ...utton e Auto thread cutter button r Trace button t Jog buttons y Carriage return button u Stitch back button i Stitch forward button o Bobbin winder button 0 Bobbin winder indicator 1 Card slot 2 Card...

Page 10: ...ssors e Bobbins r Lint brush t Seam ripper y Handy needle threader u Spool caps i Spool net o Screwdriver 0 Screwdriver small 1 Oiler 2 Offset screwdriver 3 Tweezers 4 Screwdriver large 5 Accessory bo...

Page 11: ...tructional movie CD ROM e Power supply cable r USB cable t Hoop M1 MB Hoop 240 X 200 y Hoop M2 MB Hoop 126 X 110 u Hoop M3 MB Hoop 50 X 50 i Hoop supporter o Felt ring large 0 Felt ring small 1 Spool...

Page 12: ...the bottom Insert the spool pins into the spool stand q Thread guide poles w Setscrews A e Spool stand r Spool pin x Attach the thread guide bar to the thread guide poles with the setscrews B t Thread...

Page 13: ...of thread t Spool pin for bobbin winding Setting the thread cone Attach the spool rests on the spool pins Place the thread cones on the spool pins Cover the thread cone with the spool net if the thre...

Page 14: ...wer switch on to move the carriage to the center Hold the hoop supporter with both hands and place it under the carriage plate by inserting the necks of both thumbscrews into the slots in the carriage...

Page 15: ...or easier viewing Tighten the screw knob B to secure the RCS unit y Screw knob B v Insert the connector into the connector socket on the back of the machine Fold the cable and put it under the spool s...

Page 16: ...ed v Turn the power switch on Grounding Instructions This machine is equipped with a grounding cable and plug The plug must be plugged into an appropriate outlet that is properly installed and grounde...

Page 17: ...pe B USB connector Transfer the embroidery pattern data files between the machine and PC by using optional Digitizer MB for multi needle After the data transfer is finished the LCD screen will show th...

Page 18: ...c or work that cannot be secured in the hoop It is also used for velvet and other napped fabric that would be permanently marked by the hoop Usage The stabilizer should be attached to the wrong side o...

Page 19: ...nside Put the bobbin on the bobbin winder spindle r Hole in the bobbin t Bobbin winder spindle b Push the bobbin winder stopper up against the bobbin y Bobbin winder stopper n Press the bobbin winding...

Page 20: ...illustrated q Bobbin w Bobbin case x Draw the thread to slip it into the slit of the bobbin case e Slit c Pull the thread to slide it under the tension blade until the thread comes out from the openi...

Page 21: ...the bobbin case with the latch and insert the bobbin case into the hook aligning the rib with the notch Push the bobbin case as far as it will go and release the latch q Latch w Rib e Notch Close the...

Page 22: ...the thread through the guide hole from behind While holding the thread with both hands slip the thread under the tension disk of the pre tension control Hook the thread aroung the guide pin from righ...

Page 23: ...the right in the guide plate t Third hole from the right 0 Continue to draw the thread down to the lower guide plate and pass the thread through the right hole y Right hole in the lower guide plate 1...

Page 24: ...e while pushing it gently until the threader pin goes into the needle eye Place the V notch over the needle just above the needle eye e V notch c Push the threader until the threader pin comes out thr...

Page 25: ...r hoop t Template y Arrow mark c Loosen the hoop tightening screw on the outer hoop u Outer hoop i Hoop tightening screw v Hold the inner hoop and fabric together and push them into the outer hoop Mak...

Page 26: ...l not to pinch the fabric edge under the hoop supporter Adjusting the Hoop Supporter for Optional Hoops The hoop supporter provides 2 alternate positions to adapt optional hoops available on the marke...

Page 27: ...In other modes these button are used for selecting the items r ENTER button Press this button to confirm your selection or register the settings t LCD brightness adjusting dial Turn this dial with yo...

Page 28: ...n will show W 01 Press the MODE button to start a new project or press the ENTER button if you wish to continue the last job before you turned the power off e MODE button c The LCD screen will show th...

Page 29: ...t sewing Press the MODE button to select the color section setting and press the ENTER button Press the upward or downward arrow buttons to select the desired section Press the ENTER button to registe...

Page 30: ...g the arrow buttons if necessary r Arrow buttons c To check the needle drop position lower the needle bar with the small screwdriver so you can see the needle point closer to the fabric Push down the...

Page 31: ...the beginning Then press the START STOP button again The machine will sew up to the fourth color and stop automatically Re thread each needle with the next color and press the START STOP button to co...

Page 32: ...ns Slide the hoop toward you and remove it from the machine q Setting plate w Positioning pin x Loosen the hoop tightening screw e Hoop tightening screw c Remove the inner hoop and the fabric r Inner...

Page 33: ...le thread tension Adjust the needle thread tension by turning the tension dial so that a small amount of the needle thread shows on the wrong side of the fabric q Tension dial NOTE If the thread kinks...

Page 34: ...ON Do not use the bent or blunt needle The bent needle can cause it to break Replacing the needle Loosen the needle clamp screw with the small screwdriver included in the standard accessary Pull the n...

Page 35: ...Jog buttons Press these buttons to move the hoop for precise positioning t Carriage centering button Press this button to move the carriage to the center position y Stitch back button Press this butto...

Page 36: ...er the My setting mode r Help key Press tis key to open the help movie menu t Page keys Press the previous page key to show the previous display Press the next page key to show the next display y Arro...

Page 37: ...s the OK key w Arrow keys e OK key Press the circle key next to the playback icon to start the help movie Press the circle key next to the stop icon to stop playing You can search the movie in forward...

Page 38: ...g the RCS Unit You can use the RCS unit to control two more MB 4s After setting up the first unit of the MB 4 press the MENU key and press the circle key next to the RCS icon q MENU key w Circle key R...

Page 39: ...tings or not Press the OK key if you wish to continue sewing the last pattern used before you turned the power off Or press the exit X key to start a new job w Exit key X When you press the exit X key...

Page 40: ...categorized by hoop size To view the designs on the next page press the next page key q Next page key Press the previous page key to go back to the previous page w Previous page key A The designs on...

Page 41: ...o 224 3 Tangerine 274 1 2 3 4 Orange 203 1 Sienna 258 4 5 4 8 Function keys circle keys Color list option Press the circle key next to the color list icon to switch display between 4 colors and 8 colo...

Page 42: ...pressing the circle key next to the next or previous color section icon q Circle keys color section x Press the circle key next to the manual color assignment icon and the function assignment to the...

Page 43: ...3 pages of the monogramming window Press the page key to show the next or previous page q Page keys Page 1 Roman alphabets and spaces Page 2 Numerals punctuation marks and symbols Page 3 Dieresis and...

Page 44: ...ction w Arrow keys e OK key Lettering orientation Press the circle key next to orientation icon to select horizontal or vertical orientation alternately Press the OK key to confirm your selection r Ci...

Page 45: ...er case Enter lower case u m and p Press the OK key w OK key The Ready to sew window will open Saving the monogram You may save the monogram as a data file After entering the characters press the circ...

Page 46: ...te Press the circle key next to the delete icon q Arrow keys w Cursor e Circle key delete To insert a character Press the arrow key to move the cursor under the character next to the place to where yo...

Page 47: ...cement icon to select the left justify center justify or right justify alternately q Circle key delete Horizontal orientation Left justify Center justify Right justify Vertical orientation Top justify...

Page 48: ...cle key next to the automatic color assignment icon to assign temporary colors to the needle bars refer to page 37 Press the circle key next to the custom color icon e Circle key custom color v The co...

Page 49: ...Circle key editing x The editing window will open c Press the MENU key and press the circle key next to the built in icon to import the built in patterns w MENU key e Circle key built in You can also...

Page 50: ...tional item T3 Tajima hoop 59 x 59 mm optional item T4 Tajima hoop 79 x 79 mm optional item T5 Tajima hoop 100 x 100 mm optional item T6 Tajima hoop 39 x 160 mm optional item Moving the pattern To mov...

Page 51: ...cle key rotate CCW 90 deg Press the circle key next to the return icon to confirm the change The angle of the pattern is indicated in the status box y Circle key return y Status box y q w e r t u Dele...

Page 52: ...ntally press the circle key next to the flip horizontal icon q Circle key flip horizontal To flip the pattern horizontally press the circle key next to the flip horizontal icon w Circle key flip horiz...

Page 53: ...rc icon to make a lower arc w Circle key lower arc c Press the circle key next to the upper arc icon to make a upper arc e Circle key upper arc v Press the circle key next to the outward arrow icon to...

Page 54: ...to assign a name to the customized color press the circle key next to the Name icon The keyboard window will open Enter the desired name and press the OK key r Circle key name t OK key To delete a wro...

Page 55: ...ttern 7 v The editing window will open and the stitch image of the selected pattern will appear b Move the pattern to the right bottom corner of the editing screen by using the arrow keys or by draggi...

Page 56: ...a duplicate and flip it horizontally Move the pattern to the right top corner of the editing screen 0 Press the MENU key Press the circle key next to the monogram icon o Circle key monogram 1 The mon...

Page 57: ...le key next to the outward arrow to make the arc larger 2 Circle key lower arc 3 Circle key outward arrow Press the OK key 4 OK key 5 The ready to sew window will open and the combined pattern image w...

Page 58: ...l garment Adjust the hoop position by pressing the jog buttons if necessary q Jog buttons x To check the needle drop position lower the needle bar with the small screwdriver so you can see the needle...

Page 59: ...hine Trim the thread at the beginning Then press the START STOP button again The machine will sew up to the fourth color and stop automatically Re thread each needle with the next color and press the...

Page 60: ...ave not used the machine for a while Pressing any button will turn on the sewing lights and screen The eco mode timer can be set from 1 to 30 minutes by pressing the right or left arrow button Press t...

Page 61: ...hange the indication to NO Press the ENTER button to register the new setting or press the upward arrow button to go to the next setting 06 Maximum sewing speed The maximum sewing speed can be set fro...

Page 62: ...n to go to the next setting 10 Setting the trim tail length Some times you need to adjust the tail length of the thread being trimmed depending on the thickness and type of the thread Press the right...

Page 63: ...p thread trimming threshold You can adjust number of jumps which triggers the jump thread trimming The machine will trim the jump thread automatically after the specified number of jump stitches Press...

Page 64: ...ointer to the left To select the desired attribute press the upward or downward arrow key to move the arrow up or down r Pointer t Arrow keys z LCD brightness adjustment Press the circle key next to t...

Page 65: ...wn on the LCD screen instead of entering the eco mode To activate the screen saver press the circle key next to ON When it is activated a check mark will appear in the box To inactivate the screen sav...

Page 66: ...the circle key next to Rename and the keyboard window will open Enter the identification number Only 1 to 3 can be entered To delete the number press the circle key next to the delete icon q Circle ke...

Page 67: ...or down to select the desired memory location Press the circle key next to Yes and the confirmation message will appear Press the OK key to format the memory If you do not wish to format press the exi...

Page 68: ...ed from 400 to 800 spm by 100 spm intervals Press the circle key next to or to select the desired speed q Circle keys 3 Hoop selection for monogramming Press the circle key next to or to select one of...

Page 69: ...There are 6 brands of embroidery threads to choose from Press the circle key next to the left or right head arrow to move the cursor red arrow to select the desired brand q Circle keys arrow 5 Screen...

Page 70: ...rn uses Ivory white thread on needle bar No 1 and the second pattern uses Ivory white on needle bar No 3 reserve Ivory white for needle bar No 1 So you do not need to unthread needle bar No 1 Press th...

Page 71: ...ead detector sensitivity You can adjust the sensitivity of the thread detector by setting stitch count to judge thread breakage Press the circle key next to or to adjust the sensitivity q Circle key T...

Page 72: ...n t Dutch y Japanese u German i Russian o Swedish 0 Portuguese 1 Finnish Press the arrow key to move the cursor red arrow to the language you wish to select 2 Arrow keys Press the OK key to confirm yo...

Page 73: ...circle key next to the save file icon in the Ready to Sew mode q Circle key save file x Press the circle key next to the icon of the memory location to where you wish to save the file w Circle keys me...

Page 74: ...g folder press the circle key next to Rename w Circle key rename x The keyboard window will open Enter the desired name and press the OK key Up to 8 characters can be entered e OK key NOTE To delete a...

Page 75: ...ode q Open file key x Press the circle key next to the icon of the memory location from where you wish to open the file w Circle keys memory location NOTE If the memory devices are not connected to th...

Page 76: ...ress the circle key next to the return icon and the screen will return to the folder list window without deleting the folder e Circle key return c The selected folder will be deleted and screen will r...

Page 77: ...PC Design card Press the card ejector button and the card will pop out Take the card out from the RCS unit r PC Design card NOTE When turning the power on with the PC Design card inserted it will tak...

Page 78: ...RCS unit To remove the USB memory pull it straight away from the RCS unit q USB memory w USB port NOTE When turning the power on with the PC Design card inserted it will take a few moments to start u...

Page 79: ...USB port on the CD ROM drive Insert the USB connector into the USB port on the RCS unit The CD ROM drive does not need external power source since it is supplied from the RCS unit via the USB cable w...

Page 80: ...of the hook with the lint brush q Hook cover w Lint brush Cleaning the Bobbin Case Remove the bobbin from the bobbin case Clean the inside of the bobbin case with the lint brush Insert a corner of a p...

Page 81: ...nt brush t Auto thread cutter mechanism c Replace the needle plate and attach it with the 2 setscrews Tighten the setscrew slightly v Lower the needle bar by pushing it down with the small screwdriver...

Page 82: ...ply a few drops of oil to the needle bar throgh the holes in the front cover q Holes in the front cover w Oiler Open the hook cover and remove the bobbin case Clean the inside of the hook with the lin...

Page 83: ...machine After 15 seconds the LCD screen will show the Ready to Sew mode display Remove jamming threads or other cause of overloading Press the MODE key to return to the Ready to Sew mode and re threa...

Page 84: ...ense 7 The needle thread is not threaded properly 1 The needle is not inserted properly 2 The needle is bent or blunt 3 The needle thread is not threaded properly 4 The fabric is not stretched tight e...

Page 85: ...y position is out of alignment 2 The control system does not work correctly 1 The PC card or USB memory is not inserted properly 2 The memory bank of teh PC card or USB memory is damaged 1 The USB cab...

Page 86: ...770 805 001 E Printed in Japan...

Page 87: ...770 805 001 E Printed in Japan...

Reviews: