


Page 8
2.3 Plumbing Diagrams
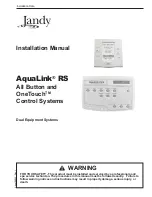
2.3.1 Basic Plumbing
Refer to Figure 1 when plumbing two separate
sets of equipment. The basic setup consists of one
pump, filter and heater for the pool and another set
for the spa.
Figure 1. Basic Plumbing for Dual Equipment
2.3.2 Plumbing - Sharing One heater
When the system setup is using only one heater,
plumb the equipment as shown in Figure 2.
Please note that for this type of plumbing a new
bezel decal must be applied over the existing decal
in order to identify the correct labeling for the
HEATER and VALVE buttons.
Figure 2. Dual Equipment System with One heater
Spa Heater
Pool Heater
Spa
Pump
Pool
Pump
Pool Intake
Spa Intake
Spa Return
Pool Return
Pool Filter
Spa Filter
Check
Valve
(optional)
Check
Valve
(Optional)
NOTE
When connecting to the AquaLink RS, plug
the JVAs into the Intake, Return and Cleaner
JVA sockets. Slide DIP Switch S1-6 to the
ON position. See wiring diagram in Section 4,
Figure 5.
Shared Heater
Check
Valves
(4)
Spa
Intake
Spa Filter
Spa
Return
Spa
Pump
Pool
Intake
Pool
Pump
Pool Filter
Pool Return
JVA
JVA
JVA
To Solar
(if installed)
From Solar
(if installed)
S1
S2
6 5 4 3 2 1 10 9 8 7 6 5 4 3 2 1
4 3 2 1 4 3 2 1
RESET
SERVICE
TIME OUT
FIL
TER PU
MP
AU
X 1
AU
X 2
AU
X 3
AU
X 4
AU
X 5
AU
X 6
SPA PUMP
AUTO
POOL HEATER SPA HEATER
SOLAR
RESET
SERVICE
TIME OUT
FIL
TER PU
MP
AU
X 1
AU
X 2
AU
X 3
AU
X 4
AU
X 5
AU
X 6
SPA PUMP
AUTO
HEATER
VALVE
SOLAR
Dual Equipment with
Shared Heater Bezel decal
Summary of Contents for AquaLink RS6
Page 2: ......
Page 15: ...Page 15 NOTES...