


Installation Instructions
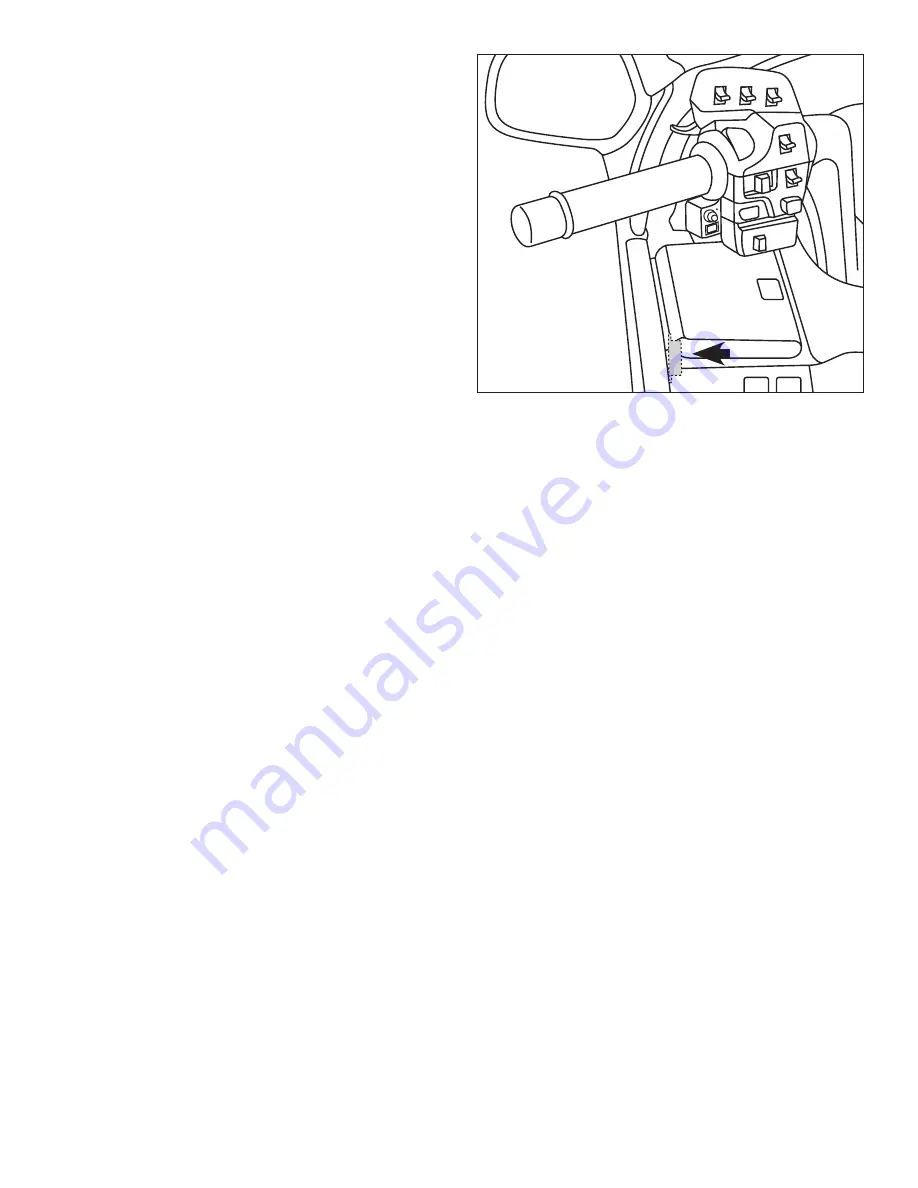
Diagram A
(a)
(b)
(c)
Installing the Integration Terminal
►
Diagram A
1. Remove:
left fairing pocket (a)
ignition switch cover (b)
wiring cover plate under left handlebar (c)
2. Clean the surface inside the left fairing pocket mounting area
with denatured alcohol.
3. Remove the backing from the double-sided mounting tape and
mount the CFBR-GL1800 on to the inner surface of the outer fair-
ing shell directly beside the fairing pocket location, making sure
that the fairing pocket can be reinstalled properly.
Diagram A.
Note:
The CFBR-GL1800 should be mounted as far rearward as
possible with the connection cables exiting forward toward the
front of the fairing.
Mounting the Multifunction/volume switch
assembly.
►
Diagram A
1. Mount the multifunction/volume switch assembly by install-
ing the bracket/clamp assembly around the exposed handlebar,
between the left-side handlebar grip and switch housing.
2. Route the wire alongside the stock wiring down the handlebar,
under the ignition switch cover and into the left fairing pocket area
of the fairing.
3. Make connections as shown in
Diagram B.
Note:
Disconnect
the factory Driver’s headset lead and plug the corresponding con-
nectors from the CBFR-GL1800 in-line between the factory (RED)
6-pin plugs.
Operation Instructions
Pairing the CFBR-GL1800 to Bluetooth Enabled
Devices.
1. To Pair To a Cell/Smart Phone.
a. Turn on the CFBR-GL1800 by switching the ignition switch to the
ACC or ON position. The LED on the multifunction switch assem-
bly will flash slow blue.
b. Press and hold down on the multifunction button for approxi-
mately 10 seconds. When the LED goes off, release the button.
c. Press and hold down on the multifunction button again continu-
ously for about 35 seconds, cycling thru the slow flashing blue,
to rapid flashing blue, to flashing red & back to rapid blue flash-
ing, at which point the CBFR-GL1800 is in pairing mode.
d. In the phone menu select Bluetooth and “search for devices”.
e. Once the JM_CORP_CFBR01 shows up on the phone’s display
select it and when asked for a PIN code type in “0000”.
f. The cell phone should now pair to the CFBR-GL1800 and the
blue LED should flash slowly.
2. To pair to a Bluetooth Enabled GPS.
a. Turn on the CFBR-GL1800 by switching the ignition switch to
the ACC or ON position. The LED on the multifunction button
assembly will flash slow blue.
b. Press and hold down on the multifunction button for approxi-
mately 10 seconds. When the LED goes off, release the button.
c. Press and hold down on the multifunction button again continu-
ously for about 35 seconds, cycling thru the slow flashing blue,
to rapid flashing blue, to flashing red & back to rapid blue flash-
ing, at which point the CBFR-GL1800 is in pairing mode.
d. Turn on the Bluetooth enabled GPS and select Bluetooth head-
set in the menu. Then select “search for devices”.
e. Once the JM_CORP_CFBR01 shows up on the GPS display select
it and when asked for a PIN code type in “0000”
f. The GPS should now pair to the CFBR-GL1800 and the blue LED
should flash slowly.
Note:
The CFBR-GL1800 does not require re-pairing each time the
motorcycle is turned off. After initial pairing, the Cell Phone or GPS
unit should automatically reconnect with the CFBR-GL1800 each
time the ignition switch is turned on.
Operation of the CFBR-GL1800 with a cell phone.
1. After successfully pairing your cell phone with the J&M CFBR-
GL1800, make a phone call. During the phone call adjust the vol-
ume control on the cell phone to maximum. Make further volume
adjustments using the handlebar mounted volume control.
2. When receiving an incoming call the “incoming call indicator-
sound” will override all other audio in the drivers headset and will
be heard in the helmet speakers. If the phone is set to Auto Answer
the incoming call will automatically be connected. If the phone is
not set to Auto Answer the call can be answered by briefly depress-
ing the multifunction button one time. To reject the call depress the
multifunction button twice or simply ignore the ring tone.
3. To end the call depress the Multifunction Button briefly or wait
for the caller to hang up and the drivers headset will automatically
return to the GL-1800 audio system.
4. To redial the last number called, press the Multifunction Button
5. To “Voice Command” dial the cell phone, briefly press the
Multifunction Button once. The cell phone must support this fea-
ture in order to use “Voice Command” dialing.


