background image

XM60 User Manual 


4-1 

Janam Technologies LLC


Set up your Janam XM60 


Locate front panel controls 


Power button (on top of device).

 Pressing the power button turns the handheld 

computer on (if it is off) and returns to the last screen that was displayed. Press the 

power button to turn the handheld computer off. 


Use the 

backlight

 to illuminate the screen in low-light conditions. Hold down the 

power button for about two seconds to turn the backlight on and off.  


Janam XM60

 screen.

 Displays the applications and data stored in your handheld 

computer. It is touch-sensitive and responds to the stylus. 


Locate back panel components 


Stylus channel.

 Holds the stylus. To use the stylus, remove it from the channel and 

hold it as you would a pen or pencil. 


IR port. 

Uses infrared technology to transmit and receive data to and from other 

handheld computers, and to perform ActiveSync operations.  


Reset button (located under battery cover).

 Under normal use, you should not 

have to use the reset button.   


USB/serial connector.

 Connects your handheld computer to a PC via a USB or 

serial cable or by inserting XM60 into a Janam cradle.  

 
Tap versus click  


Tapping is the basic action used to execute tasks, so use the stylus to tap elements on your handheld 
computer’s touch-sensitive screen. You can drag the stylus to select text, or use the stylus to drag the 

slider of any scroll bar. 


IMPORTANT:

 Always use the point of the stylus for tapping or making strokes on the handheld computer 

screen. Do not use a pen, pencil or any other sharp object to write on the screen. 


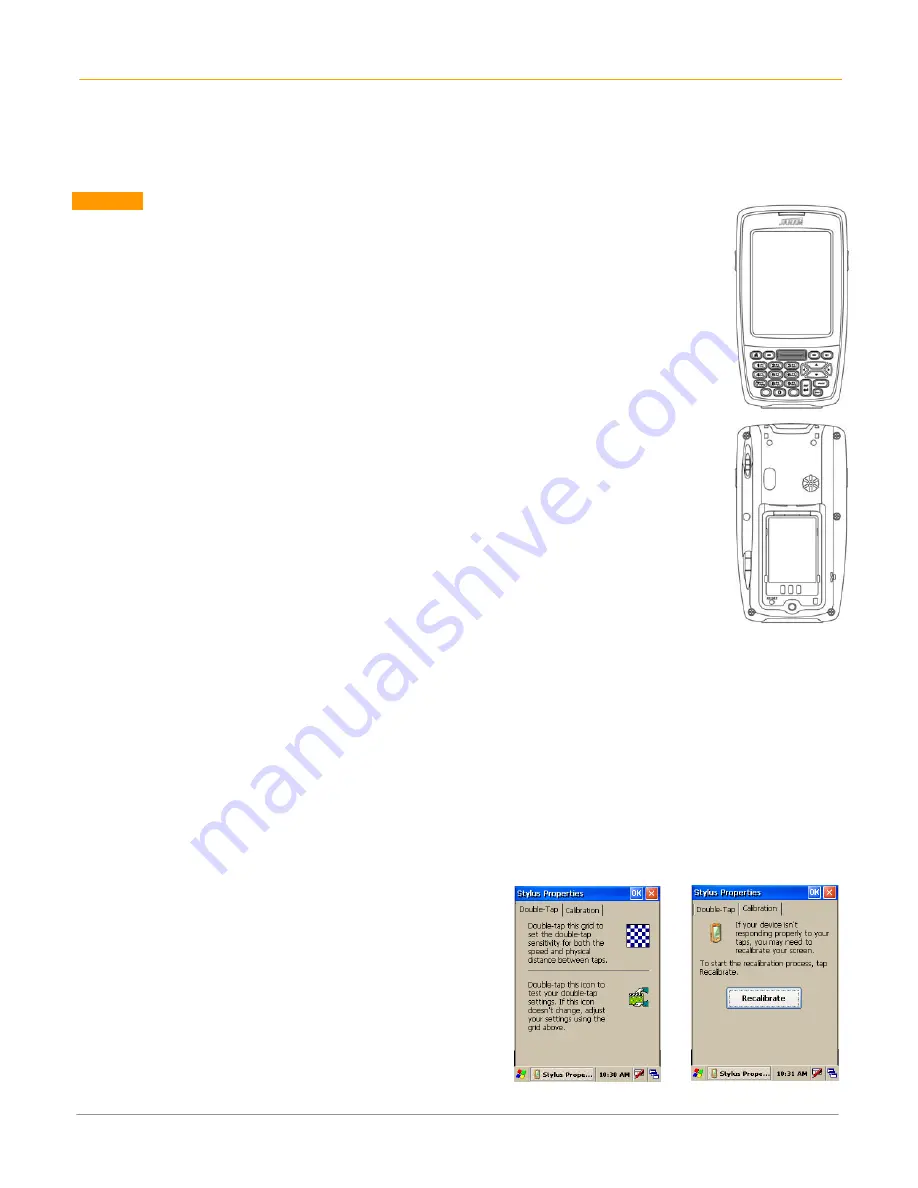
Recalibrate the screen    

 
The first time you start the Janam XM60 handheld computer, setup instructions appear onscreen. These 

instructions include a calibration screen, or digitizer. Calibration aligns the internal circuitry of the 

handheld computer with its touch-sensitive screen so your handheld computer can detect the task you 

want to perform when you tap an element on the screen. You can also recalibrate your screen at any time.  
 

To recalibrate your screen: 

1.


Tap the 

MS Windows icon > settings > control 

panel > stylus

.  

2.


Select 

double tap menu,

 and follow the 

instructions.   

3.


Tap 

calibration


menu

, and follow the 

on-screen 

instructions

, tapping the screen where indicated. 


Summary of Contents for XM60

Page 1: ...Version 2 April 2008 XM60 User Guide...

Page 2: ...XM60 User Manual ii Janam Technologies LLC...

Page 3: ...tration and setup 3 1 Enable the ScanWedge feature 3 2 Unlock 2D scanning 3 2 Enable ScanCapture feature 3 3 Chapter 4 Set Up Your Janam XM60 Locate front panel controls 4 1 Locate back panel componen...

Page 4: ...Scan Device Wizard 8 2 Bond Wizard 8 2 Send files 8 3 File browser 8 4 Bluetooth ActiveSync 8 4 Settings 8 6 Chapter 9 Beam Information Turn beam on off 9 1 Beam information 9 2 Chapter 10 Regulatory...

Page 5: ...s value the XM60 features integrated 1D barcode scanning as well as built in 2D barcode scanning capability Janam s 2D scanning solution enables users to upgrade barcode scanning capability from 1D to...

Page 6: ...g Technology 752 x 480 pixel CMOS area imager 1D Symbologies China Post Codabar Codablock F Code 11 Code 16K Code 32 Pharmaceutical PARAF Code 39 Code 49 Code 93 and 93i Code 128 EAN 8 EAN 13 Interlea...

Page 7: ...erview Power On Off Indicator LED LCD Scan Trigger Shift Alpha Numeric shift Function Backspace Space Programmable Enter Left Trigger Home Navigation Right Trigger Connector Syncing Charging Connector...

Page 8: ...XM60 User Manual 1 4 Janam Technologies LLC Hand Strap Connector Speaker Stylus IrDA Window Stylus Slot Battery Door Microphone Battery Screw Battery Compartment Reset Button...

Page 9: ...y details and instructions for developing applications that access Janam XM Series libraries including scanning imaging and hardware utilities The development kit is designed for use with Microsoft eM...

Page 10: ...indicates charging green indicates fully charged and red indicates fault 5 The battery is fully charged in approximately two hours To charge the battery using the single slot or four slot cradle 1 Con...

Page 11: ...run the boot uploader procedure 1 Insert battery 2 While the device is booting press and hold the right trigger button an older boot loader may require using the left trigger button instead until USB...

Page 12: ...data will be DELETED so make sure you are properly backed up before starting this process To check your current ROM version 1 Tap the MS Windows icon or start menu go to settings and select control pa...

Page 13: ...ur desktop You will need this file for the next section To install the latest ROM 1 Remove battery door from unit 2 Place fully charged battery in device Unit will power up 3 While device is booting P...

Page 14: ...nated and the device needs a reboot Windows is not recognizing the device Disconnect the sync cable from the device and perform a soft reset With the cable already plugged into the host computer recon...

Page 15: ...e reset has occurred and the calibration screen appears on the screen release the arrow up key IMPORTANT NOTE about battery door XM60 mobile computers feature a battery door removal detection switch T...

Page 16: ...ams XM60 Applications ScanDemo 2 Three menus will appear setup OCR options on the top of the screen 3 In the setup menu select hardware test to review all the functions of the scanner and determine if...

Page 17: ...ologies you need 4 Tap OK Note The ScanWedge function will be disabled if manual scanning is initiated either by a command API or by using the Janam Barcode Test program Unlock 2D scanning All of Jana...

Page 18: ...lock A successful unlock notification will appear 5 Press X to close the screen Note Remember to keep a record of your five digit key code The unlock code will be maintained in the unit s system after...

Page 19: ...lick cont or continue button 2 Click button again to stop preview To use intelligent capture You can use intelligent capture to scan a signature or address that is located some distance away from a ba...

Page 20: ...and aim at any support barcode If you need to capture a 2D barcode be sure to unlock your 2D feature Note the image is always the same position from the barcode 4 Select save 5 Enter image name and sa...

Page 21: ...XM60 User Manual 3 6 Janam Technologies LLC...

Page 22: ...Connects your handheld computer to a PC via a USB or serial cable or by inserting XM60 into a Janam cradle Tap versus click Tapping is the basic action used to execute tasks so use the stylus to tap e...

Page 23: ...gs control panel 2 Tap the regional settings icon you may need to scroll down to find the icon 3 Change your locale using the dropdown menu and tap OK See customize section format date time and number...

Page 24: ...ing a barcode Customize To change owner properties on your handheld computer 1 Tap MS Windows icon in the lower left corner of command bar 2 Go to settings control panel 3 Locate the owner icon and ta...

Page 25: ...ecting a country and time date and number formats keep the following in mind When you select a country the time date and number formats are adjusted as well as the week s starting day The time setting...

Page 26: ...dropdown menu or tap browse to change the background on your device 4 Tap OK To change the appearance 1 Tap on the appearance tab 2 Change scheme using the dropdown menu 3 Make changes to any item in...

Page 27: ...et options To change key size on soft keyboard 1 Tap MS Windows icon in the command bar settings control panel 2 Double tap internet options icon 3 There are six different tabs in the internet options...

Page 28: ...XM60 User Manual 4 7 Janam Technologies LLC 4 After you finish making your selections in each screen click OK to save settings Connection Security Privacy Advanced Popups...

Page 29: ...XM60 User Manual 4 8 Janam Technologies LLC...

Page 30: ...h the onscreen keyboard You can open the onscreen keyboard when you need to enter text or numbers To access the onscreen keyboard 1 From the desktop or any open application tap on the keyboard icon in...

Page 31: ...ric International Import data If you have data stored in computer applications such as spreadsheets and databases or if you want to import data from another device you can transfer the data to your Ja...

Page 32: ...user name If you didn t set up a user profile in chapter 4 follow the instructions below To create a user profile 1 Tap MS Windows icon settings control panel 2 Choose owner 3 Enter identification not...

Page 33: ...n appears shown below with further information Read carefully before proceeding because your files may be converted 7 Click the settings button in the select synchronization settings screen 6 above an...

Page 34: ...am XM60 to your PC or you will need to connect as a guest To set up a guest partnership 1 Connect your Janam XM60 to your PC 2 On your PC select start programs ActiveSync 3 Click no next 4 You will be...

Page 35: ...LLC Partnership settings To change partnership connection settings 1 Click the ActiveSync icon in your Windows system tray bottom right corner of taskbar 2 Choose file connection settings from the Ac...

Page 36: ...The following section details the basic 802 11 wireless configuration for your Janam XM60 Wireless local area network access To add or edit a WLAN 1 Tap the MS Windows icon in the command bar settings...

Page 37: ...XM60 User Manual 7 2 Janam Technologies LLC 4 Tap twice on add new 5 Enter ESSID authentication and encryption 6 After wireless is configured double tap the network icon to edit or add another WLAN...

Page 38: ...nam XM60 Please note that complex or custom installations may require additional expertise from Janam s technical and support team Start Bluetooth manager To start Bluetooth manager 1 Tap MS Windows i...

Page 39: ...to start the wizard 2 Tap next 3 Wait until searching is finished 4 Choose the device you want to add next 5 Tap finish Bond Wizard To use Bond Wizard 1 Tap the Bond Wizard icon 2 Press next 3 Press...

Page 40: ...on To send files 1 In the Bluetooth Device Manager choose send from the file menu 2 Tap search to start searching the device 3 When you see your target device select it 4 Choose the file you want to s...

Page 41: ...device you want to connect to 2 Input PIN number 3 If connection is successful you can view the remote and local files Bluetooth ActiveSync To setup your PC to accept Bluetooth ActiveSync 1 Go to MS W...

Page 42: ...ynching with another device 7 Tap OK and ActiveSync should start To set up Bluetooth LAN service 1 Go to file Bluetooth LAN access 2 Press search to search for your target connect device 3 Make sure y...

Page 43: ...o 4 A success message appears if your target device accepted the Bluetooth connection To check what service the scanned BT device supports 1 Choose the target device in the Bluetooth device manager 2...

Page 44: ...XM60 User Manual 8 7 Janam Technologies LLC To check Bluetooth chip setting 1 Go to tools about 2 The next screen will show the chip setting...

Page 45: ...XM60 User Manual 8 8 Janam Technologies LLC...

Page 46: ...n beam any file or application between Janam connected handheld devices Beaming distance to other connected devices may be different Turn beaming on off To turn beaming on or off 1 Go to MS Windows ic...

Page 47: ...indows icon in the command bar 2 Select Windows Explorer 3 Highlight or select the file you want to send 4 From the top menu select file send to beam files 5 Aim the sending device IRDA window at the...

Page 48: ...equipment XM Series batch terminal Regulatory and safety approvals Parameter Specification U S A FCC Part 15 Subpart B Canada ICES 003 Issue 4 European Community Australia EN55022 1998 A1 2000 A2 200...

Page 49: ...e user should consult the dealer or an experienced radio television technician for additional suggestions The user may find the following booklet helpful Something about Interference This is available...

Page 50: ...dical devices that meet the IEC specification Microwaves The radio in the XP Series terminal operates on the same frequency band as a microwave oven Therefore if you use a microwave within range of th...

Page 51: ...gh an authorized dealer Visit Janam s website www janam com for information The socket outlet shall be installed near the equipment and shall be easily accessible GENERAL INFORMATION 1 Before using th...

Reviews: