background image

DE

  -  Empfohlenes Werkzeug 

         (nicht enthalten) 

GB

  -  Recommended tool 


  (not included) 

FR 

 -  Outils recommandés 


  (non inclus))

IT 

  -  Attrezzo consigliato 


  (non incluso)

ES

  -  Herramienta recomendada 


  (no incluida) 

CZ 

 -  Doporučený nástroj 


   (není součástí dodávky)

PL

  -  Zalecane narzędzia


  (nie zawarte w zestawie)

DE

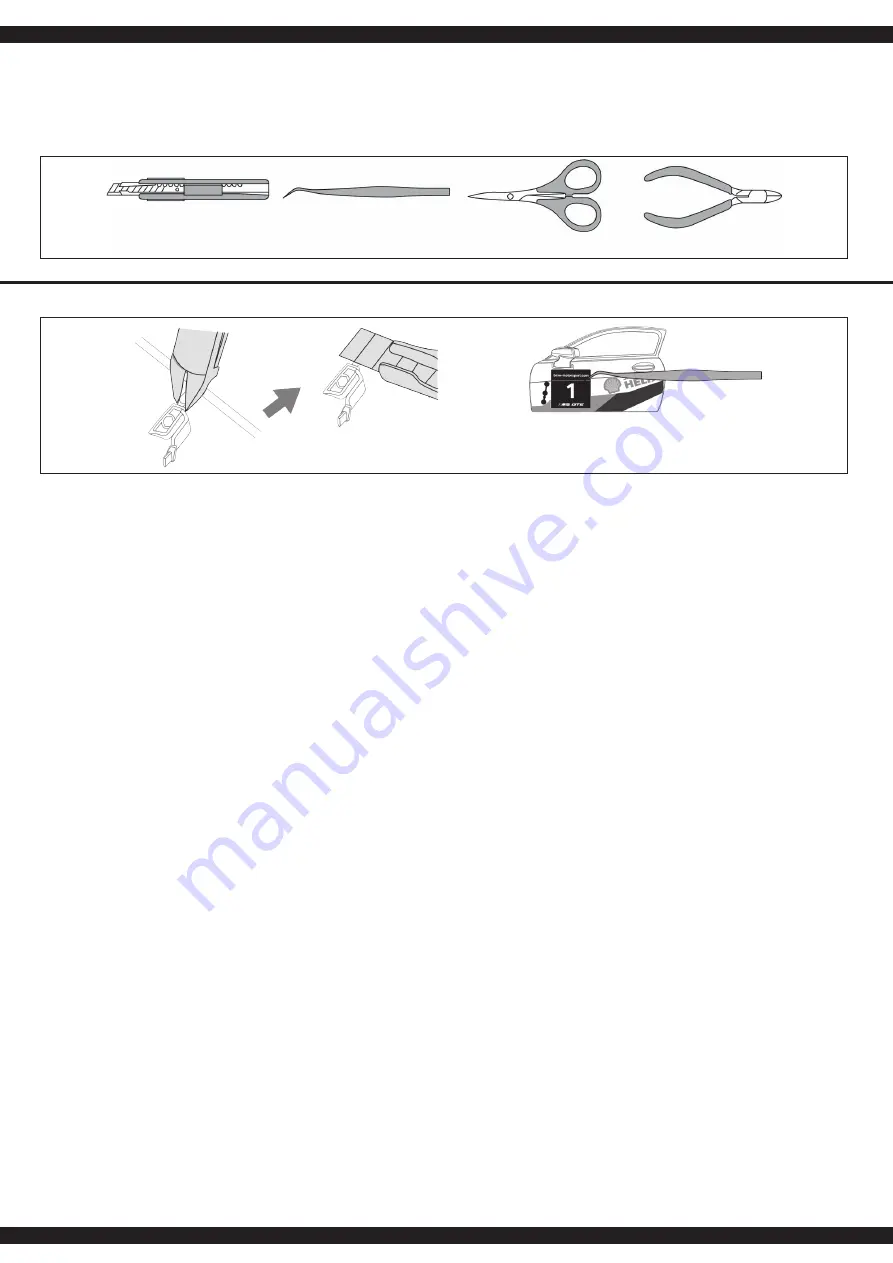
 - Montage der Bauteile

-   Verwenden Sie einen Seitenschneider, um die Komponenten vom 

  Rahmen zu lösen, und ein Hobbymesser um die Schnittstellen zu 

 glätten.

-   Ziehen Sie die Aufkleber mit einer Pinzette ab und drücken Sie diese 

  flach auf das Bauteil.

Warnung: 

Werkzeuge (Messer, Pinzette, Seitenschneider, Schere) 


dürfen nur von Erwachsenen benutzt werden. Bitte seien Sie 


vorsichtig um Verletzungen zu vermeiden!

GB

 - Assembly of components

-   Use side cutters to clip the component off, and the use knife to trim the 

  interface part to smooth.

-   Peel of the sticker with tweezers and flatten it on the component

.

Warning: 

Tools (knife, tweezers, flat-nose pliers, scissors) must be used 


by adult, please be careful to avoid personal injury!

FR 

- Assemblage des composants

-  Utiliser un cutter latéral pour couper les composants du cadre, et un 

  couteau de bricolage pour lisser les interfaces.

-   Retirez les autocollants à l‘aide d‘une pincette et appuyez-les à plat sur 

  la pièce.

Avertissement: 

Les outils (couteau, pincettes, coupe-côtes, ciseaux) 


ne doivent être utilisés que par des adultes. Faites 


attention à ne pas vous blesser !

IT

 - Montaggio dei componenti

-   Utilizzare un taglierino per tagliare i componenti dal supporto, e un

    coltellino da hobby per levigare le superfici.

-   Togliere gli adesivi con la pinzetta e posarli per mezzo di una pressione 

    sul pezzo corrispondente.

Attenzione: 

Gli attrezzi (coltello, pinzetta, taglierino, forbici) devono essere 


utilizzati solo da adulti. Si prega di fare attenzione per evitare 


tagli o lesioni!

ES

 - Montaje de los componentes

-   Use un cortador lateral para cortar los componentes del marco y un

    cuchillo de hobby para suavizar las interfaces.

-   Quita las pegatinas con pinzas y presiónalas sobre la pieza.

Advertencia: 

Las herramientas (cuchillo, pinzas, cortadores laterales, 


  tijeras) sólo deben ser utilizadas por adultos. Por favor, tenga 


  cuidado para evitar lesiones!

CZ

 - Sestavení jednotlivých dílů

-   Pomocí kleští na boční díly ustříhněte díl a pomocí nože jej zahlaďte. 

-   Pomocí pinzety odlepte nálepku a přilepte ji na díl. 

Varování: 

Abyste se vyhnuly zranění nástroje (nůž, pinzeta, ploché 


kleště, nůžky) musí být použity pouze dospělou osobou! 

PL

 - Montaż komponentów

-   Użyj nożyc bocznych do odcięcia elementów od ramy oraz noża

  hobbystycznego lub do tapet do wygładzania połączeń.

-   Użyj pincety do odklejania etykiet i dociskaj je płasko do elementu.

Ostrzeżenie:  

Narzędzia (nóż, pinceta, nożyce boczne, nożyczki) mogą 


   być używane tylko przez osoby dorosłe. Proszę uważać, aby 


   uniknąć obrażeń!

Knife

Tweezers

Scissors

Side cutters

6

Summary of Contents for BMW M8 GTE

Page 1: ...Betreiben Sie das Modell nicht bei Regen Schnee N sse oder Sand Nicht auf befahrenen Stra en und Pl tzen fahren Fahren Sie nie au erhalb der Reichweite Ihrer Fernsteuerung Nicht direkter Sonnenbestra...

Page 2: ...tant to the environment and to your health If the batteries are marked with a chemical symbol Hg Cd or Pb below the crossed out waste bin on wheels it refers to that more than 0 0005 of mercury Hg mor...

Page 3: ...tiva 2014 53 UE 2011 65 UE e 2009 48 CE Il testo integrale della dichiarazione di conformit UE disponibile al seguente indirizzo Internet www jamara shop com Conformity Attenzione Dopo ogni utilizzo a...

Page 4: ...bles s lo pueden cargarse bajo la supervisi n de un adulto Los conectores de conexi n no deben estar en cortocircuito Notas sobre el reciclado Bater as Acumuladores Bater as y acumuladores no deben de...

Page 5: ...kty s zgodne z dyrektywami 2014 53 UE 2011 65 UE i 2009 48 WE Pe ny tekst deklaracji zgodno ci UE jest dost pny pod nast puj cym adresem internetowym www jamara shop com Conformity Uwaga Po ka dym u y...

Page 6: ...aux ne doivent tre utilis s que par des adultes Faites attention ne pas vous blesser IT Montaggio dei componenti Utilizzare un taglierino per tagliare i componenti dal supporto e un coltellino da hobb...

Page 7: ...2 1 4 6 5 5 1 3 7...

Page 8: ...8 7 10 12 14 13 11 8 9 8...

Page 9: ...16 18 20 21 19 17 15 9...

Page 10: ...Chassis wie in der Abbildung gezeigt berpr fen Sie ob die T ren nach dem Zusammenbau ge ffnet und geschlossen werden k nnen 13 Stecken Sie 2 Pins 49 links und rechts in die Unterseite des Modells Ste...

Page 11: ...the gap between part 1 and the chassis Please check if the door can be open and close freely after assembly 13 Install 2 pieces of 49 respectively on the left and right sides of part 1 Install 4 piece...

Page 12: ...r la figure 12 Ins rez l os sup rieur de A8 et A9 dans l espace entre la pi ce 1 et le ch ssis V rifiez si la porte peut tre ouverte et ferm e librement apr s le montage 13 Installez 2 pi ces de 49 re...

Page 13: ...e 1 e il telaio come mostrato nella immagine Controllare che le porte possano essere aperte e chiuse dopo il montaggio 13 Inserire 2 perni 49 a sinistra e a destra nella parte inferiore del modello Qu...

Page 14: ...l chasis como se muestra en la imagen Compruebe que las puertas pueden abrirse y cerrarse despu s del montaje 13 Inserte 2 pernos 49 a la izquierda y a la derecha en la parte inferior del modelo Luego...

Page 15: ...rn skeleton A8 a A9 do mezery mezi st 1 a asi Zkontrolujte zda jdou dve e po sestaven voln otev rat a zav rat 13 Instalujte 2 kusy ze 49 postupn na levou a na pravou stranu sti 1 Instalujte 4 kusy z 5...

Page 16: ...nta u mo na swobodnie otworzy i zamkn drzwi 13 Zamontuj 2 sztuki po 49 odpowiednio po lewej i prawej stronie cz ci 1 Zamontuj 4 sztuki po 50 odpowiednio na 4 rogach cz ci 1 jak pokazano na rysunku 14...

Page 17: ...17 Aufkleber Sticker Autocollants Sticker Pegatinas N lepka Samolepky...

Page 18: ...18 Notizen Notes Remarques Appunti Notas Pozn mky Notatki...

Page 19: ...c and Slovakia Veleslav nsk 30 19 CZ 162 00 Praha 6 Tel 420 235 364 664 Mobil 420 739 075 380 Mail servis topdrony cz Web www topdrony cz Bay Tec Martin Schaaf Am Bahndamm 6 86650 Wemding Tel 07151 50...

Page 20: ...5 65 94 12 777 kundenservice jamara com Manufacturer RASTAR GROUP www rastar com Irrtum und technische nderungen vorbehalten 2 Copyright JAMARA e K 2021 Kopie und Nachdruck auch auszugsweise nur mit G...

Reviews: