5
1
2
DE
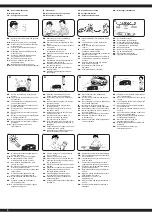
- Achtung!
Lassen Sie dem Modell nach jedem Einsatz genügend Zeit um abzukühlen bevor
Sie es wieder in Betrieb nehmen. Beim Austausch der Batterien muss eine Abkühl-
phase von mindestens 10 Minuten eingehalten werden bis das Modell wieder be-
trieben wird. Bei Überhitzung kann Beschädigung der Elektronik oder Brandgefahr
die Folge sein.
GB
- Attention!
Let the model cool off sufficiently after each use before putting it back into operation. Let the model
cool off sufficiently after each use before putting it back into operation. When changing batteries
there has to be a cooling phase of at least 10 min before model can be operated again. Overheating
can damage the electronics or may result in fire.
FR
- Attention !
Après chaque utilisation il faut attendre un peu que l‘unité se refroidisse et soit prête pour une
nouvelle utilisation. Après un changement de piles et avant de remettre en marche l‘unité, il faut
préserver au moins un cycle de refroidissement d‘au moins 10 minutes. Une surchauffe peut causer
l‘endommagement des éléments électroniques ou un risque d‘incendie.
IT
- Attenzione!
Dopo ogni utilizzo, attendere un istante. In questo periodo, il modello si raffredderà e sarà pronto per
essere nuovamente usato. Dopo la sostituzione della batteria e prima di avviare
nuovamente il modello, eseguire almeno un ciclo di raffreddamento della durata di almeno 10 minuti.
Il surriscaldamento può causare il danneggiamento dei dispositivi elettronici o il rischio di incendio.
ES
- ¡Atención!
Deje que el modelo después de cada uso el tiempo suficiente para enfriarse antes de volver a
ponerlo en funcionamiento. Al sustituir las baterías debe ser respetada un período de enfriamiento
de al menos 10 minutos hasta que se hace funcionar de nuevo el modelo. El sobrecalentamiento
puede dañar la electrónica o peligro de incendio puden ser la consecuencia.
CZ
- Upozornění!
Po každém použití chvíli počkejte. Během této doby se model ochladí a bude připraven k dalšímu
použití. Po výměně baterie a před opětovným spuštěním modelu, zachovejte nejméně jeden chla
-
dicí cyklus trvající min. 10 minut. Přehřátí může způsobit poškození elektroniky nebo nebezpečí
požáru.
PL
- Uwaga!
Po każdym użyciu należy zaczekać aż model ostygnie zanim ponownie rozpocznie się zabawę.
Jeśli pojazd jest rozgrzany, należy w przypadku wymiany baterii odczekać minimum 10 minut, za
-
nim ponownie rozpocznie się zabawę. Przegrzanie może uszkodzić elementy elektroniczne lub
spowodować pożar.
NL
- Attentie!
Laat het model na elk gebruik voldoende afkoelen voordat u het weer in gebruik neemt. Bij het
vervangen van batterijen moet er een afkoelfase van minstens 10 minuten zijn voordat het model
opnieuw kan worden gebruikt. Oververhitting kan de elektronica beschadigen of brand veroorzaken.
SK
- Upozornenie!
Po každom použití je potrebné chvíľu počkať. Počas tejto doby sa model ochladí a bude pripravený
na ďalšie použitie. Po výmene batérie a pred opätovným uvedením modelu do prevádzky, je potreb
-
né zachovať priebeh aspoň jedného chladiaceho cyklu, trvajúceho min. 10 minút. Prehriatie môže
spôsobiť poškodenie elektroniky.
HU
- Figyelem!
Minden használata után egy kis időt várjon. Ez időn belül a modell lehűl és a következő használatra
kész lesz. Akkumulátorcsere után és a modell ismételt beüzemelése előtt legalább egy hűtési ciklust
kell tartani, amely 10 percig tart. A túlmelegedés az elektronika meghibásodását és tűzveszélyt
okozhat.
DE
- Bindevorgang:
Nach dem Einlegen der Batterien in den Sender blinkt die LED
am Sender und der Sender ist bereit zum Binden. Schalten Sie
nun das Modell ein. Wenn am Sender die LED nicht mehr leuch-
tet ist das Fahrzeug mit dem Sender gebunden. Der Sender
besitzt keinen Ein/Aus-Schalter und schaltet sich nach ca. 60
Sekunden Inaktivität automatisch ab. Durch drücken einer belie-
bigen Sendertaste wird er wieder aktiviert. Das Fahrzeug besitzt
einen Ein/Aus-Schalter und muss nach dem Gebrauch ausge-
schaltet werden um ein entladen der Batterien zu verhindern!
GB
- Binding procedure:
After inserting the batteries into the transmitter, the LED on the
transmitter will flash and the transmitter is ready to bind. Now
switch on the model. When the LED on the transmitter is no lon-
ger lit, the vehicle is bound to the transmitter. The transmitter
does not have an on/off switch and will automatically turn off
after approximately 60 seconds of inactivity. Pressing any trans-
mitter button will reactivate it. The vehicle has an on/off switch
and must be switched off after use to prevent the batteries from
discharging!
FR
- Procédure de fixation:
Après avoir inséré les piles dans l‘émetteur, la LED de l‘émetteur
clignote et l‘émetteur est prêt à être relié. Allumez maintenant le
modèle. Lorsque la LED de l‘émetteur n‘est plus allumée, le véhi-
cule est lié à l‘émetteur. L‘émetteur ne dispose pas d‘un interrup-
teur marche/arrêt et s‘éteint automatiquement après environ 60
secondes d‘inactivité. Une pression sur n‘importe quel bouton de
l‘émetteur le réactivera. Le véhicule est équipé d‘un interrupteur
marche/arrêt et doit être éteint après utilisation pour éviter que
les batteries ne se déchargent!
IT
- Procedura di binding:
Dopo aver inserito le batterie nella trasmittente, il LED sulla tras-
mittente lampeggia e la trasmittente è pronta per il collegamento.
Ora accendete il modello. Quando il LED sulla trasmittente non è
più acceso, il veicolo è collegato con la trasmittente. La trasmit-
tente non ha un interruttore on/off e si spegne automaticamente
dopo circa 60 secondi di inattività. Si riattiva premendo qualsi-
asi pulsante della trasmittente. Il veicolo ha un interruttore on/
off e deve essere spento dopo l‘uso per evitare che le batterie
si scarichino!
ES
- Procedimiento de binding:
Después de insertar las baterías en el transmisor, el LED del
transmisor parpadeará y el transmisor estará listo para la cone
-
xión. Ahora enciende el modelo. Cuando el LED del transmisor
deja de estar encendido, el vehículo está conectado al trans
-
misor. El transmisor no tiene interruptor de encendido/apagado
y se apaga automáticamente tras unos 60 segundos de inac
-
tividad. Se reactiva pulsando cualquier botón del transmisor.
El vehículo tiene un interruptor de encendido/apagado y debe
desconectarse después de su uso para evitar que las baterías
se descarguen.
CZ
- Proces vázání:
Po vložení baterií do vysílače začne blikat kontrolka LED na
vysílači a vysílač je připraven k vázání. Nyní zapněte mo
-
del. Když kontrolka LED na vysílači přestane svítit, je vozidlo
s vysílačem spojeno. Vysílač není vybaven vypínačem a po
přibližně 60 sekundách nečinnosti se automaticky vypne. Zno
-
vu se aktivuje stisknutím libovolného tlačítka vysílače. Vozidlo
je vybaveno vypínačem a po použití musí být vypnuto, aby se
baterie nevybíjely!
PL
- Procedura łączenia:
Po włożeniu baterii do nadajnika dioda LED na nadajniku zacz
-
nie migać, a nadajnik będzie gotowy do wiązania. Teraz należy
włączyć model. Gdy dioda LED na nadajniku przestanie się
świecić, pojazd jest powiązany z nadajnikiem. Nadajnik nie jest
wyposażony we włącznik/wyłącznik i wyłączy się automatycznie
po około 60 sekundach bezczynności. Naciśnięcie dowolnego
przycisku nadajnika spowoduje jego ponowną aktywację. Pojazd
jest wyposażony we włącznik/wyłącznik i musi być wyłączany po
użyciu, aby zapobiec rozładowaniu akumulatorów!
NL
- Bindende procedure:
Nadat de batterijen in de zender zijn geplaatst, gaat de LED op
de zender knipperen en is de zender klaar om te worden ge-
koppeld. Schakel het model nu in. Als de led op de zender niet
meer oplicht, is het voertuig aan de zender gebonden. De zender
heeft geen aan/uit-schakelaar en schakelt na ca. 60 seconden
inactiviteit automatisch uit. Het wordt weer geactiveerd door
op een zenderknop te drukken. Het voertuig heeft een aan/uit
schakelaar en dient na gebruik uitgeschakeld te worden om te
voorkomen dat de accu‘s ontladen!
SK
- Záväzný postup:
Po vložení batérií do vysielača bliká na vysielači kontrolka
LED a vysielač je pripravený na viazanie. Teraz zapnite model.
Keď kontrolka LED na vysielači prestane svietiť, vozidlo je s
vysielačom prepojené. Vysielač nemá vypínač a po približne 60
sekundách nečinnosti sa automaticky vypne. Opätovne sa akti
-
vuje stlačením ľubovoľného tlačidla vysielača. Vozidlo je vyba
-
vené vypínačom a po použití sa musí vypnúť, aby sa zabránilo
vybitiu batérií!
HU
- Kötési folyamat:
Miután behelyezte az elemeket az adóba, az adón lévő LED vil
-
log, és az adó készen áll a kötésre. Most kapcsolja be a modellt.
Amikor az adó LED-je már nem világít, a jármű összekapcso
-
lódik az adóval. Az adó nem rendelkezik be-/kikapcsolóval, 60
másodperc inaktivitás után automatikusan kikapcsol. Bármelyik
adó gomb megnyomásával újra aktiválható. A jármű be-/kikapc
-
solóval rendelkezik, és használat után ki kell kapcsolni, hogy az
akkumulátorok ne merüljenek le!
DE
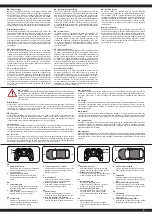
1. Vorwärts/rückwärts
Drücken Sie den Vorwärts oder Rückwärts
Knopf, wird das Modell vorwärts bzw.
rückwärts fahren.
2. Links bzw. Rechts lenken
Durch betätigen des Links bzw. Rechts
Knopfes, lenkt Ihr Modell nach links oder
rechts.
GB
1. Forward/Reverse
If you press the forward or reverse button,
the model drives forwards or backwards.
2. Turn left /right
When pressing the left /right button, your
model will steer to the left or right.
FR
1. Avant/arrière
Appuyez sur la touche avant ou arrière, le
modèle roulera en fonction de la direction
souhaité en avant ou en arrière.
2. Tourner à gauche ou à droite
En appuyant sur la touche de droite ou de
gauche, votre modèle se dirigera soit à
droite soit à gauche
IT
1. Avanti/indietro
Premere il pulsante avanti o indietro, il
modello si muove in avanti o indietro.
2. Girare a sinistra o a destra
Premendo il pulsante sinistra o destra, il
modello gira a sinistra o destra.
ES
1. Adelante/atrás
Presione el botón adelante o atrás, el
modelo se mueve hacia adelante o atrás.
2. Gire a la izquierda o la derecha
Pulsando el botón izquierdo o derecho, el
modelo gire hacia la izquierda o derecha.
CZ
1. Dopředu / Dozadu
Stiskněte tlačítko pro pohyb vpřed nebo
vzad, model přejde dopředu nebo dozadu.
2. Odbočit vlevo nebo vpravo
Stisknutím levého nebo pravého tlačítka se
model pohybuje doleva nebo doprava.
PL
1. Do przodu/do tyłu
Naciśnięcie dźwigni gazu do
przodu lub do tyłu spowoduje, że model
poruszy się do przodu lub do tyłu.
2. Skręt w prawo lub w lewo
Podczas przesunięcia dźwigni zmiany
kierunku w lewo lub w prawo, pojazd
będzie jechał odpowiednio w lewo lub w
prawo.
NL
1. Vooruit/achteruit
Zet het gashendel naar voren of naar
achteren, het model zal vooruit of achteruit
rijden.
2. Links of rechts draaien
Als u de richtingsstick naar links of rechts
duwt, rijdt het voertuig naar links of rechts.
SK
1. Vpred/vzad
Ak budete ťahať za páku dopredu alebo
plyn späť, bude model pohybovať dopredu
späť.
2. Zatočenie doľava alebo doprava
Po presunutí páčky pre smer jazdy doľava
alebo doprava model bočí v do ľavej alebo
pravej strany.
HU
1. Előre/hátra
A gázkar előre és hátra nyomásakor a
modell előre, ill.
2. Kormányzás balra vagy jobbra
Nyomja meg az iránykart balra vagy jobbra
kormányoz a modell balra vagy jobbra.


