DE
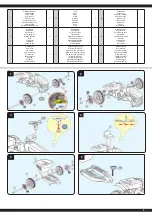
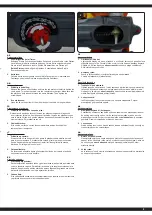
1. Montage der Vorderräder
Bringen Sie die Achskappe (19) an die Vorderachse (1), wie im Bild gezeigt, an.
Bringen Sie zuerste die Radabdeckungen (20) an den Vorderräder (2) an und
schieben Sie diese Anschließend auf die Vorderachse (1).
Zum Schluss bringen Sie eine Achssicherung (4) auf der Vorderachse an.
Schlagen Sie anschließend die Schlaghülsen (5) darauf fest.
2. Montage der Hinterräder
Bringen Sie zuerst die Radabdeckungen (20) an den Hinterrädern (6) an.
Befestigen Sie anschließend die Achshalterung (21) in den Hinterrädern.
Schieben Sie die Hinterräder (6) auf die Hinterachse (7).
Befestigen Sie die Räder, indem Sie zuerst die große Achssicherung (8) auf die
Hinterachse (7) schieben und danach die große Schlaghülse (9) darauf fest
schlagen. Wiederholen Sie diesen Vorgang auf der anderen Seite.
3. Montage des Lenkrads
Platzieren Sie das Lenkrad (10) auf der Lenkradfassung (11) und drücken Sie
das Lenkrad in die Aussparung bis es einrastet.
4. Montage des Sitzes
Schieben Sie den Sitz (12) auf die dazugehörige Schiene indem Sie die
Halterungen nach innen drücken. Schieben Sie den Sitz nach hinten
bis er fest sitzt.
5. Montage des Anhängers
Bringen Sie zuerst die Radabdeckungen (20) an die Räder an.
Schieben Sie zuerst ein Rad (2) auf die Radachse (14) und dann eine Distanz-
hülse (15). Positionieren Sie den Kipper (17) auf dem Anhängerfahrgestell (16)
und schieben Sie die vorbereitete Radachse (14) gleichzeitig durch das
Anhängerfahrgestell und den Kipper (17). Schieben Sie nun eine weitere
Distanzhülse (15) und dann das nächste Rad (2) auf die lange Achse (14) und
Drücken Sie die Radabdeckungen auf die Räder bis sie einrasten. Stecken Sie
zuerst die kleine Achssicherung (4) und dann die kleine Achsabdeckung (5) auf
die Enden der Achse (14).
6. Verbinden des Anhängers mit dem Traktor
Legen Sie die Löcher des Traktorhecks und des Anhängers übereinander und
Stecken Sie den Kupplungsbolzen (18) hindurch.
Benutzung unter unmittelbarer Aufsicht von Erwachsenen.
Das Modell zu steuern erfordert ein gewisses Mindestmaß an
Geschick und Vorsicht. Machen Sie sich deshalb unbedingt vor
dem Betreiben des Modells mit seinen Eigenschaften und
seiner Steuerung vertraut. Das Modell hat ein hohes Eigen-
gewicht. Dadurch besteht ein erhöhtes Schadens und
Verletzungsrisiko im Falle eines Kontrollverlustes. Vermeiden
Sie jegliche absichtliche oder unabsichtliche Art von Kollision
oder Zusammenstößen mit Gegenständen oder die
Gefährdung von Personen.
GB
1. Mounting the front wheels
Attach the axle cap (19) to the front axle as shown in the picture.
First attach the wheel covers (20) to the front wheels (2) and then push them
onto the front axle (1). Finally, fit an axle lock (4) on the front axle.
Then hammer the impact sleeves (5) onto it.
2. Mounting the rear wheels
First fit the wheel covers (20) to the rear wheels (6). Slide the rear wheels (6)
onto the rear axle (7). Then fix the axle bracket (21) in the rear wheels. Secure
the wheels by first sliding the large axle lock (8) onto the rear axle (7) and then
firmly hammering the large impact sleeve (9) onto it. Repeat this procedure on
the other side.
3. Assembly of the steering wheel
Place the steering wheel (10) on the steering wheel socket (11) and press the
steering wheel into the recess until it engages.
4. Assembly of the seat
Slide the seat (12) onto the corresponding rail by pressing the
Press the brackets inwards. Push the seat backwards until it is firmly seated.
5. Assembly of the trailer
First fit the wheel covers (20) to the wheels.
First push a wheel (2) onto the long axle (14) and then a distance sleeve (15).
Position the tipper (17) on the chassis (16) and push the prepared long axle
(14) through the chassis and the tipper (17) simultaneously. Now push another
distance sleeve (15) and then the next wheel (2) onto the long axle (14) and
press the wheel covers onto the wheels until they engage. First put the small
axle guard (4) and then the small axle cover (5) on the ends of the axle (14).
6. Connecting the Trailer and the Tractor
Place the holes in the rear of the tractor and trailer on top of each other and insert
the connecting pin (18).
Only use in direct supervision of an adult!
To control the vehicle a minimum skill level and caution is
needed. Make sure you are familiar with the operation of the
model and its characteristics. The model is heavy. This is an
increased risk of injury and damage in the event of loss of
control. Avoid any kind of intentional or unintentional collisions
with objects or hazards to persons
FR
1. Montage des roues avant
Fixez le capuchon d‘essieu (19) sur l‘essieu avant (1) comme indiqué sur la
photo. Fixez d‘abord les enjoliveurs (20) aux roues avant (2), puis faites-les
glisser sur l‘essieu avant (1). Enfin, fixez un verrou d‘essieu (4) à l‘essieu avant.
Martelez ensuite les douilles à chocs (5) sur celle-ci.
2. Montage des roues arrière
Fixez d‘abord les enjoliveurs (20) sur les roues arrière (6). Fixez ensuite le
support d‘essieu (21) dans les roues arrière. Faites glisser les
roues arrière (6) sur l‘essieu arrière (7). Fixez les roues en faisant d‘abord
glisser le grand verrou d‘essieu (8) sur l‘essieu arrière (7), puis en martelant
fermement la grande douille d‘impact (9). Répétez cette procédure
de l‘autre côté.
3. Montage du volant
Placez le volant (10) sur la douille (11) et enfoncez le volant dans la douille
jusqu‘à ce qu‘il s‘enclenche.
4. Montage du siège
Faites glisser le siège (12) sur le rail correspondant en appuyant sur les
supports vers l‘intérieur. Pousser le siège vers l‘arrière jusqu‘à ce qu‘il soit bien
en place.
5. Montage de la remorque
Fixez d‘abord les enjoliveurs (20) sur les roues.
Poussez d‘abord une roue (2) sur l‘axe de roue (14), puis une douille d‘écartement
(15). Positionnez la benne basculante (17) sur le châssis de la remorque (16) et
poussez l‘essieu de roue préparé (14) simultanément à travers le châssis
de la remorque et la benne basculante (17). Poussez maintenant une autre
douille d‘écartement (15), puis la roue suivante (2) sur l‘axe long (14) et appuyez
les enjoliveurs sur les roues jusqu‘à ce qu‘ils s‘enclenchent. Poussez d‘abord
le petit verrou d‘essieu (4), puis le petit couvercle d‘essieu (5) sur les extrémités
de l‘essieu (14).
6. L‘attelage de la remorque au tracteur
Placez les trous à l‘arrière du tracteur et de la remorque les uns sur les autres et
insérez l‘axe d‘accouplement (18) à travers eux.
Utiliser uniquement sous la surveillance d’un adulte!
Le pilotage du modèle demande une certaine dose d’adresse
et de prudence. De ce fait familiarisez-vous avec le modèle,
surtout au niveau des caractéristiques et ses commandes
avant toute utilisation. Le modèle a un poids propre élevé. De
ce fait le risque de dommages ou de blessures est élevé dans
le cas d’une perte de contrôle. Evitez tout type de collision,
accidentelle ou voulue, avec d’autres véhicules, objets ou
personnes.
6
Summary of Contents for 460825
Page 11: ...11 ...


