7
GB
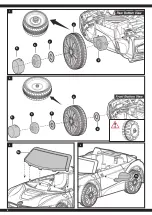
1. Attach the gear box and rear wheels
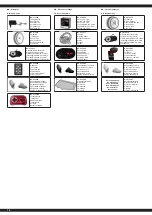
Remove all the parts from the rear axle.
Put the drive motor (2) onto the rear axle (“R” labeled gear box should be fit to the “R”
side of vehicle body; “L” labeled gear box should be fit to “L” side of vehicle body). connect the
motor wire plug with the plug in at the motor clamp port, and insert the motor into the clamp
slot. Put the driving wheel (3) on the rear axle and make it match with the gear box. Slide a
washer (8) onto the axle. Fix the whole thing with a lock nut (5). Finally, put a cover (6) on the
wheel. Repeat this on the other side.
2. Mounting the front wheels
Remove all the parts from the front axle.
Slide a washer (8) onto the front axle. Attach a front wheel (4) and a washer (8) onto the axle.
Fix the whole thing with a lock nut (5). Finally, put a cover (6) on the wheel. Repeat this on the
other side.
After assembling any wheel to the axles, please check the gap between the
screw thread and the collapsible (refer to below picture), if the gap is too big,
please add two or three washers inside the wheel, But after tightening the nut
outside the wheel, please turn the wheel by your finger to check if the wheel
can run smoothly, this is very important, because if the wheel can run smoothly,
it is ok, but if the nut press the wheel and the wheel can’t run smoothly, the
motor will be broken easily! Then you need to decrease one or two washers to
make sure the wheel can run smoothly!
3. Attach the Windshield
Insert the tabs on the windshield (14) in the slots on the vehicle body, push until you hear it click
into place.
4. Attach the view mirrors
Install the view mirrors (15) to the desingated position, and fasten it.
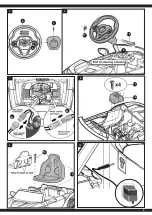
5. Placing the battery in the steering wheel
1. Open the battery cover on the front of the steering wheel.
2. Put 2 AA batteries making sure that it is correctly put in.
3. Then close the cover.
6. Steering wheel assembly
Place the steering wheel (9) over the steering column, protruding from the middle of the
steering wheel base. Align the holes on each side of steering wheel with the holes at the end
of the steering column. Fasten an nut (11) on the opposite end of the screw (10) to secure the
steering wheel to the steering column.
7. Connect he Power Supply
Connect the connectors as shown.
A
Plug the red fuse connector into the terminal on battery
B
Plug the vehicle connector into the motor connector on body as shown above.
Repeat for the other side.
8. Attach the Motor Hood
Fit the motor hood (16) on the motor. Tighten four screws (17) to secure it. .
9. Mounting the seat
Fit the tabs on back of the seat (12) into the grooves on the rear of the vehicle. Insert two
screws (13) through the seat and into the vehicle body, and tighten them with a screwdriver.
10. Charging Your Vehicle
• The power swich must be turned in OFF position when charging.
• Insert the charger (16) into the socket - the LED lights up green. Connect the charger to
the charging socket.
• The LED on your charger lights up red as long as the battery is being charged. If the LED
lights green again, the battery is fully charged.
• The charge time is 10 hours.
• Do not charge the battery more than once within 24 hours.
• Charger and battery heat up during the charging process.
Warning!
• Let the model cool off sufficiently after each use before putting it back into operation.
When using an additional batteries let it cool of for minimum 15 minutes until the model
is operated again. Overheating can damage the electronics or may result in fire.
• Always disconnect the model from the charger immediately after charging. Always
disconnect the charger from the power supply immediately after disconnecting the
model. Inserting the rechargeable model or charger after charging will result in damage
to the model, charger or the power supply (fire hazard).
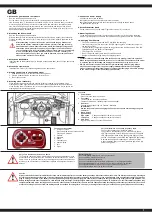
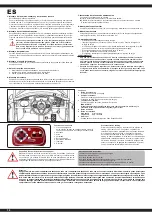
Functions
1 Power button
Press to turn the vehicle on and off.
2 Foot pedal
To move the car, press the pedal down.
To brake or slow down, release pressure from the pedal.
3 Shift lever
Change the direction of the car, Forward - Backward.
IMPORTANT!
Always stop vehicle when changing the speed or direction to avoid damage the gears
and motor.
4 Music button
5 Speed button
High speed
Change the speed of the car more quickly.
Low speed
Change the speed of the car more slowly
6 AUX input
Input for a Smartphone or other AUX devices.
Only use in direct supervision of an adult!
To control the vehicle a minimum skill level and caution is needed. Make sure you
are familiar with the operation of the model and its characteristics. The model is
heavy. This is an increased risk of injury and damage in the event of loss of control.
Avoid any kind of intentional or unintentional collisions with objects or hazards to
persons.
Battery warning:
Non-rechargeable batteries are not to be recharged!
Do not open! Do not dispose of in fire!
Do not mix old and new batteries!
Do not mix alkaline batteries, standard (carbon-zinc) or rechargeable batteries!
Rechargeable batteries are to be removed from the toy before being charged!
Rechargeable batteries are only to be charged under adult supervision!
The supply terminals are not to be short-circuited!
Caution
Always switch off the model immediately after each use. Immediately after each use the battery should be disconnected from the model. The battery can be deeply discharged
by leaving it switched on accidentally or leaving it plugged in. Deep discharge causes the battery to lose power or can be damaged to such an extent that charging or dischar
-
ging is no longer possible or the battery can self-ignite during charging or discharging (fire hazard). Never attempt to charge or discharge deeply discharged batteries. The
battery voltage should never fall below 11,9 volts to avoid deep discharge. The fully charged battery has a voltage of approx. 13 Volt. After use, the intact battery should be fully
charged immediately after a cooling phase of at least 10 minutes but at the latest after 12 hours to avoid subsequent deep discharge by self-discharge. If the battery is not used
or stored for a longer period of time, the battery should be checked for voltage (min. 12,3 volts) or damage at least every 3 months and charged or disposed of if necessary.
Functions of transmitter
1. Emergency brake
Press it and the running funciton will fail.
Press again, it release.
2. Forward
3. Backward
4. Speed
5. Frequency key
6. Speed display
7. Left
8. Right
For the first time to use need to frequency bind
Take out the remote control, install the battery.
Long press on the frequency key 2-4 seconds. Low speed
LED lights wall flash. Turn on the power of the car. Low speed
LED lights will from flash to long lighting, then frequency bind
succed. If the frequency bind failed (low speed LED lights flash).
Remobe the battery and repeat steps 1-3. Remote control
withour operation after 10 seconds, indication light will off into
power saving mode.
1
4
2
3
5
7
8
6


