11
DE - Videofunktion und Übertragung auf den PC
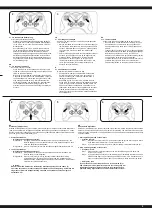
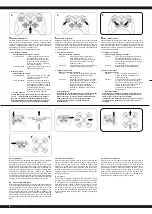
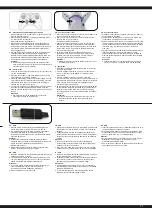
1. Mit den Tasten für Foto (1) bzw. Video (2) am Sender können
Sie eine Aufnahme starten.
2. Drücken Sie die Fototaste (1) einmal und lassen Sie wieder
los. Die rote LED (3) blinkt kurz.
Ein Standbild wurde abgespeichert.
3. Drücken Sie die Videotaste (2) einmal und lassen Sie sie
wieder los. Die rote LED leuchtet. Dies signalisiert das die
Aufnahme läuft. Drücken Sie die Videotaste nochmal erlischt
die rote LED wieder, die Aufnahme wird beendet und das
Video abgespeichert.
4. Die Speicherkarte kann problemlos durch eine Ersatzkarte
ausgetauscht werden. Entfernen Sie die Speicherkarte
indem Sie an der Seite des Modells leicht auf die Micro-SD-
Karte drücken, die Speicherkarte springt ein Stück heraus.
Nun können Sie die Speicherkarte leicht herausziehen.
Achtung!
● Setzen Sie die Karte mit den goldenen Kontakten nach
oben (zum Propeller) in den Einschub ein und schieben Sie
sie so weit hinein, bis sie einrastet.
GB - Photo / Video
1. Using the buttons on the transmitter for photo (1) or video (2),
you can start recording.
2. Press the Foto button (1) again and release again. The red
LED (3) fl ashes. A still image is stored.
3. Press the Video button (2) once and release it again. The red
LED is lit permanently. It signals that the recording. Press the
Video button again turns off the LED and the recording is
stopped and the video will be saved.
4. To view recording remove the Micro SD Card from the side of
the model, by slightly depressing the Micro SD Card and
allowing it to then spring out enough to grab it and pull it out of
the slot.
Attention!
● Micro SD card should be placed with the little gold
connections upward (to the propeller)
FR - Fonction photos / vidéo
1. Avec la touche pour photos (1) et vidéo (2) de l’émetteur vous
pouvez démarrer les prises de vues.
2. Appuyez sur la touche photo (1) une fois et la lâchez tout
aussitôt. LED rouge (3) clignote.
Une image fi xe était sauvegardée
3. Appuyez sur la touche vidéo (2) une fois et la lâchez tout
aussitôt. La LED s’allume continuellement pour signaliser
que l’enregistrement est en court. Appuyez à nouveau sur la
touche vidéo, la LED rouge s’éteint, l’enregistrement est
terminé et est sauvegardé.
4. La carte mémoire peut être échangée par une carte
équivalente. Enlevez la carte mémoire par appuyer sur la
carte SD micro à la face du modèle. La carte mémoire
disjoncte et vous pouvez la puiser facilement.
Attention !
● Mettez la carte avec le point de contact doré vers le haut
(au hélice) dans le tiroir.
IT - Foto/Video
1. Utilizzando i pulsanti sul trasmittente per foto (1) o video (2),
si avvia la registrazione
2. Premere il pulsante immagine (1) di nuovo e rilasciarlo di
nuovo. Il LED rosso (3) lampeggia. Un immagine viene
memorizzata.
3. Premere il pulsante video (2) una volta e rilasciarlo
nuovamente.Il LED rosso si accende in modo permanente. Si
segnala che la registrazione e in corso. Ripremere il pulsante
video e la LED rossa si spegne è la registrazione viene
interrotta e il video viene salvato.
4. La scheda di memoria può essere facilmente sostituito da una
carta sostitutiva. Rimovere premendo sul lato della modello
facilmente sulla scheda Micro SD, la scheda di memoria
uscirá leggermente. Ora può facilmente estrarre la scheda di
memoria
Attenzione!
● Inserire la scheda con il contatto dorata verso l‘alto (al
elica) nella fessura e spingerla fi no a quando non si
incastri.
ES - Función Foto/Vídeo
1. Utilizando los botones de la emisora para foto (1) o video (2),
puedes iniciar la grabación.
2. !Pulse el botón de imagen (1) y vuelva a soltar. El LED rojo
(3) parpadea. Una imagen se ha memorizado.
3. Pulse el botón de vídeo (2) una vez y suelte de nuevo. El LED
rojo se ilumina de forma permanente. Señala que la grabación
se esta realizando. Pulse el botón de vídeo otravez, se apaga
la luz LED roja y la grabación se detiene y el vídeo se
memoriza.
4. La tarjeta de memoria puede ser fácilmente sustituida por una
tarjeta de reemplazo. Remover la tarjeta de memoria
pulsando fácilmente en la lateral de la modelo, la tarjeta de
memoria saldrá ligeramente. Ahora se puede sacar la tarjeta
de memoria.
Atención!
● Inserte la tarjeta con el contacto dorado hacia arriba (al
helice) en la ranura y empujarlo hasta que se encastre.
1
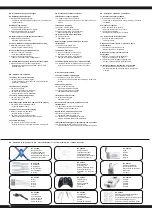
DE - USB
1. Stecken Sie die Speicherkarte in den USB-Adapter und
diesen in den USB-Anschluß ihres PCs oder Laptop.
2. Der USB-Adapter sollte von ihrem Computer automatisch
erkannt werden und wird als Laufwerk angezeigt.
Das Anschauen der Videos sollte mit verschiedenen Media-
Playern möglich sein.
Achtung!
● Sollten Sie Probleme beim abspielen der Daten haben,
probieren Sie es mit einem anderen Mediaplayer. Sie können
Online nach einem kostenlosen Download eines
Media-Players suchen.
● Mit der Videofunktion können nur Videos aufgenommen
werden. Tonaufnahmen sind nicht möglich.
GB - USB
1. Insert the memory card into the USB adapter and these in the
USB port of your PC or laptop.
2. The USB adapter should be automatically detected by your
computer and appears as a drive. The viewing of the video
should be possible with different media players.
Attention!
● If you have trouble playing the fi les with Quicktime try your
other media players. You can also look online for
recommended free downloadable media player.
● Video camera does not record sound.
FR - USB
1. Engagez la carte mémoire dans le lecteur USB puis branchez
l’ensemble sur un des ports USB de votre PC ou ordinateur
portable.
2. L‘adaptateur USB doit être automatiquement détecté par
votre ordinateur et apparaît comme un lecteur. En regardant
la vidéo devrait être possible avec des joueurs de différents
médias.
Attention!
● Si vous avez des soucis pour lire vos enregistrements,
veillez changer de lecteur media. Vous pouvez télécharger
Online des lecteurs non payants.
● Avec la fonction vidéo vous ne pouvez enregistrer que des
vidéos sans son. L’enregistrement de son n’est pas possible.
IT - USB
1. Inserire la scheda di memoria nel adattatore USB e poi nella
porta USB del suo PC o del portatile.
2. L‘adattatore USB dovrebbe essere rilevato automaticamente
dal computer e appare come un disco. Guardareil video
dovrebbe essere possibile con vari Media-Player.
Attenzione!
● Se avete difficoltà a guardare i dati, provare a utilizzare un
altro Mediaplayer. È possibile cercare online per il download
gratuito di Media-Players.
● Con la funzione video solo le immagini possono essere
registrate. Non é possibile registrare l’audio.
ES - USB
1. Inserir la tarjeta de memoria en el adaptador USB y este en la
conexion USB de su ordenador o portátil.
2. El adaptador USB debe ser detectado automáticamente por
el ordenador y aparece como una unidad. Mirando el vídeo
debe ser posible con con varios Media Players.
Atención!
● Si tiene problemas en ver los datos, tienes que usar un otro
Mediaplayer. Puedes buscar online para descargar
gratuitivamente un Media Player.
● Con la función de vídeo sólo se pueden grabar las imágenes.
La grabación de sonido no es posible.
2
3


