background image

10 


USE OF THE MACHINE


After having unpacked the machine put it in its working place in a flat and stable position. 


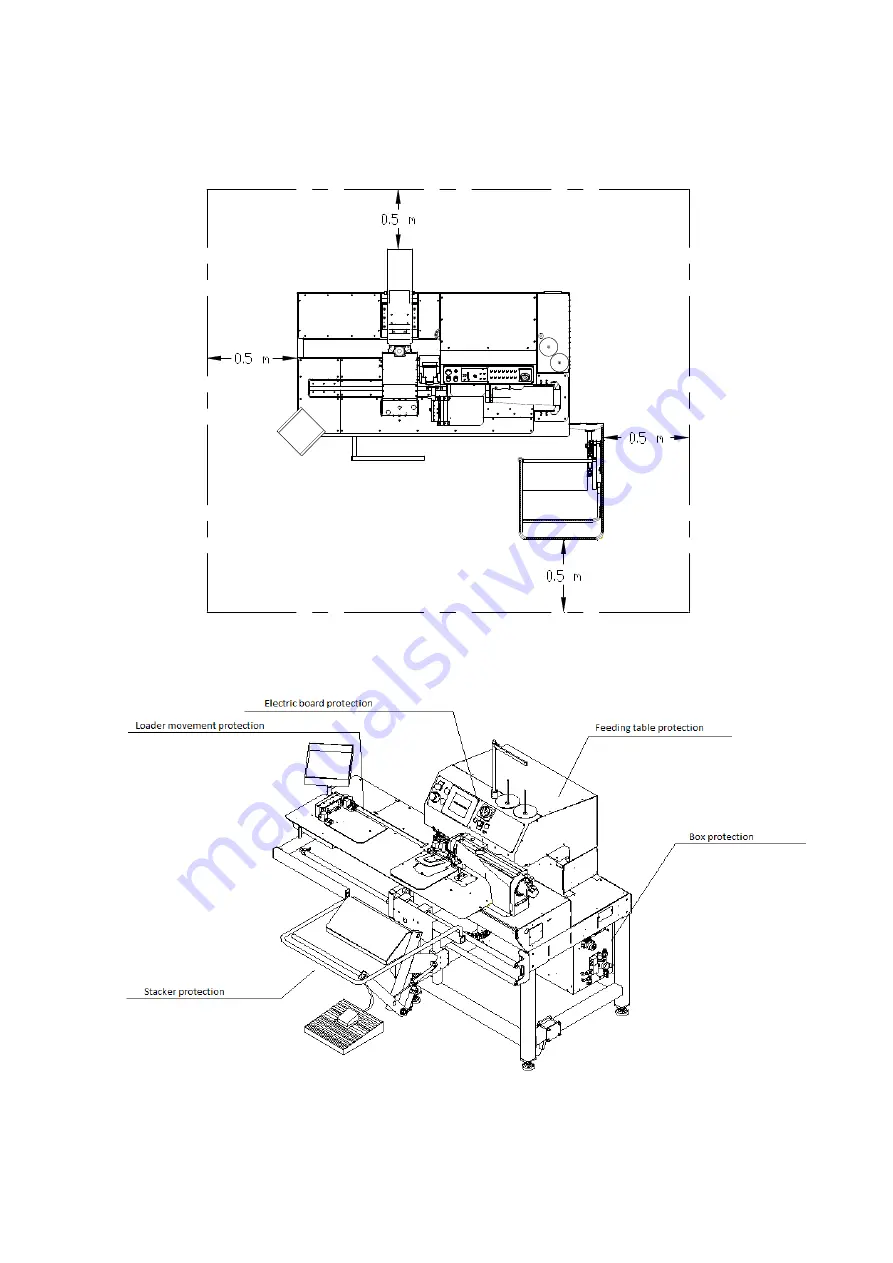
MINIMUM DISTANCES FOR A PROPER MAINTENANCE 

Leave a free space of at least 50 cm on each side of the machine


It is extremely dangerous to use the machine without its safety devices (emergency button, belt 

protection and so on). Never use the machine without the safety devices. 


The safety devices removal is allowed exclusively during the machine maintenance and must be 

done exclusively buy specialized staff. 


Summary of Contents for JT864P-A

Page 1: ...1 JAM INTERNATIONAL PROGRAMMABLE AUTOMATIC FLAT BED SEWING MACHINE JT864P A JT864P A 95 INSTRUCTION MANUAL ...

Page 2: ...CE 10 CONNECTION TO THE ELECTRIC SYSTEM 11 CONNECTION TO THE PNEUMANTIC SYSTEM 11 MACHINE DESCRIPTION 11 SPECIFICATIONS 11 CONTROL PANEL BUTTON INDEX 12 STARTING 13 MACHINE POSITION AFTER HOME POSITION 14 DOWNLOAD THE SEWING PROGRAM FROM THE USB KEY 14 AUTOMATIC CYCLE 16 THREAD BREAKING 17 BOBBIN WARNING 17 STITCHING TEST 18 LOADING AND STITCHING TEST 19 STITCHING CHECK 19 PROGRAM SELECTION FROM T...

Page 3: ...3 LOADING POINT ADJUSTMENT 29 SEWING PROGRAMS ADJUSTMENT 30 ...

Page 4: ...staff trained on purpose MANUFACTURER RESPONSABILITY JAM INTERNATIONAL is not responsible for any mishap breaking accidents due to the missing knowledge or non application of the instructions contained in the present manual JAM INTERNATIONAL is not responsible as well for modifications variations and or installation of non previously authorized accessories Particularly JAM INTERNATIONAL declines a...

Page 5: ...for service or spare parts must be forwarded to JAM INTERNATIONAL s r l Via G Perini 2 60010 Ostra Vetere AN ITALY Tel 39 071 67872 Fax 39 071 67873 e mail parts jaminternational it specifying the following Machine model Serial number Details regarding the faults verified The checks made Any other useful information Part number and description of the required spare parts ...

Page 6: ...chine while wearing clothes ornaments or accessories which can get caught on any moving part Gather up long hairs under a cap Wear clothes which allow to bear objects and tools in closed pockets The machine user must know the safety devices installed on it as well as the respective proper modalities of use Check daily the proper functioning of the emergency buttons and of the safety devices Never ...

Page 7: ... hit the eyes Use the protective glasses and gloves when using lubricants and greases in order to avoid the contact with eyes and skin and the consequent risk of irritations and inflammations The employer is compelled to provide the operator with the Individual Safety Devices and to inform him about their proper use and maintenance REMAINING RISKS The machine has been designed and produced with th...

Page 8: ...achine check its stability STORAGE In case of long storage keep the machine in a dry place sheltered from rain and wind Protect well the electrical parts from the dust and from external agents The machine may suffer heavy damages if while waiting for the installation it is kept in environments with critical temperatures Never expose it to temperatures lower thatn 10 C and higher than 60 C Do not d...

Page 9: ...n that it doesn t tilt on one side PACKAGE The kind of package may be different according to the machine the mean of transport and the destination In a wooden crate in case of transport by sea or by air Wrapped in a protection film to be transported with road vehicles AIR NOISE UTTERED BY THE MACHINE The machine described in this manual does not represent a risk factor itself as the peak level of ...

Page 10: ...eave a free space of at least 50 cm on each side of the machine It is extremely dangerous to use the machine without its safety devices emergency button belt protection and so on Never use the machine without the safety devices The safety devices removal is allowed exclusively during the machine maintenance and must be done exclusively buy specialized staff ...

Page 11: ... avoid functioning problems or damages to the machine CONNECTION TO THE PNEUMATIC SYSTEM Connect the air pipe to the quick pipe fitting located on the pressure governor let the air in and check that the air gauge signals a maximum pressure as described in the specifications If necessary adjust the pressure on the correct value by lifting and turning the knob of the pressure governor clockwise to i...

Page 12: ... speed 3 Program name 4 Program number 5 6 Program file 7 Bobbin counter reset 8 Bobbing counter setting 9 Stacker button 10 Jig change button 11 Setting button 12 Manual forward movement button 13 Stitching test button 14 Manual backward movement button 15 Reset button 16 Automatic button 17 Warnings ...

Page 13: ... fig 3 Fig 3 1 3 Press the touch screen in the centre as pointed out by the arrow fig 2 the Home screen will appear as in fig 4 Fig 4 1 4 Press simultaneously the start buttons positioned on the right and left side of the panel holder bar as shown in fig 5 The machine will move to its home position and will lift up the needle and the presser foot Fig 5 1 5 The home screen will appear as shown in f...

Page 14: ...ar as in fig 7 Fig 7 3 2 OPTION 1 3 2 1 Press the button open the screen will appear as in fig 8 Fig 7 3 2 2 Press the button CN IN the screen will appear as in fig 9 check that the USB icon is green while the USB key is still connected Fig 8 3 2 3 Select the program by using the arrows press the button open and wait for the file transfer to be completed 3 2 4 Repeat the operation described on 3 2...

Page 15: ...2 Press the button CN IN 3 3 3 Select the program by using the arrows and press the button open 3 3 4 Repeat the operation described on 3 3 3 to insert another program 3 3 5 Press the button Exit the home screen will appear fig 4 3 3 6 Press the button reset to get back to the main screen fig 6 ...

Page 16: ...he loading clamp shape 4 2 5 Press simultaneously the start buttons fig 5 4 3 CYCLE SEQUENCE 4 3 1 After pressing the start buttons the loading clamp moves on the loading point under the sewing clamps 4 3 2 The internal sewing clamp lowers 4 3 3 The loading clamp lifts up 4 3 4 The loader moves to the home position 4 3 5 The external sewing clamp lowers 4 3 6 The sewing cycle starts 4 3 7 Once the...

Page 17: ...BOBBIN WARNING 6 1 BOBBIN WARNING SET UP 6 1 1 Press the button pre set bobbin counting on the main screen Fig 6 circled in red a numerical keyboard will appear 6 1 2 Set the chosen number corresponding to stitches number 6 1 3 Press ENTER to confirm go back to the previous screen 6 2 BOBBIN WARNING 6 2 1 When during the seam the bobbin counting reaches the set number once the seam is finished the...

Page 18: ...1 5 Pressing the pedal after a few movements it is possible to lower and to lift up the presser foot 7 1 6 Check that during the seam the needle and or the presser foot do not hit the sewing clamps 7 1 7 To get back on the seam path press the button manual backward movement 7 1 8 Pressing the pedal while pressing the button manual forward movement or the button manual backward movement the seam pa...

Page 19: ...rnal sewing clamp lowers 8 1 9 The loading clamps lifts up 8 1 10 The loader moves to the home position 8 1 11 The external sewing clamp lowers 8 1 12 The sewing clamps move to the stitching start point 8 1 13 Check that the pocket is positioned at the centre of the external sewing clamp 8 1 14 Execute the operations described from 7 1 4 to 7 1 9 8 1 15 If the loaded pocket position is not correct...

Page 20: ...1 2 Press the button OPEN The screen as in fig 8 appears Figura 8 10 1 3 Select the program from the list by using the arrows 10 1 4 Press the button FILE The screen as fig 4 appears Fig 4 10 1 5 Press the button RESET to get back to the main screen Fig 6 10 1 6 Check the strings on PROGRAM NUMBER 4 and PROGRAM NAME 3 that the program loaded is correct ...

Page 21: ...en as fig 11 will appear Fig 11 11 1 5 Press the button PROGRAM NUMBER where highlighted a numerical keyboard will appear 11 1 6 Insert the new program number 11 1 7 Press the button ENTER to get back to the previous screen 11 1 8 Press the button CONFIRM which will disappear and the button SAVE will appear 11 1 9 To change the name of the saved program press PROGRAM NAME where highlighted An alph...

Page 22: ... as fig 10 will appear 11 1 13 Press the button EXIT The screen as ig 4 will appear 11 1 14 Press the button RESET to get back to main screen as fig 6 On the strings of the program number 4 and the program number 3 the new data will be displayed ...

Page 23: ...will appear 12 1 6 To cancel the operation press the button X get back to the previous screen 12 1 7 To confirm the removal press the button CONFIRM The previous screen will appear Fig 12 check on the program list whether the removal have been made correctly 12 1 8 Press the button EXIT The screen as fig 10 will appear 12 1 9 Press the button EXIT The screen as fig 4 will appear 12 1 10 Press the ...

Page 24: ... correctly select the program to be saved by using the arrows 13 1 6 Press the button FOLDER 13 1 7 Wait for the copy to be made The confirmation screen will appear 13 1 8 To cancel the operation press the button X Get back to the previous screen 13 1 9 To confirm the removal press the button CONFIRM The previous screen Fig 12 will appear wait for the program list existing in the machine memory to...

Page 25: ...25 13 1 13 Press the button RESET to get back to the main screen fig 6 ...

Page 26: ...ress on the parameter value 14 1 5 In case of numerical values a numerical keyboard will appear 14 1 6 Enter the new value 14 1 7 Press ENTER Get back to the previous screen Fig 13 14 1 8 In case of alphabetical values the value will change by pressing on it 14 1 9 Once all the parameters have been set press the button EXIT the screen as fig 10 will appear 14 1 10 Press the button EXIT the screen ...

Page 27: ...threading following the proper passages 15 1 11 Se the bobbin case inside the proper place located under the sewing head following the correct direction 15 1 12 Do the needle threading 15 1 13 Press the button EXIT the screen as fig 4 will appear 15 1 14 Press the button RESET to get back to the main screen as fig 6 The bobbin winding can be made even when the machine is running by following the o...

Page 28: ...pipe fittings 16 1 6 Take off the internal retractable sewing clamp by pulling it backward INTERNAL FIXED SEWING CLAMP 16 1 7 Take off the internal fixed sewing clamp by pulling it backward 16 1 8 Replace all the clamps with the new ones in case of using the internal retractable sewing clamp it is possible to replace only the blades 16 1 9 Once replaced all the clamps in the proper blocks and in c...

Page 29: ...proper pins that the loading clamp centring holes match with the external sewing clamp holes 17 1 6 If the centring holes of the two clamps do not match lift up the loading clamp by hand 17 1 7 Move the sewing clamps by using the direction arrows 17 1 8 Check the centring through the proper pins 17 1 9 Repeat the operation until the loading clamp will be centred with the external sewing clamp 17 1...

Page 30: ...or moved 18 1 1 Deactivate the AUTOMATIC button press the pedal until the screen as fig 7 appears Fig 7 18 1 2 Press the button SETTING the screen as fig 10 will appear Fig 10 18 1 3 Press the button SEWING PROGRAM ADJUSTMENT the screen as fig 16 will appear Fig 16 18 1 4 Press the button the sewing clamps move to the first stitch of the sewing program and the screen as fig 17 will appear Fig 17 ...

Page 31: ... to get back to the previous screen Fig 18 18 2 5 Press the button and the sewing clamps will move to the last stitch 18 2 6 Move to the desired position by using the direction arrows 18 2 7 Press the button SAVE to get back to the screen as fig 17 18 2 8 Press the button EXIT the machine will take back the sewing clamps to their home position The screen as in fig 10 will appear 18 2 9 Press the b...

Page 32: ...up to the end of the segment to be moved 18 3 3 Move to the desired position using the direction arrows 18 3 4 Press the button SAVE to save the movement made 18 3 5 Repeat the operations from 18 3 1 to 18 3 4 to move another stitch or segment In case any error occurs during the screen saving fig 18 the icon MODIFY PROGRAM ERROR will appear repeat the modification procedure starting form the origi...

Page 33: ...33 JAM INTERNATIONAL www jaminternational it JAM INTERNATIONA s r l Via G Perini 2 60010 Ostra Vetere AN ITALIA tel 071 67872 fax 071 67873 JT864P A JT864P A 95 ORIGINAL INSTRUCTIONS ...

Reviews: