background image


CV-S3500E


- 19 -


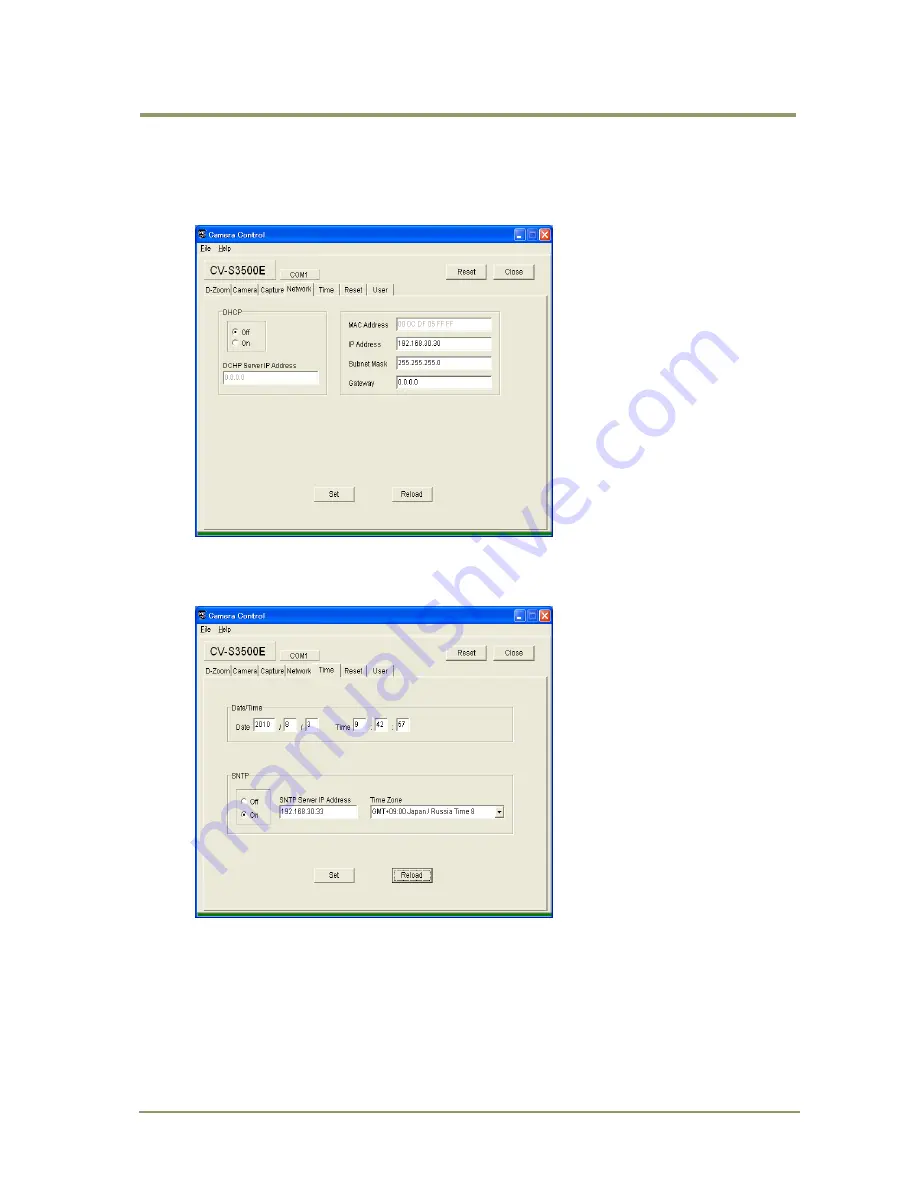
Click “Network” to confirm the current network settings. 

When the CV-S3500E is connected to the network, the following is the default setting. 

If changes are needed, open the PC’s “Control Panel” and clck on “Network connection”, 

“Local area network” , “Property”, “Internet protocol /TCP/IP” and  “Property”. In the 

property window, set the appropriate IP address and subnet mask for the system. 


Click “Time” for setting the date and time. If it needs to be automatically synchronized, 

set SNTP server ON. 


Summary of Contents for CV-A10CL-A70CL

Page 1: ...1019E 1007 CV S3500E NTSC PAL selectable Progressive scan color video camera Document Version Ver 1 0 CV S3500E_Ver 1 0_Sept2010 User s Manual...

Page 2: ...d and found to comply with the limits for a Class B digital device pursuant to Part 15 of the FCC Rules These limits are designed to provide reasonable protection against harmful interference in a res...

Page 3: ...asures for the Administration of the control of Pollution by Electronic Information Products known as China RoHS The table shows contained Hazardous Substances in this camera mark shows that the envir...

Page 4: ...een Display 11 7 1 Top menu 11 7 2 CAMERA menu tree 13 7 3 SET UP menu tree 14 7 4 Descriptions of camera functions 15 8 Camera Configuration RS 232C 16 8 1 RS 232SC Interface 16 8 2 Download and inst...

Page 5: ...CV S3500E 4 5 References 33 Change history 34 User s Record 35...

Page 6: ...thernet The CV S3500E is suitable for various applications using NTSC or PAL analog output or as an IP network camera providing high quality images 2 Main Features 1 3 inch progressive scan Bayer mosa...

Page 7: ...connection 100BASE T 10BASE T Power over Ethernet Holes for RJ 45 Holes for fixing screws of RJ 45 note 2 LED ACT Network connection ACT LED LINK Network connection LINK Fig 1 Locations Note 1 Use th...

Page 8: ...light Power ON and it is ready to use 4 2 2 LED LINK Green light Connecting with 100BASE T or 10BASE T 4 2 3 LED ACT Orange light Standby for 100BASE T connection Orange flashing Communicating in 100B...

Page 9: ...s connector Pin no Signal Remarks 1 GND For DC input 2 12 V DC input 3 GND 4 Video out VBS 1 5 NC 6 Y output 7 C output 8 RS 232C TXD output 9 RS 232C RXD input 1 This video output is the same as BNC...

Page 10: ...JPEG still pictures Using a web browser the camera can be configured for different applications Fig 7 Ethernet connection 6 3 1 MAC address and IP address When connecting to a net work please check M...

Page 11: ...terface are shown in the following table Still Movie Format Scan mode select Image size NTSC PAL mode Frame rate Bit rate Still image JPEG or Non Compression 1280 x 960 1280 x 960 960 x 720 960 x 720...

Page 12: ...hold to access the on screen menu 2 Advance through menu items for setting with the UP or DOWN button 3 DOWN key Select the item by moving downwards 7 1 Top menu When pressing FUNC button for a few se...

Page 13: ...he SET UP functions SET UP Push FUNC button Fig 12 To start the setup of the SET UP functions In order to set the screen OFF press DOWN button Please note that the FUNC button works only to move forwa...

Page 14: ...G SHARPNESS GAMMA AUTO ONEPUSH MANUAL 3200K 4500K 5600K OFF 1 100 1 250 1 500 1 1000 1 2000 1 4000 1 10000 CCD IRIS AUTO EXPOSURE OFF MANUAL 12dB MAX 24dB MAX OFF PAT 1 PAT 2 PAT 3 DARK LIGHT OFF X2 X...

Page 15: ...ting items while the UP and DOWN buttons can be used to select an appropriate setting SET UP SCAN MODE H MIRROR D ZOOM TV SYSTEM 1280 x 960 960 x 720 OFF ON NTSC PAL IP_ADR DHCP SNTP 192 168 30 30 OFF...

Page 16: ...X4 Maximum four times integration X6 Maximum six times integration X8 Maximum eight times integration Note INTEG MAX is a high sensitivity mode using longer integration times If the objects are movin...

Page 17: ...era control tool can be downloaded at www jai com Click CV S3500_ver100_T0112 msi and follow the screen described below After the installation is completed two tools CV S3500E and NetCam Search are cr...

Page 18: ...500E and execute the camera control tool The following communication window comes up The default setting of port is AUTO and the camera control tool automatically searches for the appropriate port Cli...

Page 19: ...for setting the RTP and HTTP movie image format is opened Set the data volume and picture quality of the transferred image through Ethernet Settings can only be made on fields that are not grayed out...

Page 20: ...etting If changes are needed open the PC s Control Panel and clck on Network connection Local area network Property Internet protocol TCP IP and Property In the property window set the appropriate IP...

Page 21: ...xec button in order to reset the EEPROM to the default settings Click User for specific user settings This sets the access level and password for users The user level is as follows Administrator Full...

Page 22: ...P address at the default address of the CV S3500E There are two ways to set IP address 1 Set IP address manually 2 Obtain an IP address automatically Use DHCP server 9 1 1 Set IP address manually The...

Page 23: ...ome up on the screen Set IP address As CV S3500E default IP address is 192 168 30 30 set 192 168 30 33 as an example Note Do not use the same IP address in the network Check Subnet mask The default is...

Page 24: ...DHCP as ON 3 Then using NetCamSearch check the IP address 4 Then set the IP address using the procedure described in the section 9 1 1 5 Start Internet Explorer and log in as Administrator 9 2 TOP me...

Page 25: ...JPEG still image cannot be captured In RTP MPEG4 or H 264 should be selected In this case the following indication appears on the screen if JPEG Still is selected In the case of an HTTP movie the movi...

Page 26: ...up Select the items listed across the tab 9 4 1 SetUp D Zoom The following window is to used to set digital zoom ON or OFF to set zoom position and zoom area 9 4 2 SetUp Camera The following window is...

Page 27: ...ture quality compression rate The picture quality can be selected normal high or super The picture quality becomes better from normal to super but the data volume will also increase 9 4 4 SetUp Networ...

Page 28: ...be accessed input IP address After SNTP is ON reload the new settings data 9 4 6 SetUp Reset Click Reset for camera reset or EPROM reset Reset only works as the camera powers ON or OFF Click EEPROM Pr...

Page 29: ...r the Default Administrator For users 1 through 5 the Access level can be set Administrator All operating functions are accessible Operator Possible to operate camera Viewer Can only view images One l...

Page 30: ...ions 40 LE NS 29 L I N K A CT V IDEO OUT UP O D W N FUNC 55 55 CS Mount 12 7 100 B A S E T X 10 B A S E T 27 5 30 5 91 7 2 U1 4 20 2 M2 6 79 1 D C I N Y C O UT RS 232 C PO WER Outside size tolerance 0...

Page 31: ...S3500E 30 11 Specifications 11 1 Spectral sensitivity 0 0 1 0 2 0 3 0 4 0 5 0 6 0 7 0 8 0 9 1 400 500 600 700 800 Relative Camera Sensitivity Wavelength nm Rch Gch Bch Fig 17 Camera spectral sensitivi...

Page 32: ...y 59 94Hz 50Hz Electronic shutter OFF 1 100 1 250 1 500 1 1000 1 2000 1 4000 1 10000 Auto shutter Video output BNC Composite Video 1Vp p 75 Video output D sub 9pin Y C Component Y 1Vp p 75 C 0 3Vp p 7...

Page 33: ...4 2 0 Pixel Size Still Motion JPEG 1280 x 960 960 x 720 MPEG4 H 264 RTP Motion JPEG 640 x 480 Frame rate Note Still Motion JPEG 1 to 2 fps MPEG4 H 264 RTP Motion JPEG 15 30 fps 12 5 25fps Bit rate Nor...

Page 34: ...ow up as white spots blemishes Exposure to cosmic rays can cause blemishes to appear on the image sensor Please take care to avoid exposure to cosmic rays during transportation and storage It is recom...

Page 35: ...CV S3500E 34 Change history Date Revision Changes Sept 2010 Ver 1 0 New release...

Page 36: ...re trademarks or registered trademarks of their respective owners JAI A S cannot be held responsible for any technical or typographical errors and reserves the right to make changes to products and do...

Reviews: