background image

8    MANTENIMIENTO

es-28

8.5

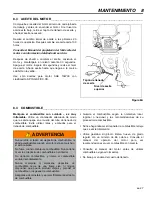
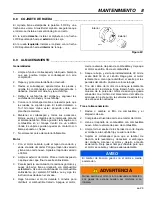
RETIRADA DE LA ZAPATA DE LA CUCHILLA FIJA _____________________________

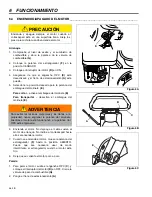
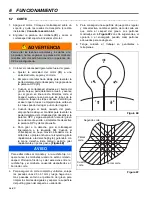
1. Para quitar la zapata 

(E)

, aflojar la tuerca 

(A)

 y girar

las tuercas 

(B)

 1/4 de giro a la izquierda o más para

que la cuchilla fija toque ligeramente las cuchillas

del molinete.

2. Quitar las piezas de montaje 

(D)

 de ambos lados de

la zapata.

3. Girar la tuerca de fijación 

(C)

 a la izquierda hasta

que los bordes de la zapata dejen de tener presión

de los muelles.

4. Girar y sacar los bordes de la zapata de las copas

de los muelles 

(F)

 y de la barra 

(G)

.

5. Para volver a colocar la zapata de la cuchilla fija,

colocar los bordes de la zapata entre las copas de

los muelles y los bordes de la barra de ajuste,

después meter la zapata en su posición.

6. Alinear los orificios de montaje de la zapata con el

marco y volver a montar las piezas 

(D)

.

7. Ajustar la cuchilla fija al molinete. Apretar las

piezas.

Figura 8B

8.6

ESMERILADO Y RECTIFICACION ____________________________________________

Compruebe si la cuchilla fija y las cuchillas del molinete

han sufrido daños. Consulte la Sección 7.2.

1. Determine si es posible esmerilar o rectificar el

borde de corte para restaurarlo.

2. Para obtener el rendimiento óptimo, use un

rectificador de cuchillas fijas para darle acabado a

la cuchilla; luego vuelva a montar la cuchilla fija y

ajuste su separación al molinete de la manera

descrita en la Sección Sección 7.3. 

3. Desactivar el embrague del molinete e inclinar la

máquina hacia atrás para que descanse sobre el

asa.

4. Quitar la cubierta del eje y la empaquetadura del

lado derecho del molinete. Instalar un perno de 3/8-

24 y una contratuerca en el extremo del eje y

conectarlo a una máquina de esmerilado.

a. Aplicar pasta de lapidar con un cepillo de

mango largo en toda la longitud del molinete (se

recomienda pasta de granularidad 120, Sección

Sección 2.6).

b. Siga rectificando y al mismo tiempo haga un

ajuste fino de la distancia entre el molinete y la

cuchilla fija hasta que haya una separación

uniforme a lo largo de todos los bordes de

corte.

5. Quite el compuesto de rectificado con cuidado y

completamente del molinete y de la cuchilla fija

antes de hacer funcionar el molinete en sentido de

avance

.

8.7

RUEDAS DE TRANSPORTE (OPCIÓN) ________________________________________

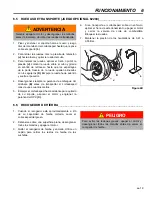
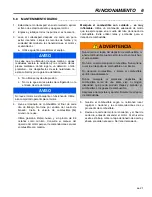
1. Mantener los neumáticos bien inflados para

prolongar su duración. Compruebe la presión sólo

con los neumáticos fríos.

2. Use un medidor de presión baja de neumáticos

exacto: 0,413 - 0,551 BAR.

A

B

C

F

E

G

D

AVISO

No dejar el cortacésped inclinado por un período
prolongado, ya que el aceite podría ingresar en la
cámara de combustión.


PRECAUCIÓN

A menos que tenga la capacitación, herramientas y

experiencia debidas, NO intente montar un neumático

en una llanta. Un montaje incorrecto puede provocar

una explosión, lo cual podría dar como resultado

lesiones graves.

!

Summary of Contents for PGM 22 InCommand

Page 1: ...arned of its dangers and should read the entire manual before attempting to set up operate adjust or service the machine ADVERTENCIA ADVERTENCIA Si se usa de forma incorrecta esta máquina puede causar graves lesiones Cualquier persona que use y mantenga esta máquina deberá estar entrenado en su uso correcto instruido sobre sus peligros y deberá leer el manual completamente antes de tratar de insta...

Page 2: ...tate of California to cause cancer and birth defects or other reproductive harm FOREWORD Suggested Stocking Guide To Keep your Equipment fully operational and productive Jacobsen suggests you maintain a stock of the more commonly used maintenance items We have included part numbers for additional support materials and training aids To order any of the following material 1 Write your full name and ...

Page 3: ...3 Operating Procedures 17 6 4 Starting Stopping Engine 18 6 5 Transport Wheels Optional Kit 62293 19 6 6 Grass Catcher 19 6 7 Mowing 20 6 8 Daily Maintenance 21 7 Adjustments 7 1 General 22 7 2 Reel To Bedknife 22 7 3 Bedknife 23 7 4 Brake 23 7 5 Cutting Height 24 7 6 Handle 24 7 7 Torque Specification 25 8 Maintenance 8 1 General 26 8 2 Engine 26 8 3 Engine Oil 27 8 4 Fuel 27 8 5 Bedknife Shoe Re...

Page 4: ...e of material toward bystanders nor allow anyone near the machine while in operation The owner operator can prevent and is responsible for injuries inflicted to themselves to bystanders and damage to property 11 Never operate equipment that is not in perfect working order or is without decals guards shields discharge deflectors or other protective devices securely fastened in place 12 Never discon...

Page 5: ...ce By following all instructions in this manual you will prolong the life of your machine and maintain its maximum efficiency Adjustments and maintenance should always be performed by a qualified technician If additional information or service is needed contact your Authorized Jacobsen who is kept informed of the latest methods to service this equipment and can provide prompt and efficient service...

Page 6: ...ore than 10 ethanol Under no circumstances should you use a blend with methanol Engine Oil Capacity 5 8 qt 0 6 l Type SAE 10W 30 API Classifi cation SF or SG 2 3 MOWER _________________________________________________________________ Height of cut 5 64 to 7 16 in 2 to 11 mm Bedknives Hardened carbon steel High profile yields 5 32 in 4 mm cut Low profile yields 7 64 in 2 8 mm cut Tournament yields ...

Page 7: ...568 Lapping Compound 120 grit 5002489 10 Pound Pail 5002491 25 Pound Pail Light Kit 5002962 Orange Paint 12 oz spray 554598 Push Brush 68500 Smooth Roller with Scraper 68530 Soft Touch Rotary Brush Requires 68557 68560 Solid tube Roller with Scraper 68641 Turf Groomer 68579 Vertical Reel 68556 2 1 2 Gallon Fuel Can 554948 5 1 4 Gallon Fuel Can 554949 Mower Caddy PGM Latch Kit 68652 Mower Caddy 686...

Page 8: ...WWR JH QVWDOOHHUG YHUPRJHQ ႛ QVWDOOHHULWXG QHWRY LPVXV ႛ VHQQHWWX QHWWRWHKR ႛ 3XLVVDQFH QRPLQDOH QHWWH ႛ QVWDOOLHUWH 1HWWROHLVWXQJ ႛ ˈ ˮ ˢˠ ˢ ˤ ˤ ႛ 1HWWµ EH S WHWW WHOMHV WP Q ႛ 3RWHQ D QHWWD LQVWDOODWD ႛ 3DUHG ÕWÃ WíNOD MDXGD ႛ U QRML JDOLD ႛ LVDಬ WDO 4WXJé ႛ 0RF DLQVWDORZDQD QHWWR ႛ 3RW QFLD LQVWDODGD ႛ 3XWHUHD LQVWDODWÅ QHWÅ ႛ ÎLVW LQģWDORYDQ Y NRQ ႛ 1HWR YJUDMHQD PRÏ ႛ 3RWHQFLD LQVWDODGD QHWD ...

Page 9: ...HUDGRU ႛ MXGQLY YLG I UDUHQV UD ႛ YD DVWLJ I ULU VWMµUQDQGD ႛ 6Wº QLY YHG RSHUDWºUHQV ºUH ႛ 㝜 勂㡐 儶 ႛ OMµ VW UNXU I ULU VWMµUQDQGD ႛ ኇ ዉዙኜሯ ሻቮ没檂ዉ ወ ႛ ꩡ끞녅 뙢閶 ꭁ넁 ꆽꙝ ႛ 2SHUDW U XODN U OW H L ႛ G D HT G D HT DUPRQLVHG VWDQGDUGV XVHG ႛ ႛ 3RXŀLW KDUPRQL RYDQ QRUP ႛ UXJWH KDUPRQLVHUHGH VWDQGDUGHU ႛ HEUXLNWH JHKDUPRQLVHHUGH VWDQGDDUGV ႛ DVXWDWXG KWOXVWDWXG VWDQGDUGLG ႛ WHW W KGHQPXNDLVWHWXW VWDQGDUGLW ႛ 1R...

Page 10: ...HPLWLU D GHFODUD R HP QRPH GR IDEULFDQWH TXH SRVVXL D GRFXPHQWD R W FQLFD TXH HVW DXWRUL DGD D FRPSLODU R SURFHVVR W FQLFR H TXH HVW HVWDEHOHFLGD QD RPXQLGDGH 6HPQÅWXUD SHUVRDQHL PSXWHUQLFLWH VÅ HODERUH H GHFODUDĥLD Q QXPHOH SURGXFÅWRUXOXL FDUH GHĥLQH GRFXPHQWDĥLD WHKQLFÅ HVWH DXWRUL DWÅ VÅ FRPSLOH H GRVDUXO WHKQLF ġL HVWH VWDELOLWÅ Q RPXQLWDWH 3RGSLV RVRE SRYHUHQHM Y VWDYHQ P Y KO VHQLD Y PHQH Y ...

Page 11: ...e was rotating with the machine stationary The Machinery Safety Directive 2006 42 EC By compliance to The Lawnmower Standard EN836 1997 Referenced to Hand Arm BS EN ISO20643 2008 Information Supplied for Physical Agents Directive 2002 44 EC By reference to Hand Arm Standards BS EN ISO 5349 1 2001 BS EN ISO 5349 2 2001 PGM 22 Hand Arm Acceleration Level 63280 PGM 22 11 Blade 63286 PGM 22 15 Blade M...

Page 12: ...Never carry passengers 6 Keep bystanders away 361854 To avoid serious bodily injury stop engine and disengage reels before working on mower or emptying baskets DANGER 3001235 1 No opere esta maquina sin previo entrenamiento instruccion y sin haber leido el manual de operacion 2 Tenga todas las guardas en su lugar y plezas bien aseguradas 3 Neutralice todas las velocidades y apa gue el motor antes ...

Page 13: ...NSPECTION_______________________________________________________ 1 Perform a visual inspection of the entire unit look for signs of wear loose hardware and components that may have been damaged during transport 2 Inspect paint and decals for damage or scratches Decals provide important operating and safety information Replace all missing or hard to read decals 3 Check that the engine oil level is ...

Page 14: ...turn engine to idle The bail must be disengaged to start the engine D Engine Switch The engine switch enables and disables the ignition system The engine switch must be in the ON position for the engine to run Turning the engine switch to the OFF position stops the engine Figure 5A Figure 5B Unlock Lock Fuel Gasoline Choke Engine Off Engine Run Fast Slow Throttle Operator Presence Control Engine E...

Page 15: ...l valve lever must be in the ON position for the engine to run When the engine is not in use leave the fuel valve lever in the OFF position to prevent carburetor flooding and to reduce the possibility of fuel leakage H E Stop Used to stop the engine Push switch down to disable engine ignition pull up for normal operation Figure 5C Figure 5D WARNING To prevent bodily injury or property damage never...

Page 16: ... an engine stop E Stop switch that will stop the engine from the operator s position 2 To test the system a Place mower on the kickstand b Disengage the reel clutch lever E 3 Start the engine a Slide bail to the left and engage OPC Bail b Engine speed will increase the drive mechanism will engage and the wheels will begin to turn c Release the O P C bail The bail must disengage engine speed return...

Page 17: ...pment 9 Disengage the reel clutch to stop blades when not mowing 10 Disengage the reel clutch when crossing paths or roadways Look out for traffic 11 Stop and inspect the equipment for damage immediately after striking an obstruction or if the machine begins to vibrate abnormally Have the equipment repaired before resuming operation 12 Slow down and use extra care on hillsides Use caution when ope...

Page 18: ...nap back into the starter Do not tilt the mower back when starting 7 When engine starts move choke lever F to the OPEN position Intermittent choking may be required while engine is cold 8 Allow engine to warm up gradually Stopping 1 To stop the engine release the O P C bail C and set engine switch D to OFF position Close fuel valve G 2 Engage parking brake A Figure 6A Figure 6B Figure 6C CAUTION A...

Page 19: ...kstand start the engine and engage the O P C bail C 6 When using a vehicle to transport the mower apply parking brake stop engine and close fuel shut off valve Chock or block the wheels 7 Keep tires inflated to 6 to 8 psi 0 41 to 0 55 BAR Figure 6D 6 6 GRASS CATCHER _________________________________________________________ 1 When the basket is about two thirds 2 3 full of grass clippings move mowe...

Page 20: ...right start by turning mower slightly to the left 2 When the mower has moved approximately 1 2 its own width to the left swing it around quickly to the right 3 and 4 guiding the mower with your right hand This method makes it possible to turn around quickly with very few steps Figure 6E 4 To assure complete even cutting overlap swaths by 1 to 2 in 25 to 51 mm then make one or more passes around th...

Page 21: ...t inside the fuel filler neck Avoid using cans and funnels to transfer fuel 5 Store fuel according to local state or federal ordinances and recommendations from your fuel supplier 6 Check the engine oil at the start and end of each day before starting the engine If the oil level is low remove the oil filler cap and add oil as required Do not overfill NOTICE Use of salt water or affluent water will...

Page 22: ...Use a standard flat file to dress the bedknife 3 If wear or damage is beyond the point where the reel or bedknife can be corrected by the lapping process they must be reground 4 Proper reel to bedknife adjustment is critical A gap of 0 001 to 0 003 in 0 025 to 0 076 mm must be maintained across the entire length of the reel and bedknife 5 The reel must be parallel to the bedknife An improperly adj...

Page 23: ...echeck adjustment When the reel to bedknife is properly adjusted the reel will spin freely and will cut a piece of newspaper along the full length of the reel when the paper is held at 90 to the bedknife Figure 7C 7 4 BRAKE __________________________________________________________________ A properly adjusted brake requires 10 lb pull at top of brake lever to engage and must have 1 50 in 38 mm cen...

Page 24: ...ide of the screw head P then tighten wing nut to lock the adjustment 4 Place gauge bar between front roller and traction roller near the outer end of the rollers 5 Slide screw head over bedknife Q and adjust knob L so roller just contacts the gauge bar Tighten nut M 6 Repeat Steps 4 and 5 on the opposite end of the reel then tighten nuts M Recheck and readjust the cutting height if necessary Figur...

Page 25: ...b Nm 75 8 4 100 11 3 107 12 1 143 16 1 9 16 18 ft lb Nm 92 124 122 165 129 174 172 233 1 4 28 in lb Nm 85 9 6 115 13 0 120 13 5 163 18 4 5 8 11 ft lb Nm 113 153 151 204 159 215 211 286 5 16 18 in lb Nm 157 17 7 210 23 7 220 24 8 305 34 4 5 8 18 ft lb Nm 128 173 170 230 180 244 240 325 5 16 24 in lb Nm 173 19 5 230 26 0 245 27 6 325 36 7 3 4 10 ft lb Nm 200 271 266 360 282 382 376 509 3 8 16 ft lb ...

Page 26: ...____ IMPORTANT A separate Engine Manual prepared by the engine manufacturer is supplied with this machine Read the engine manual carefully until you are familiar with the operation and maintenance of the engine Proper attention to the engine manufacturer s directions will assure maximum service life of the engine To order replacement engine manuals contact the engine manufacturer The proper break ...

Page 27: ... it is highly flammable Use an approved container the spout must fit inside the fuel filler neck Avoid using cans and funnels to transfer fuel Store fuel according to local state or federal ordinances and recommendations from your fuel supplier Never overfill or allow the tank to become empty Use clean fresh regular grade unleaded gasoline minimum 86 Octane Refer to the engine s operator manual fo...

Page 28: ...l to bedknife as described in Section 7 3 3 Disengage reel clutch and tip machine back to rest on the handle 4 Remove shaft cover and gasket from left side of reel Assemble a 3 8 24 bolt and locknut to the end of the shaft and attach to lapping machine a Apply lapping compound with a long handle brush along the entire length of the reel 120 grit is recommended Section 2 6 b Continue lapping and at...

Page 29: ... crankcase Install drain plug and refill with fresh oil Torque drain plug to 22 ft lb 30 Nm 2 Clean exterior of engine Paint the exposed metal or apply a light coat of rust preventative oil 3 To prevent the build up of gum residues and vanish films fill the tank with stabilized fuel Use an anti oxidant fuel conditioner such STA BIL Read and follow the instructions on the container 4 Operate the en...

Page 30: ... Open valve See Engine Manual Turn on switch Engine hard to start or runs erratically stalls looses power or stops Choke in wrong position Fuel leaks Dirty or incorrect fuel Loose wiring Air intake plugged Vent in fuel cap plugged See Engine Manual Tighten fuel hose clamps Refill with proper grade clean fuel Check spark plug wire Clean air intake and air cleaner Clean fuel cap Mower does not react...

Page 31: ...ded Inspection and Lubrication Intervals Daily 20 50 100 300 Yearly Lubricant Air Cleaner I C Combustion Chamber C Engine Oil I R R I Fuel Line R 2 yrs Spark Plug A R Valve Clearance A Grease Locations Figure 7C 1 Roller L L II 2 Height Adj L II 3 RT Reel Shaft L II 4 Traction Roller L II 5 Clutch Shaft Bearing L II 6 Clutch Pivot Shaft L III 7 Clutch Needle Bearing III 8 Traction Hub L III 9 Whee...

Page 32: ...9 NOTES en 32 9 NOTES ...

Page 33: ...ped on the name plate or serial plate of your product 4 Order by the quantity desired the part number and description of the part as given in the parts list 5 Send or bring the order to an authorized Jacobsen Distributor 6 Inspect all shipments on receipt If any parts are damaged or missing file a claim with the carrier before accepting 7 Do not return material without a letter of explanation list...

Page 34: ...tros daños reproductivos PREFACIO Guía de almacenamiento recomendado Para que el equipo esté en todo momento operativo y productivo Jacobsen recomienda que almacene los repuestos más comúnmente utilizados Hemos incluido números de piezas para los materiales de apoyo adicionales y ayudas a la formación Para realizar el pedido de alguno de los siguientes materiales 1 Escriba su nombre completo y com...

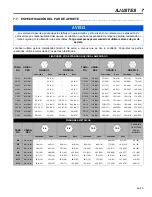
Page 35: ... apagado del motor 18 6 5 Ruedas de transporte juego opcional 62293 19 6 6 Recogedor de hierba 19 6 7 Mecanismo de corte 20 6 8 Mantenimiento diario 21 7 AJUSTES 7 1 General 22 7 2 Molinete a cuchilla fija 22 7 3 Cuchilla fija 23 7 4 Freno 23 7 5 Altura de corte 24 7 6 Palanca 24 7 7 Especificación del par de apriete 25 8 MANTENIMIENTO 8 1 General 26 8 2 Motor 26 8 3 Aceite del motor 27 8 4 Combus...

Page 36: ... Nunca dirija la descarga de material hacia los transeúntes ni permita que nadie se acerque a la máquina mientras esté funcionando El operario es responsable de las lesiones causadas a las demás personas y o los daños a la propiedad 11 No manipule nunca equipo que no esté funcionando en perfecto orden o sin etiquetas protectores deflectores de descarga o cualquier otro dispositivo de protección fi...

Page 37: ...las instrucciones de este manual conseguirá prolongar la vida de su máquina y mantener su máxima eficacia Los ajustes y las tareas de mantenimiento deben ser realizadas siempre por un técnico cualificado Si necesita más información póngase en contacto con su distribuidor Jacobsen quien le informará de los métodos de mantenimiento más recientes y le proporcionará un servicio puntual y eficaz ADVERT...

Page 38: ...e una mezcla de combustible no utilice una con más de 10 de etanol En ninguna circunstancia se debe utilizar una mezcla con metanol Aceite de motor Capacidad 0 6 l Tipo SAE 10W 30 clasificación API SF o SG 2 3 CORTACÉSPED___________________________________________________________ Altura de corte 2 a 11 mm Cuchillas fijas Acero de carbono reforzado Perfil alto Corte de 4 mm Perfil bajo Corte de 2 8...

Page 39: ...mpuesto esmerilado 120 limaduras 5002489 5 kg 5002491 12 5 kg Juego de luces 5002962 Pintura naranja spray de 450 ml 554598 Cepillo de empuje 68500 Rodillo suave con raspador 68530 Cepillo giratorio suave se requiere 68557 68560 Rodillo de tubo sólido con raspador 68641 Turf Groomer 68579 Molinete vertical 68556 Lata de combustible de 10 l 554948 Lata de combustible de 10 l 554949 Juego de enganch...

Page 40: ...1HWWR JH QVWDOOHHUG YHUPRJHQ ႛ QVWDOOHHULWXG QHWRY LPVXV ႛ VHQQHWWX QHWWRWHKR ႛ 3XLVVDQFH QRPLQDOH QHWWH ႛ QVWDOOLHUWH 1HWWROHLVWXQJ ႛ ˈ ˮ ˢˠ ˢ ˤ ˤ ႛ 1HWWµ EH S WHWW WHOMHV WP Q ႛ 3RWHQ D QHWWD LQVWDOODWD ႛ 3DUHG ÕWÃ WíNOD MDXGD ႛ U QRML JDOLD ႛ LVDಬ WDO 4WXJé ႛ 0RF DLQVWDORZDQD QHWWR ႛ 3RW QFLD LQVWDODGD ႛ 3XWHUHD LQVWDODWÅ QHWÅ ႛ ÎLVW LQģWDORYDQ Y NRQ ႛ 1HWR YJUDMHQD PRÏ ႛ 3RWHQFLD LQVWDODGD QHW...

Page 41: ...SHUDGRU ႛ MXGQLY YLG I UDUHQV UD ႛ YD DVWLJ I ULU VWMµUQDQGD ႛ 6Wº QLY YHG RSHUDWºUHQV ºUH ႛ 㝜 勂㡐 儶 ႛ OMµ VW UNXU I ULU VWMµUQDQGD ႛ ኇ ዉዙኜሯ ሻቮ没檂ዉ ወ ႛ ꩡ끞녅 뙢閶 ꭁ넁 ꆽꙝ ႛ 2SHUDW U XODN U OW H L ႛ G D HT G D HT DUPRQLVHG VWDQGDUGV XVHG ႛ ႛ 3RXŀLW KDUPRQL RYDQ QRUP ႛ UXJWH KDUPRQLVHUHGH VWDQGDUGHU ႛ HEUXLNWH JHKDUPRQLVHHUGH VWDQGDDUGV ႛ DVXWDWXG KWOXVWDWXG VWDQGDUGLG ႛ WHW W KGHQPXNDLVWHWXW VWDQGDUGLW ႛ 1...

Page 42: ... HPLWLU D GHFODUD R HP QRPH GR IDEULFDQWH TXH SRVVXL D GRFXPHQWD R W FQLFD TXH HVW DXWRUL DGD D FRPSLODU R SURFHVVR W FQLFR H TXH HVW HVWDEHOHFLGD QD RPXQLGDGH 6HPQÅWXUD SHUVRDQHL PSXWHUQLFLWH VÅ HODERUH H GHFODUDĥLD Q QXPHOH SURGXFÅWRUXOXL FDUH GHĥLQH GRFXPHQWDĥLD WHKQLFÅ HVWH DXWRUL DWÅ VÅ FRPSLOH H GRVDUXO WHKQLF ġL HVWH VWDELOLWÅ Q RPXQLWDWH 3RGSLV RVRE SRYHUHQHM Y VWDYHQ P Y KO VHQLD Y PHQH Y...

Page 43: ...o con la máquina estacionada Directiva de seguridad de maquinaria 2006 42 EC Según Los reglamentos sobre cortacéspedes EN836 1997 Referentes a manos brazos BS EN ISO20643 2008 Información suministrada para la Directiva sobre agentes físicos 2002 44 EC Según Estándares sobre manos brazos BS EN ISO 5349 1 2001 BS EN ISO 5349 2 2001 PGM 22 Nivel de aceleración en manos brazos 63280 PGM 22 11 cuchilla...

Page 44: ...moving parts 5 Never carry passengers 6 Keep bystanders away 361854 To avoid serious bodily injury stop engine and disengage reels before working on mower or emptying baskets DANGER 3001235 1 No opere esta maquina sin previo ent renamiento instruccion y sin haber leido el manual de operacion 2 Tenga todas las guardas en su lugar y plezas bien aseguradas 3 Neutralice todas las velocidades y apa gue...

Page 45: ... OPC 4 2 INSPECCIÓN INICIAL ______________________________________________________ 1 Realice una inspección visual de la unidad busque indicios de desgaste piezas sueltas y componentes dañados durante el transporte 2 Revise la pintura y las etiquetas en busca de daños o arañazos Los adhesivos ofrecen consejos importantes sobre funcionamiento y seguridad Sustituya los adhesivos que falten o que sea...

Page 46: ...El enganche debe desactivarse para encender el motor D Interruptor del motor El interruptor del motor se encuentra ubicado en el motor y debe estar en la posición ON para arrancar el motor El interruptor del motor debe estar en posición ON encendido para que el motor funcione Al poner el interruptor del motor en posición OFF apagado el motor se para Figura 5A Figura 5B Desbloquear Bloquear Combust...

Page 47: ...alanca de la válvula del combustible debe estar en posición ON conectado para que el motor gire Cuando el motor no esté en uso deje la palanca de la válvula del combustible en posición OFF desconectado para evitar una inundación en el carburador y reducir la posibilidad de una fuga de combustible H Parada E Utilizada para parar el motor Baje el interruptor para apagar el motor y súbalo para encend...

Page 48: ... parada del motor Parada E que para el motor desde la opsición del operario 2 Para probar el sistema a Ponga la máquina en el elevador b Suelte la palanca del embrague del molinete E 3 Encienda el motor a Mueva el enganche a la izquierda y active el enganche OPC b La velocidad del motor aumentará se activará el mecanismo de la transmisión y las ruedas comenzarán a girar c Suelte el enganche OPC El...

Page 49: ... césped 10 Desengranar el embrague del molinete cuando se crucen caminos o carreteras Esté atento al tráfico 11 Pare y revise el equipo en busca de daños inmediatamente después de chocar con un obstáculo o si la máquina comienza a vibrar anormalmente Repare el equipo antes de reanudar el trabajo 12 Reduzca la velocidad y tenga sumo cuidado en pendientes Tenga cuidado cuando trabaje cerca de pendie...

Page 50: ...ue No incline el cortacésped hacia atrás al encender el motor 7 Cuando se encienda el motor mueva la palanca del estrangulador F hasta la posición ABIERTO Puede que sea necesario usar de modo intermitente el estrangulador cuando el motor esté frío 8 Deje que se caliente el motor poco a poco Parada 1 Para parar el motor suelte el enganche OPC C y coloque el interruptor del motor D en OFF Cierre la ...

Page 51: ...te para quitarlo de su soporte arrancar el motor y engranar la palanca del OPC C 6 Si se transporta el cortacésped sobre un vehículo aplicar el freno de estacionamiento apagar el motor y cerrar la válvula de corte de combustible Bloquear las ruedas 7 Mantener la presión de los neumáticos de 0 41 a 0 55 Bar Figura 6D 6 6 RECOGEDOR DE HIERBA___________________________________________________ 1 Cuand...

Page 52: ...ra girar a la derecha gire el cortacésped ligeramente a la izquierda 2 Cuando el cortacésped se haya movido alrededor de la mitad de su propia anchura a la izquierda gírelo rápidamente a la derecha 3 y 4 guiándolo con la mano derecha Este método permite girar rápidamente en pocos pasos Figura 6E 4 Para asegurar un corte completo y uniforme solape las pasadas unos 25 o 51 mm y luego haga una o más ...

Page 53: ...r latas y embudos para el llenado de combustible 5 Guarde el combustible según la normativa local regional o nacional y las recomendaciones de su proveedor de combustible 6 Revise el aceite del motor al comienzo y el final de cada día antes de encender el motor Si el nivel de aceite está bajo retire la tapa de llenado de aceite y añada el aceite necesario No llene demasiado AVISO Se sabe que la ut...

Page 54: ...al de la cuchilla fija Utilice una lima plana para aplanar la cuchilla fija 3 Si el desgaste o el daño de el molinete o la cuchilla fija impide su rectificado mediante pulido deben ser afilados de nuevo 4 Es sumamente importante que el molinete y la cuchilla fija estén perfectamente ajustados Se debe mantener una separación de entre 0 025 y 0 076 mm en toda la longitud de el molinete y la cuchilla...

Page 55: ...hilla fija están bien ajustados el molinete girará libremente y podrá cortar un trozo de periódico a lo largo del molinete cuando el papel se sujeta a 90 respecto a la cuchilla fija Figura 7C 7 4 FRENO __________________________________________________________________ Un freno ajustado apropiadamente requiere una resistencia de 4 5 kg en el vértice de la palanca del freno para engranar y debe habe...

Page 56: ... P y luego apretar la tuerca mariposa para asegurar el ajuste 4 Coloque la barra calibradora entre el rodillo delantero y el rodillo de tracción cerca del extremo exterior de los rodillos 5 Deslizar la cabeza del tornillo sobre la cuchilla de platina Q y ajustar la perilla L para reducir la separación entre el rodillo y la barra calibradora Apretar la tuerca M 6 Repetir los pasos 4 y 5 en el extre...

Page 57: ...111 109 148 115 156 154 209 1 4 20 in lb Nm 75 8 4 100 11 3 107 12 1 143 16 1 9 16 18 ft lb Nm 92 124 122 165 129 174 172 233 1 4 28 in lb Nm 85 9 6 115 13 0 120 13 5 163 18 4 5 8 11 ft lb Nm 113 153 151 204 159 215 211 286 5 16 18 in lb Nm 157 17 7 210 23 7 220 24 8 305 34 4 5 8 18 ft lb Nm 128 173 170 230 180 244 240 325 5 16 24 in lb Nm 173 19 5 230 26 0 245 27 6 325 36 7 3 4 10 ft lb Nm 200 27...

Page 58: ...on esta máquina se incluye un Manual del Motor adicional preparado por el fabricante del motor Lea este manual detenidamente hasta familiarizarse con la operación y mantenimiento del motor La atención adecuada a las indicaciones del fabricante asegurarán una vida de servicio máxima del mismo Para pedir manuales de recambio del motor se deberá poner en contacto con el fabricante del mismo El rodaje...

Page 59: ...el cuello del tubo de llenado de combustible Evite utilizar latas y embudos para el llenado de combustible Guarde el combustible según la normativa local regional o nacional y las recomendaciones de su proveedor de combustible Nunca haga rebosar el depósito de combustible ni deje que se vacíe totalmente Utilice gasolina sin plomo limpia nueva de grado regular con un mínimo de 86 octanos Consulte e...

Page 60: ...y ajuste su separación al molinete de la manera descrita en la Sección Sección 7 3 3 Desactivar el embrague del molinete e inclinar la máquina hacia atrás para que descanse sobre el asa 4 Quitar la cubierta del eje y la empaquetadura del lado derecho del molinete Instalar un perno de 3 8 24 y una contratuerca en el extremo del eje y conectarlo a una máquina de esmerilado a Aplicar pasta de lapidar...

Page 61: ... Nm 2 Limpie el exterior del motor Pinte el metal expuesto o aplique una capa fina de aceite antioxidante 3 Para impedir la acumulación de residuos gomosos y capas de barniz llene el depósito con combustible estabilizado Use un acondicionador de combustible antioxidante por ejemplo STA BIL Lea y siga las instrucciones dadas en el envase 4 Haga funcionar el motor durante 5 minutos para distribuir e...

Page 62: ...a con dificultad o funciona irregularmente falla pierde potencia o se apaga Estrangulador en posición incorrecta Fuga de combustible Combustible sucio o de tipo incorrecto Cables sueltos Entrada de aire obturada Orificio de ventilación del tapón de combustible obstruido Consulte el Manual del motor Apriete las abrazaderas de las mangueras Rellene con combustible limpio del grado correcto Revise el...

Page 63: ...mente 20 50 100 300 Anualmente Lubricante Filtro de aire I C Cámara de combustión C Aceite de motor I R R I Conducto de combustible R 2 años Bujía A R Separación de válvulas A Puntos de engrase Figura 7C 1 Rodillo L L II 2 Ajuste de altur L II 3 Eje de molinete RT L II 4 Rodillo de tracción L II 5 Cojinete del eje del embrague L II 6 Eje del pivote del embrague L III 7 Cojinete de aguja del embrag...

Page 64: ...9 NOTAS es 32 9 NOTAS ...

Page 65: ...bricante o placa de serie de su artículo 4 Especifique la cantidad deseada el número de pieza y la descripción de la pieza según aparece en la lista de piezas 5 Envíe o lleve el pedido a un distribuidor autorizado Jacobsen 6 Revise todos los envíos al recibirlos Si alguna pieza está dañada o faltante enviar una reclamación con el transportista antes de aceptar 7 No envíe material sin una carta de ...

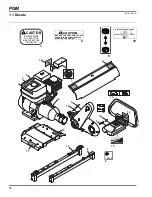
Page 66: ... TO ENGAGE TRACTION 2 SQUEEZE BAIL TO HANDLE 16 16 PGM 1 1 Decals Serial No All BE SURE THE TRACTION CLUTCH LEVER IS IN NEUTRAL BEFORE STARTING THE ENGINE CAUTION 1 REEL CLUTCH CONTROL ENGAGE DISENGAGE J T 3001792 10 9 ALLOW ENGINE TO COOL FOR 2 MINUTES BEFORE REFUELING CAUTION 2 ...

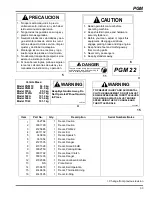
Page 67: ...plezas en movimiento 5 No deberan transportar pasajeros si no existe un asiento para ellos 6 Si no sabe leer ingles pida que aiguien le lea las calcomanias de avisos y los manuales de instruccion y operacion PRECAUCION 5 CAUTION 1 Read operators manual before operating machine 2 Keep shields in place and hardware securely fastened 3 Before you clean adjust or repair this equipment disengage all dr...

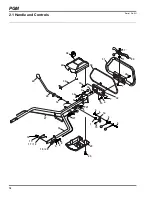
Page 68: ...34 A A B B C C 1 1 2 3 4 5 5 5 6 6 7 7 8 8 9 10 11 12 13 14 15 16 17 18 19 20 21 22 23 24 25 26 27 27 28 29 30 31 32 33 34 35 36 37 38 39 PGM 2 1 Handle and Controls Serial No All ...

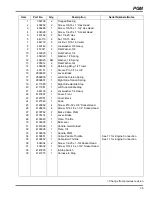
Page 69: ...9900 1 Left Side Torsion Spring 18 2809901 1 Right Side Torsion Spring 19 4117380 1 Right Side Handle Stop 20 4117381 1 Left Side Handle Stop 21 446130 4 Lockwasher 1 4 Heavy 22 4147697 1 Cover Front 23 4127051 1 Cover Back 24 4127340 1 Knob 25 4128662 4 Screw 10 32 x 3 8 Socket Head 26 4128933 4 Screw 5 16 18 x 1 1 2 Socket Head 27 4130762 2 Brake Cable PGM 28 4131414 1 Lever Brake 29 4136323 1 P...

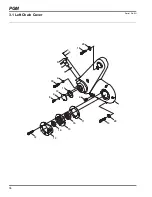
Page 70: ...36 8 9 10 11 18 4 3 4 5 6 7 18 20 1 2 19 20 12 13 14 15 16 17 PGM 3 1 Left Chain Cover Serial No All ...

Page 71: ...46110 2 Lockwasher 8 Medium 10 304758 1 Cover 11 304757 1 Gasket 12 434041 4 Screw 1 4 20 x 3 4 Flat Soc Hd 13 1001309 1 Bracket L H Brake Mounting 14 313777 1 Seal Oil 15 3002906 7 1 Housing Bearing 16 303566 1 Bearing 17 304747 1 Gasket 18 434043 3 Screw 1 4 20 x 2 1 4 Socket Head 19 434042 5 Screw 1 4 20 x 1 1 2 Socket Head 20 3006511 5 Washer Required for proper sealing of Left Side Frame 4731...

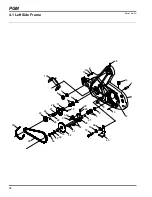
Page 72: ...38 17 8 7 37 36 23 24 21 20 18 34 24 39 35 33 32 22 31 31 30 30 26 27 5 2 15 16 38 25 6 13 12 14 1 28 29 19 5 4 11 10 9 40 3 PGM 4 1 Left Side Frame Serial No All ...

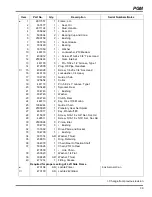
Page 73: ... 461173 1 Pin 5 32 x 1 Groove Type 1 20 503448 1 Sprocket Reel 21 304743 1 Bushing 22 304745 1 Washer 23 304746 1 Clutch Reel 24 463113 2 Key 3 4 x 3 16 Morton 25 1004944 1 Guide Chain 26 2500020 1 Planetary Gear Set Spider 27 463017 1 Key Woodruff 9 28 415007 1 Screw 5 16 18 x 3 8 Set Soc Hd 29 428511 1 Screw 5 16 18 x 5 16 Set Soc Hd 30 2500024 3 Pinion Idler 31 304718 3 Bushing 32 131832 1 Driv...

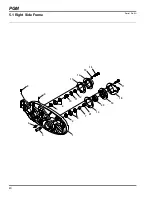
Page 74: ...40 8 9 6 5 1 2 4 7 21 13 20 19 18 3 4 10 11 12 13 14 15 16 17 PGM 5 1 Right Side Frame Serial No All ...

Page 75: ...Fitting Grease 9 471214 1 Fitting Grease 10 363047 1 Spring Tension 11 453020 1 Flat Washer 5 8 12 444713 1 Locknut 5 8 16 Center Jam 13 304747 2 Gasket 14 348847 1 Cover Reel Bearing 15 446130 4 Lockwasher 1 4 Heavy 16 434028 4 Screw 1 4 20 x 3 4 Socket Hd 17 434041 4 Screw 1 4 20 x 3 4 Flat Socket Hd 18 1001308 1 Bracket R H Brake Mounting 19 3002907 7 1 Housing Bearing 20 343667 1 Bearing Ball ...

Page 76: ... 10 503477 22 High Profile 503478 22 Low Profile 503479 22 Tournament 5002887 22 Special Tournament Standard Bedknife Options 4131369 22 High Profile 4131001 22 Low Profile 4131370 22 Tournament 4131003 22 Special Tournament 4131005 22 Medium Section Optional MagKnife Bedknife PGM 6 1 Cross Bars Reel and BedKnife Serial No All ...

Page 77: ...1 2 Flat Head 20 365502 1 Screw L H Bedknife Mounting Apply Never Sieze to bolt 21 365501 1 Screw R H Bedknife Mounting Apply Never Sieze to bolt 22 454017 2 Washer Shakeproof Cone 23 332516 2 Rod Bedknife Adjusting 24 307456 4 Cup Bedknife Adjusting Spring 25 307360 2 Spring Bedknife Adjusting 26 350626 4 Nut Bedknife Adjusting 27 307373 1 Support Spring 28 343616 2 Stud 29 3005692 2 Nut Roller A...

Page 78: ...44 1 2 3 32 4 5 6 7 8 9 10 11 11 12 13 14 31 15 17 18 21 23 29 24 25 26 19 Throttle Cable Installation 20 22 Part of Engine Part of Engine 27 16 27 28 29 PGM 7 1 Engine and Clutch Serial No All ...

Page 79: ...03 1 Key 1 2 x 1 8 Woodruff 14 503532 1 Engine 4HP Honda 15 320774 1 Key 3 16 x1 1 2 Square 16 4108643 1 Spring Throttle Plate 17 4135990 1 Torque Clutch Engages at 2000 RPM 18 4245695 1 Clutch Shaft PGM 19 4136549 1 Guide Cable 20 4136554 1 Collar Cable Stop 21 1 Set Screw 6 32 22 4137299 1 Set Screw 6 32 x 3 16 Cup 23 400218 2 Screw 5 16 24 x 1 2 Hex Head 24 400108 4 Screw 1 4 20 x 3 4 Hex Head ...

Page 80: ...46 10 8 7 4 2 3 1 6 5 21 20 5 6 3 2 4 7 9 11 12 8 13 14 15 16 15 11 17 18 19 PGM 8 1 Traction Rollers Serial No All ...

Page 81: ...rust 7 103862 2 Housing Differential 8 308033 2 Bushing 9 400059 6 Screw 10 24 x 5 8 Hex Socket 10 444782 6 Locknut 10 24 Center 11 338394 2 Hub Roller 12 471214 2 FItting Grease 13 400190 6 Screw 5 16 18 x 1 1 4 Hex Head 14 446136 6 Lockwasher 5 16 Heavy 15 163523 2 Roller Traction 16 471222 2 Fitting Grease 17 304569 2 Bushing 18 366648 2 Seal Grease 19 364171 8 Bolt Special 20 308028 1 Shaft Pi...

Page 82: ...48 17 14 15 12 13 10 20 21 11 5 5 3 18 19 23 16 2 3 1 4 6 7 8 9 22 22 PGM 9 1 Transport Wheels Serial No All ...

Page 83: ... 8 361451 1 Washer 9 164056 2 Band Brake 10 366742 2 Pin Brake Band 11 415513 2 Screw 1 4 20 x 1 2 Socket Set 12 461389 2 Pin 7 32 x 1 1 4 Roll 13 3004621 2 Sleeve Clutch 62293 1 Pneumatic Transport Tires Optional Kit 14 4256478 2 Rim 5 x 3 15 360111 2 Valve 16 4256477 2 Tire 11 x 4 5 17 434049 6 Screw 5 16 18 x 2 Socket Head 18 271920 2 Spacer Wheel 19 366719 2 Latch 20 366716 6 Spacer 21 366704 ...

Page 84: ...66708 35 366716 49 366718 49 366719 49 366742 49 400102 37 400106 43 400108 45 400184 43 400190 47 400194 45 400218 45 400262 35 400266 43 400268 35 403528 37 403723 47 403912 39 4108643 45 4117380 35 4117381 35 4125685 33 4127051 35 4127335 33 4127340 35 4128662 35 4128933 35 4130298 43 4130762 35 4131414 35 4131528 33 4135990 45 4136323 35 4136325 35 4136328 35 4136539 35 4136549 45 4136551 35 4...

Page 85: ...51 INDEX 503448 39 503477 2 503478 2 503479 2 503532 45 545940 39 41 554847 49 62293 49 ...

Page 86: ......

Page 87: ......

Page 88: ...ory trained technicians backed by Genuine Jacobsen Parts provide reliable high quality product support El equipo de Jacobsen está construido exactamente conforme a las normas establecidas por las certificaciones ISO 9001 e ISO 14001 en todas nuestras plantas de fabricación Una red mundial de distribuidores y técnicos capacitados en fábrica y respaldados por las piezas originales Jacobsen ofrece as...

Reviews: