background image

Micro-JLT GNSS™ User Manual

64

© 2019 Jackson Labs Technologies, Inc.


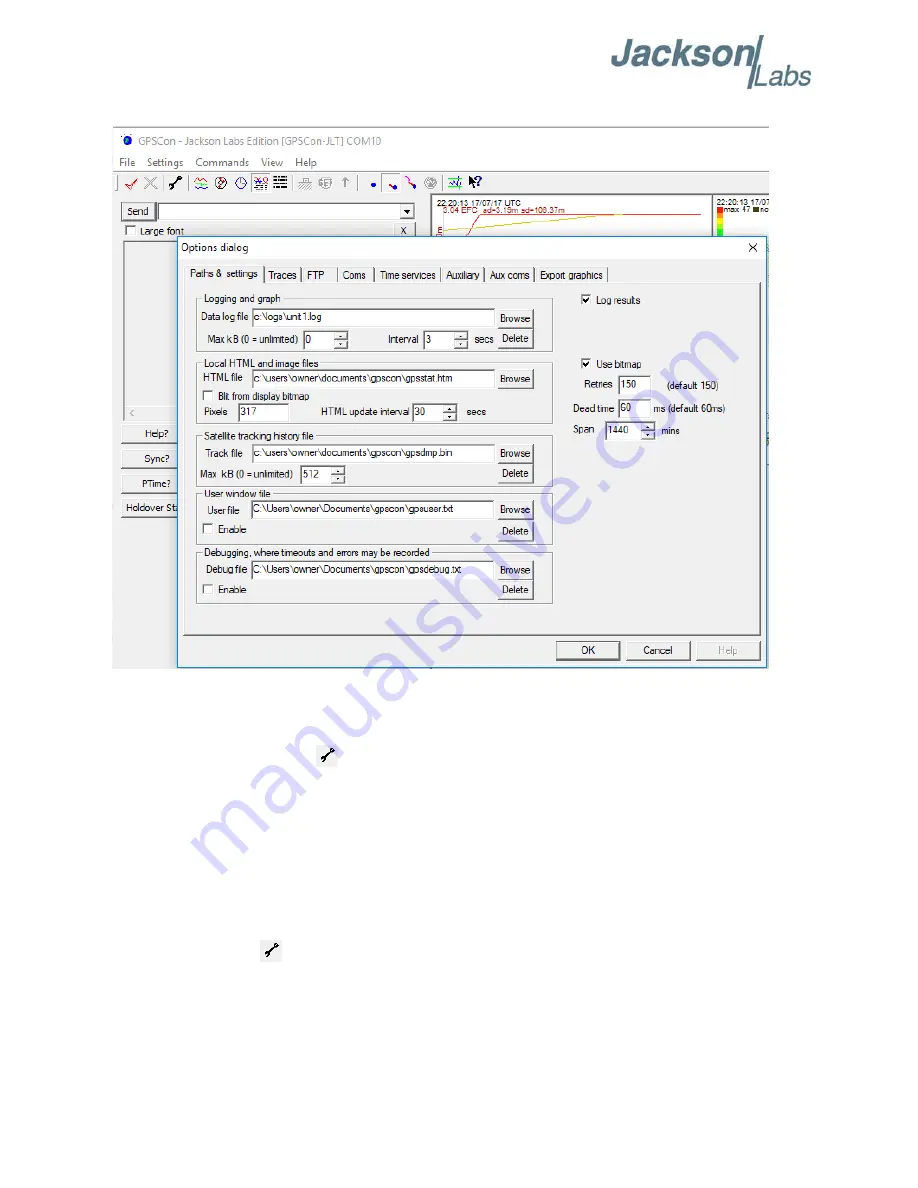
Figure 5.1 Options window

5.3.1.1 Communication Parameters

Before you can use GPSCon you must set the communication parameters for your system. Open the 
dialog box by pressing the 

 wrench icon. Then select the “Coms” tab. You will see the window 

shown in 

Figure 5.2

. Available COM ports for your particular computer are indicated with a “*” 

symbol next to the COM port number in the drop-down menu. You can only select COM ports with 
this adjacent symbol. Select the correct COM port for your computer’s serial port connection and set 
the baud rate to 115200, parity to None, Data Bits to 8 and Stop Bits to 1. Set Flow Control to 
“None”. Once you have configured the communication parameters, press the “OK” button to close 
the window.

5.3.1.2 Auxiliary Parameters

After pressing the 

 wrench icon, you can select the “Auxiliary” tab to configure auxiliary 

measurements. See 

Figure 5.3

 for an example of an auxiliary measurement. You will notice that the 

“Aux1” request string has been set to 

meas:current?<CR>

 and the “Trace to go to” is set to trace 

position 6. See “Trace position” diagram for the arrangement of the trace positions in the trace 
window. In this example the data obtained from the meas:current? query will be plotted in trace 

Summary of Contents for Micro-JLT GNSS

Page 1: ...Micro JLT GNSS User Manual Document 80200550 Version 1 2 Date November 6 2019...

Page 2: ...Micro JLT GNSS User Manual Copyright 2019 Jackson Labs Technologies Inc...

Page 3: ...13 3 2 General SCPI Commands 13 3 2 1 Quick Start Commands 13 3 2 2 IDN 14 3 2 3 HELP 14 3 3 GPS Subsystem 14 3 3 1 GPS SATellite 15 3 3 2 GPS SATellite TRAcking COUNt 15 3 3 3 GPS SATellite VISible...

Page 4: ...OUTput ON OFF 29 3 5 6 PTIMe LEAPsecond 30 3 5 7 PTIMe LEAPsecond PENDing 30 3 5 8 PTIMe LEAPsecond ACCumulated 30 3 5 9 PTIMe LEAPsecond DATE 31 3 5 10PTIMe LEAPsecond DURation 31 3 5 11PTIMe STAMp S...

Page 5: ...te SERial PROmpt ON OFF 47 3 9 3 SYSTem COMMunicate SERial BAUD 9600 19200 38400 57600 115200 47 3 9 4 SYSTem STATus 47 3 9 5 SYSTem FACToryReset ONCE 47 3 9 6 SYSTem CPURESET 47 3 9 7 SYSTem ISP 48 3...

Page 6: ...eters 64 5 3 1 2 Auxiliary Parameters 64 5 3 1 3 Traces Parameters 65 5 3 2 Sending manual commands to the receiver 67 5 3 3 Using the Mouse in the Graph Window 67 5 3 4 Exporting the graphics 69 5 4...

Page 7: ...run in stationary Position Hold mode as well as 3D mobile mode to discipline either a single oven or optional double oven OCXO local oscillator to better than 0 1ppb frequency accuracy typically It s...

Page 8: ...Antenna Lightning Protector Always use a UL approved and properly installed GNSS Antenna Lightning protector on the coaxial GNSS antenna feed to prevent damage injury and or death in case of a lightn...

Page 9: ...Conditions This instrument is intended for indoor use It is designed to operate at a maximum relative non condensing humidity of 95 and at altitudes of up to 50 000 meters Refer to the specifications...

Page 10: ...Micro JLT GNSS User Manual 4 2019 Jackson Labs Technologies Inc...

Page 11: ...ith significantly better than 1ppb frequency accuracy By default the unit will be set to Position Hold mode and an antenna position Auto Survey process is started after power on that may take up to 3...

Page 12: ...rt website page for free WARNING Do not connect RS 232 serial levels to connector J1 The unit may become damaged from RS 232 serial levels on connector J1 as the default configuration is RS 422 differ...

Page 13: ...Micro JLT GNSS User Manual Figure 2 2 Micro JLT GNSS Double Oven PCB 2 1 2 Mechanical Drawings The following drawings show the mechanical dimensions and the pinout of the Micro JLT GNSS PCB Figure 2 3...

Page 14: ...ive signal J1 Pin 7 RX Serial P RS 422 positive signal input RXD_TTL RS 422 level positive signal TTL level RS 422 positive signal TTL SCPI communications port input to unit J1 Pin 8 RX Serial N RS 42...

Page 15: ...1 is equivalent to a standard 3 3V TTL serial output and may be used as such when used without termination If the Micro JLT GNSS is ordered with the TTL option pin 5 of connector J1 TXD_TTL pin 7 of c...

Page 16: ...representation of UTC USNO available The selection of GNSS systems is made with the GPS SYST SEL command as detailed in Section 3 3 33 Because these systems operate at different carrier frequencies w...

Page 17: ...high frequency accuracy typically better than 10 digits of frequency accuracy when locked to GNSS signals 2 5 Remote serial control The unit is controlled via the RS 422 TTL serial port at 115200 bau...

Page 18: ...the Integral part of the PID loop This corrects phase offsets between the Micro JLT GNSS 1PPS signal and the UTC 1PPS signal as generated by the GNSS receiver Set higher values for tighter phase follo...

Page 19: ...Micro JLT GNSS GNSDO Additional information regarding the SCPI protocol syntax can be found on the following web site http www ivifoundation org scpi A basic familiarity with the SCPI protocol is rec...

Page 20: ...ight in MSL Meters rather than in GPS Meters on all commands that return antenna height the legacy Fury GPSDO uses GPS height The NMEA position fixes are in the WGS84 coordinate system while the X Y a...

Page 21: ...tes PRN that the almanac predicts should be visible given date time and position 3 3 4 NMEA Support The following NMEA commands allow the Micro JLT GNSS GNSDO to be used as an industry standard naviga...

Page 22: ...ports PJLTS and PJLTV Jackson Labs proprietary NMEA sentences PASHR and a proprietary version of the GGA sentence GGASTat described in Section 3 3 6 Please note that the position direction and speed d...

Page 23: ...ion of the lock state variable The command allows capture of the position and other information available in the GGA command as well as tracking the lock state and health of the unit s OCXO performanc...

Page 24: ...described in Section 3 3 4 3 3 10 GPS GPGSV int 0 255 This command instructs the Micro JLT GNSS to send the NMEA standard GSV message every N seconds with N in the interval 0 255 The command is disabl...

Page 25: ...city in the y direction cm s ccccc is the velocity in the z direction cm s ddd is the speed accuracy estimate cm s eeeeeeeee is the GPS TOW in seconds ff is the current UTC leap second offset in secon...

Page 26: ...00 0 00 8 00 0 00 0 0 46 21 Please note that the length of the string is fixed at 115 characters plus the two binary 0x0d 0x0a termination characters PASHR POS 0 aa bbbbbb 00 cccc ccccc d eeeee eeeee...

Page 27: ...d is the lock status e eeeeeee is the EFC voltage ff ffff is the EFC percentage 0 to 100 g gEhh is the estimated frequency accuracy similar to 100s ADEV in scientific notation iii is the seconds in h...

Page 28: ...for the most accurate GPS coordinates to be provided in high dynamic applications such as Jet aircraft Doppler tracking is enabled in all airborne modes as Carrier Phase tracking is very difficult to...

Page 29: ...The current dynamic state being applied to the GNSS receiver can be queried with the command GPS DYNAMic STATe Please note that this command syntax has changed from previous products such as the FireF...

Page 30: ...dynamics The dynamic state is always set to STATIONARY if one of the Position Hold Auto Survey stationary modes is selected using the command GPS TMODe as the Position Hold mode setting overrides any...

Page 31: ...for a 0 0ns offset to the UTC 1PPS time pulse Change in this command will be effective after the next power cycle or after the GPS RESET ONCE command is sent 3 3 23 GPS REFerence PULse SAWtooth This...

Page 32: ...he Survey when the minimal duration has been reached and the variance of the average position is under the specified minimum variance 3 3 28 GPS SURVey VARIANCE mm 2 This command specifies the minimum...

Page 33: ...and positioning information for the NMEA data and to generate the 1PPS reference for the GNSDO The command is followed by a list of the shortened names of the GNSS systems to enable The shortened nam...

Page 34: ...n the Micro JLT GNSS 3 4 3 GYRO CAL float float float float float float This command is not supported in the Micro JLT GNSS 3 4 4 GYRO CAL COMPUTE This command is not supported in the Micro JLT GNSS 3...

Page 35: ...he local time is referenced to UTC time The hour minute and second is returned 3 5 3 PTIMe TIME STRing This query returns the current 24 hour time suitable for display for example 13 24 56 3 5 4 PTIMe...

Page 36: ...ts in NV memory and applies them correctly even if the antenna is removed prior to the leapsecond as long as the pending information has been received and stored in NV memory and the unit has a proper...

Page 37: ...3 5 11 PTIMe STAMp Subsystem This subsystem is unrelated to OCXO disciplining For more information on OCXO disciplining please refer to Section 3 6 The commands below are implemented for time stamping...

Page 38: ...fer to Section 3 5 15 for more information on filters Lastly the time stamps can be outputted to the RS 422 TTL serial interface Please refer to Section 3 5 12 for more information on time stamp outpu...

Page 39: ...E ASYnc command GPS time stamp 2059 520524 000000016 Below is few samples of the results displayed when using the PTIMe STAMp MODE OUTput or PTIMe STAMp MEMory commands 01 2060 167182 000000061 first...

Page 40: ...ime stamps based on the type of filter By default the filter is in OFF mode which the filter is disabled allowing all time stamps to be processed Multiple filters can be enabled at onc except the OFF...

Page 41: ...d command found in Section 3 5 16 Variable N is the stored pulse period limit specified with the PTIMe STAMp FILTer 1PPeriod command found in Section 3 5 17 By default variable M is set to 1 and varia...

Page 42: ...cribed in Section 3 5 15 is disabled If this command is sent then the pulse storage period speci fied in the PTIMe STAMp FILTer 1PPeriod command in Section 3 5 17 will be reset to one The maximum numb...

Page 43: ...abled If this command is sent then the limit of stored time stamps specified in the PTIMe STAMp FILTer PPSecond command in Section 3 5 16 will be reset to one The maximum number of pulse period is one...

Page 44: ...more information on OCXO disciplining please refer to Section 3 6 This query returns all 100 most recent time stamps at once These time stamps are in GPS time for mat with week number and week second...

Page 45: ...ore information on time stamping please refer to Section 3 5 11 This subsystem regroups the commands related to the synchronization of the Micro JLT GNSS with the GNSS receiver The list of the command...

Page 46: ...exit the holdover state even while GNSS signals are still being properly received This forced holdover allows the unit to effectively disable GNSS locking while still keeping track of the state of the...

Page 47: ...SOURce MODE EDGE NEGative POSitive This command configures the triggering edge of the external PPS input source Pin 3 of J4 connector shown in Figure 3 1 for both OCXO disciplining discussed in Sectio...

Page 48: ...he reference 1PPS at which point the unit will initiate a counter reset jam sync aligning the oscillator driven 1PPS with the reference 1PPS phase The oscillator phase is slowly and continuously adjus...

Page 49: ...he 1PPS output signal is disabled until proper GNSS lock is achieved 3 6 14 SYNChronization OUTput 1PPS RESET This query returns the state of the SYNC OUT 1PPS RESET command and may return ON or OFF 3...

Page 50: ...lts in 0x40 0x10 0x4 0x54 The unit would thus indicate HEALTH STATUS 0x54 A health status of 0x0 indicates a properly locked and warmed up unit that is completely healthy and does not have any pending...

Page 51: ...t DIAGnostic 3 7 1 DIAGnostic ROSCillator EFControl RELative This query returns the Electronic Frequency Control EFC output value of the internal reference oscillator It returns a percentage value bet...

Page 52: ...Sure POWersupply This query returns the power supply voltage applied to the Micro JLT GNSS board 3 8 3 MEASure POWersupply VOSCillator This query returns the power supply voltage applied to the OCXO w...

Page 53: ...always 8 bit 1 stop bit no parity no HW flow control Upon Factory reset the speed is set at 115200 bauds Higher baud rates such as 115200 are suggested if several NMEA commands are enabled or high ra...

Page 54: ...tion float 10 0 10 0 SERVo PHASECOrrection float 500 0 500 0 SERVo COARSedac int 0 255 SERVo 1PPSoffset int ns 5000000 5000000 SERVo TRACe int 0 255 SERVo FASTlock int 1 20 SERVo FALEngth int 100 2000...

Page 55: ...ERVo FASTlock 3 10 2 SERVo FALEngth int 100 20000 This command adjusts the length of time during which the FASTLOCK feature is active please see the command SERVo FASTlock above The length can be set...

Page 56: ...ill query the state of this command SERVo EFCScale 3 10 6 SERVo EFCDamping int 2 4000 This command sets the Low Pass filter effectiveness of the DAC Values from 2 to 50 are typically used Larger value...

Page 57: ...ill query the state of this command SERVo PHASECOrrection 3 10 11 SERVo 1PPSoffset int ns 5000000 5000000 This command sets the Micro JLT GNSS 1PPS signal s offset to UTC in 5 55ns steps The maximum c...

Page 58: ...SERVo This command returns the result of the following queries SERVo DACGain SERVo EFCScale SERVo PHASECOrrection SERVo EFCDamping SERVo SLOPe SERVo COARSedac SERVo AGINGcompensation SERVo 1PPSoffset...

Page 59: ...link provided below Alternatively you can also use the Flash magic utility to perform the same upgrade The JLTerm application is available for download at http www jackson labs com index php support T...

Page 60: ...ownload The Micro JLT GNSS is RS 422 level TTL compatible An RS 422 TTL to RS 232 converter must be used when connecting to the computer s RS 232 serial port or to industry standard RS 232 to USB adap...

Page 61: ...rogramming begins Figure 4 2 Properly Program the unit in ISP mode It is important to put the device in ISP mode prior to conducting a firmware upgrade Failure to send the SYST ISP command may result...

Page 62: ...as shown in Figure 4 4 This will begin to download the firmware automatically and reset the board If there is a failure or error please refer to the next step Figure 4 4 Open Hex File and Download Fir...

Page 63: ...the Flash Magic Programming Utility A Open the Flash Magic utility Select the correct Device LPC1833 by clicking Change and select LPC1800 LPC1833 If Flash Magic version is 11 20 or older skip to Sect...

Page 64: ...to browse for the hex file that you downloaded in Section 4 4 E Check again for the Erase option Sectors used by file in Figure 4 7 F Go to Start section and press the gray start button You will obse...

Page 65: ...2019 Jackson Labs Technologies Inc 59 Micro JLT GNSS User Manual Figure 4 8 Flash Magic Programming Utility Classic Version Figure 4 9 Required Flash Magic Communications Options...

Page 66: ...r Figure 4 10 Device selection window C Expand the ARM CORTEX folder and select the appropriate processor in this case the LPC1833 Figure 4 11 Expanded device selection window D Select the Baud Rate o...

Page 67: ...d the warranty G Under Step 3 Hex File browse for the hex file that you downloaded in Section 4 4 H Under Step 4 Options check Activate Flash Bank I Go to Step 5 and press Start You will observe the f...

Page 68: ...Micro JLT GNSS User Manual 62 2019 Jackson Labs Technologies Inc...

Page 69: ...m index php support 5 2 Installation Extract the contents of the ZIP file downloaded from the Jackson Lab s website and execute the MSI installer Follow the on screen instructions to complete the inst...

Page 70: ...for your computer s serial port connection and set the baud rate to 115200 parity to None Data Bits to 8 and Stop Bits to 1 Set Flow Control to None Once you have configured the communication paramet...

Page 71: ...pressing the wrench icon you can select the Traces tab and configure the trace labels and vertical plot ranges See Figure 5 4 for an example of an auxiliary measurement The labels and parameters are c...

Page 72: ...Micro JLT GNSS User Manual 66 2019 Jackson Labs Technologies Inc Figure 5 3 Auxiliary Parameters window Figure 5 4 Traces Parameters window...

Page 73: ...ver over the buttons to see the exact command that is sent Figure 5 5 Sending manual commands 5 3 3 Using the Mouse in the Graph Window Refer to Figure 5 6 for the following description The default vi...

Page 74: ...t becomes the left end of the curve Then similarly click the right mouse button on the curve at the time you wish to be the right most portion of the magnified curve and it immediately becomes the end...

Page 75: ...the entire logfile contents Use the checkbox Export all graph data to make this choice You may select a size of the exported images in X and Y The file format may be BMP JPG GIF or PNG Your settings w...

Page 76: ...unit over a period of more than 200 hours The red trace is EFC crystal frequency control voltage The crystal is aging becoming faster in frequency over time This requires the control voltage to be low...

Page 77: ...the OCXO in the evenings heating it up and thus making the unit use lower power during that event In Figure 5 9 which is a zoom of Figure 5 8 we can see the phase offset error of the internal OCXO to...

Page 78: ...Micro JLT GNSS User Manual 72 2019 Jackson Labs Technologies Inc...

Page 79: ...stomer shall prepay shipping charges and shall pay all duties and taxes for products returned to Jackson Labs Technologies Inc for warranty service Except for products returned to Customer from anothe...

Page 80: ...ackson Labs Technologies Inc products are not intended for use in medical life saving or life sustaining applications 6 1 3 Exclusive Remedies THE REMEDIES PROVIDED HEREIN ARE THE CUSTOMER S SOLE AND...

Page 81: ...Second int 1 100 Added Section 3 5 17 PTIMe STAMp FILTer 1PPeriod int 1 604800 Added Section 3 5 18 PTIMe STAMp LAST Added Section 3 5 19 PTIMe STAMp MEMory Added Section 3 5 20 PTIMe STAMp RESET Adde...

Page 82: ...5 22 PTIMe Updated Section 3 6 1 SYNChronization HOLDover DURation Updated Section 3 6 2 SYNChronization HOLDover INITiate Updated Section 3 6 3 SYNChronization HOLDover RECovery INITiate Updated Sec...

Page 83: ...on 4 2 ISP Flash Loader Utility installation Updated Section 4 3 Putting the PCB into In Circuit Programming ISP mode Updated Section 4 4 Downloading the firmware Updated Section 4 4 3 Using the Flash...

Reviews: