


8/9
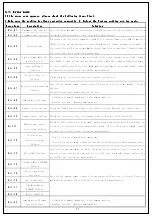
3.4 Error mode
3.4 Error mode
3.4 Error mode
3.4 Error mode
If the error code appears, please check the following items first:
If the error code appears, please check the following items first:
If the error code appears, please check the following items first:
If the error code appears, please check the following items first:
1.Make sure the machine
1.Make sure the machine
1.Make sure the machine
1.Make sure the machine has been connected correctly; 2. Reload the factory setting and try again.
has been connected correctly; 2. Reload the factory setting and try again.
has been connected correctly; 2. Reload the factory setting and try again.
has been connected correctly; 2. Reload the factory setting and try again.
Error Code
Error Code
Error Code
Error Code
Description
Description
Description
Description
Solution
Solution
Solution
Solution
E r r - 0 1
Hardware over-current Turn off the power switch, and restart after 30 seconds. If the controller still does
not work, please replace it and inform the manufacturer.
E r r - 0 2
Software over-current
E r r - 0 3
Under-voltage
Disconnect the controller power and check if the input voltage is too LOW (lower than
176V). If yes, please restart the controller when the normal voltage is resumed. If
the controller still does not work when the voltage is at normal level, please replace
the controller and inform the manufacturer.
E r r - 0 4
Over-voltage when the
machine is off
Disconnect the controller power and check if the input voltage is too high (higher
than 264V). If yes, please restart the controller when the normal voltage is resumed.
If the controller still does not work when the voltage is at normal level, please
replace the controller and inform the manufacturer.
E r r - 0 5
Over-voltage in
operation
E r r - 0 6
Short circuit of
solenoid
-Take plug out, if error continues, replace control box.
E r r - 0 7
Motor current measuring
failure
Turn off the system power, restart after 30 seconds to see if it works well. If such
failure
happens frequently, seek technical support.
E r r - 0 8
Sewing motor blocked
- Eliminate sluggish movement in the sewing machine
- Replace encoder - Replace sewing motor
E r r - 0 9
Brake circuit failure Check the brake resistor plug on the electric board. Replace the control box
E r r - 1 0
Communication failure Check the connection and if necessary plug in. Replace the control box.
E r r - 1 1
Machine head needle
positioning failure
Check if the connection line between machine head synchronizer and controller is
loose or not, restore it and restart the system. If it still does not work, please
replace the controller and inform the manufacturer.
E r r - 1 2
Initial motor
electrical angle
Failure
- Try 2 to 3 more times after power down
- if it still does not work, please replace the controller and inform the manufacturer.
E r r - 1 3
Motor HALL failure
turn off the system power, check if the motor sensor plug is loose or dropped off,
restore it and restart the system. If it still does not work, please replace the
controller and inform the manufacturer.。
E r r - 1 4
DSP Read/Write EEPROM
Failure
Turn off the system power, restart the system after 30 seconds, if it still does not
work,please replace the controller and inform the manufacturer.
E r r - 1 5
Motor over-speed
protection
E r r - 1 6
Motor reversion
E r r - 1 7
HMI Read/Write
EEPROM failure
E r r - 1 8
Motor overload
E r r - 2 3
Sewing motor blocked
encoder failure
- Eliminate sluggish movement in the sewing machine
- Replace encoder - Replace sewing motor
Summary of Contents for JK-58420J
Page 1: ......
Page 2: ......
Page 3: ......
Page 4: ...1 2 3 4 5 6 7 8 9 10 11 12 13 14 15 1 2 3 4...
Page 6: ...58420J 58420J Electronic Control Instructions...
Page 8: ...1 3 AC 2 2 1 2 1 2 2 1 12 2 13 W 14 15 16 17 18 2 7...
Page 23: ...2019 03 Edition 2019 March...


