


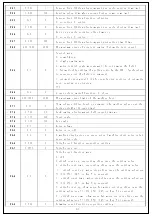


P 5 4
0~100
8
抬压脚电磁铁每周期关闭时间 ms
P 5 6
0/1
1
上电自动找上针位:
0:不找 1:找
P 5 7
0~600
100
抬压脚电磁铁保护时间 100ms
P 6 0
200~3000
2700
定长缝最高速(自动测试速度)
P 6 2
0~4
0
特殊运行模式:
0:操作工选择(正常);
1:简易缝模式;
2:测电机初始角(不再需要取下皮带);
3:计算传动比模式(需要有停针传感器,且不能取下皮带);
4:自动测试模式 1(带停针位的自动测试,运行 5S,停止 5S)。
P 6 6
0/2
2
2:打开安全开关功能;0:关闭
P 7 1
0~50
2
缓放压脚级别调整,数值越小放的越快;(超频打开时间)
P 7 6
1~500
60
倒缝电磁铁全出力时间 ms
P 7 8
1~359
120
钳线开始角度
P 7 9
0~359
320
钳线结束角度
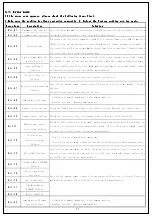
P 9 8
0~4
4
语音音量大小
P A 2
0-1
0
语音开关
P A 5
0-2
0
0 开机语音和按键语音 1 仅为开机语音 2 仅为按键语音
P A 6
1~100
1
stitch 计数器功能比例值设定
P A 7
1~9999
1
stitch 计数值设定
开机+P 165 参数改为 2007 恢复出厂设置
P A 8
0~6
0
stitch 计数器模式选择:
0:不计数;
1:依针数往上计数,数完设定值后自动重新计数;
2:依针数往下计数,数完设定值后自动重新计数;
3:依针数往上计数,数完设定值后,马达自动停止,须由 S4 [152.INI] =CRS 设定或
面板上的 A 键来启动重新计数;
4:依针数往下计数,数完设定值后,马达自动停止,须由 S4 [152.INI] =CRS 设定或
面板上的 A 键来启动重新计数;
5:依针数往上计数,数完设定值后,报错,马达不停止。当后踩脚踏板后,马达停止停
止,须由 S4 [152.INI] =CRS 设定或面板上的 A 键来启动重新计数;
6:依针数往下计数,数完设定值后,报错,马达不停止。当后踩脚踏板后,马达停止,
须由 S4 [152.INI] =CRS 设定或面板上的 A 键来启动重新计数。
P A 9
1~100
1
Trimming 计数器功能比例值设定
P A A
1~9999
1
Trimming 计数值设定
P A B
0~4
0
Trimming 计数器模式选择:
0:不计数;
1:Trimming 数往上计数,数完设定值后自动重新计数;
2:Trimming 数往下计数,数完设定值后自动重新计数;
3:Trimming 数往上计数,数完设定值后,马达自动停止,须由 S4 [152.INI] =CRS 设
定或面板上的 A 键来启动重新计数;
4:Trimming 数往下计数,数完设定值后,马达自动停止,须由 S4 [152.INI] =CRS 设
定或面板上的 A 键来启动重新计数;
5
/
7
Summary of Contents for JK-58420J
Page 1: ......
Page 2: ......
Page 3: ......
Page 4: ...1 2 3 4 5 6 7 8 9 10 11 12 13 14 15 1 2 3 4...
Page 6: ...58420J 58420J Electronic Control Instructions...
Page 8: ...1 3 AC 2 2 1 2 1 2 2 1 12 2 13 W 14 15 16 17 18 2 7...
Page 23: ...2019 03 Edition 2019 March...


