background image

GN 9350


GN 9330


GN 9330 USB

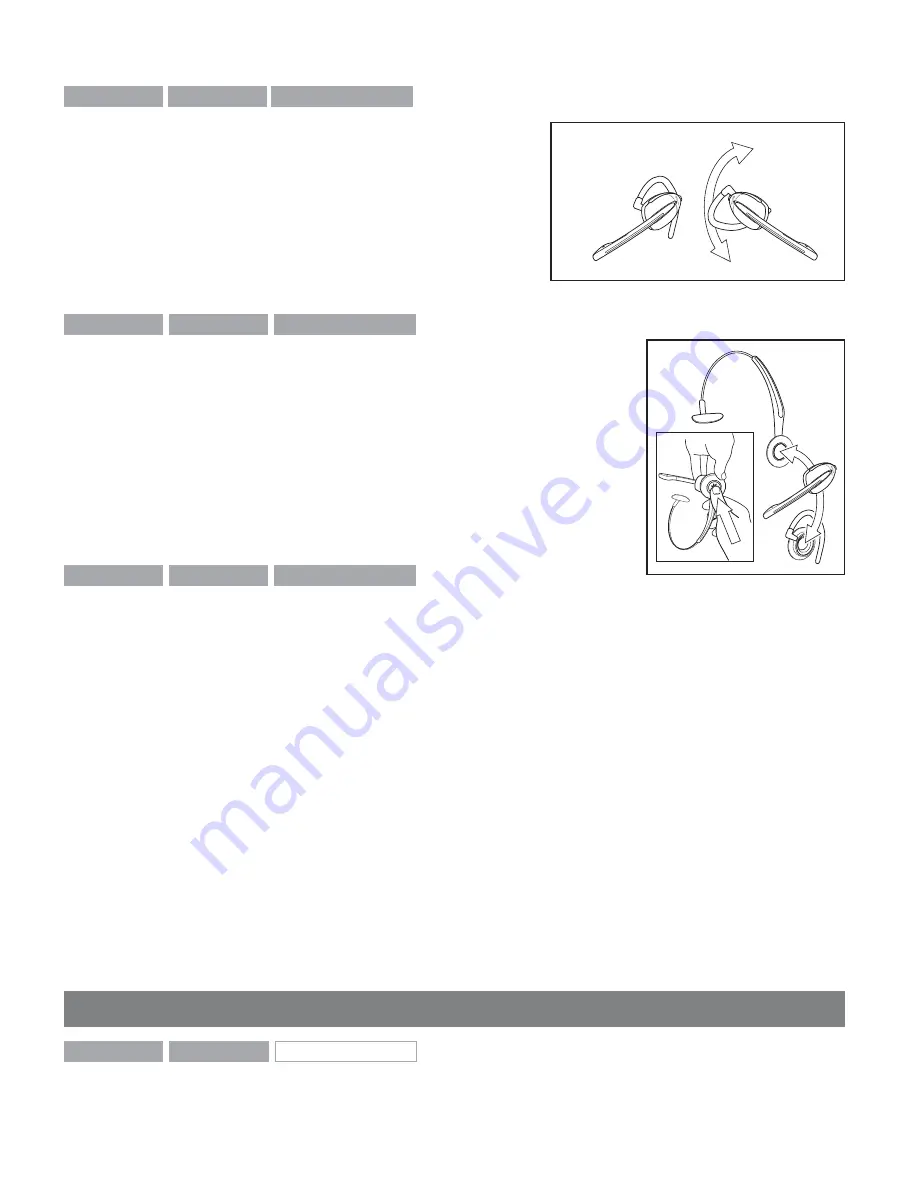
3.3  Ear hook wearing styles

You can choose to wear the headset on either the 
left or right ear. The headset can be rotated 360˚.


Changing ear hook wearing side

1.   Flip the ear hook over.
2.   Rotate the ear hook 180°.

GN 9350


GN 9330


GN 9330 USB

3.4   Changing wearing styles

All wearing styles (headband, neckband and ear hook) are inter-
changeable.

To change any wearing style (for example, from headband to ear 
hook):
1.   Unclip headset from the current wearing style.
2.   Affi x the new wearing style.

GN 9350


GN 9330


GN 9330 USB

3.5   Receive volume button reorientation

By default, the headset is set-up for wearing on the right ear. This means the volume con-
trol is pushed up to increase the volume, and pushed down to decrease the volume. If you 
change the wearing ear of the headset, you may also want to change the orientation of the 
volume control so that volume is still increased by pressing the volume control up.


To change the headset’s volume control button orientation:

1.  

Make sure there is no link between the headset and the base, (indicator on headset is not 
fl ashing).

2.  Press the headset’s mute button for 10 seconds.
 

–> The headset’s link indicator will light.

3.   Determine how you prefer to increase volume (pushing the control either up or down).
4.    Press the volume control either up or down (according to preference) until the headset’s 

link indicator turns off.

  4. Operating the headset

GN 9350


GN 9330


GN 9330 USB

4.1  Making/ending calls via telephone with RHL/EHS function

10

Summary of Contents for GN9330 - Headset - Over-the-ear

Page 1: ...N Netcom All rights reserved GN Netcom Australia Pty Ltd www gnnetcom com au GN Netcom Singapore www gnnetcom com sg GN Netcom Asia Ltd www gnnetcom com hk ENG Guide for additional functions www gnnet...

Page 2: ...arly marked GN 9350 GN 9330 GN 9330 USB to which products they concern When the feature does not apply it will simply have a wire frame box and no grey fill i e GN 9350 GN 9330 GN 9330 USB 1 Product i...

Page 3: ...4 6 Switching a call from desk telephone handset to headset 13 4 7 New master headset pairing to base 13 5 Use with DECT cordless telephones 14 6 Replacing battery pack GN Netcom accessory 14 6 1 Add...

Page 4: ...USB Desk telephone connectivity VoIP USB connectivity GN 1000 RHL enabled Electronic hookswitch enabled Display for set up Adjustable range Sound refinement DSP Conference call On line indicator conne...

Page 5: ...ou want to use your VoIP application as default calling media press the USB button for 5 seconds If you want to change it back again press the Telephone button for 5 seconds GN 9350 GN 9330 GN 9330 US...

Page 6: ...Press the OK button to confirm a specific choice value within the 5 different menus A star beside a selected choice value indicates the current setting Default start position The LCD display is always...

Page 7: ...e enabled please refer to our website www gnnetcom com gn9120 ehs setup Please also refer to your telephone s user manual for clarification 4 modes are available GN RHL non EHS works with the GN 1000...

Page 8: ...rmal Bass and Fixed Switch These two sections are separated by a blank line It is possible to choose one mode in each of the two sections Your headset offers 3 treble bass modes Treble Normal and Bass...

Page 9: ...h NIOSH standards and EU health and safety codes of 85 dB A The TT4 protection level is compliant with pertinent Australian recommendation Important In some jurisdictions applicable regulations or law...

Page 10: ...quality of incoming calls by removing impurities transmitted with the signal such as background noise from your caller s environment 3 Wearing styles Your headset offers headband neckband and ear hoo...

Page 11: ...s means the volume con trol is pushed up to increase the volume and pushed down to decrease the volume If you change the wearing ear of the headset you may also want to change the orientation of the v...

Page 12: ...pending on whether the call is coming via the desk phone telephone or via VoIP USB After the call it will revert to the default mode you selected earlier The initial factory set mode is the telephone...

Page 13: ...icipant is now terminated from the conference call GN 9350 GN 9330 GN 9330 USB 4 4 Emergency calling via VoIP Your headset supports quicker emergency calling via VoIP applications softphone If the hea...

Page 14: ...adset 1 Remove the headset from base or if already out press the headset s talk button This establishes a link The headset s link indicator will start flashing and the call will be switched to the hea...

Page 15: ...ight for 2 seconds to indicate successful pairing Your headset is now ready to use with your cordless telephone Consult your cordless telephone s user manual for using your headset with your cordless...

Page 16: ...dio and visual indicators The headset and base have audio and visual indicators that represent various functions associated with setting up and using the product GN 9350 GN 9330 GN 9330 USB 7 1 Headse...

Page 17: ...indicator Base talk button Lit when in telephone mode and flashing when linked up USB mode button s indicator Base talk button Lit when in USB mode and flashing when linked up Mute functionality indi...

Page 18: ...t Then call a friend and adjust your headset s microphone as described in the Guide for basic set up and use For setting information on your telephone system please also refer to www gnnetcom com gn93...

Page 19: ...iquids into any button sockets receptors or other openings Avoid exposing the product to rain Children and product packaging The packaging including plastic bags and wrapping parts are not toys for ch...

Reviews: