Jabra ACTIVA User Manual Download Page 5

5

Set up 

IMPORTANT: You must complete the following two steps before operation. You
only need to follow these steps once for your phone. If, however, you use a
different phone, you will need to repeat these steps.

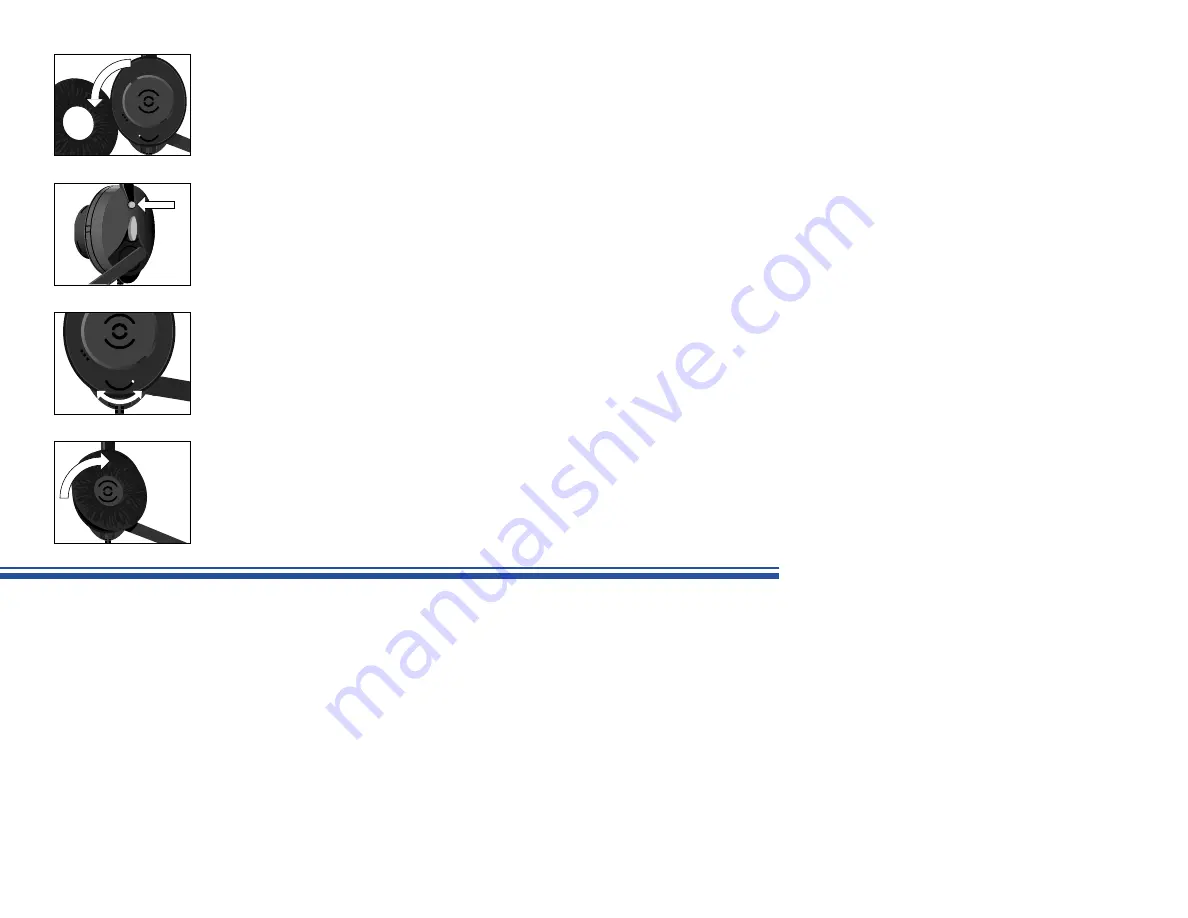
Step 1: Adjusting to your telephone

1. To set up the headset to your telephone, you need to adjust the termination switch.

To do so, remove the earplate and ear cushion from the receiver by turning the
earplate 45° counter-clockwise. The telephone termination switch, marked A – G, is
now visible. (Figure 10)

2. Press and hold the mute button on the outside of the receiver for 3 seconds. After 3

seconds you will hear a signal indicating the headset is now in set-up mode. 
(Figure 11)

3. Put the headset receiver to your ear. Lift the handset from the telephone and listen for

a dial tone in your headset.

4. If you hear a dial tone, blow into the microphone. If you can hear the sound of your

blowing, the setting is correct.

5. If there is no dial tone or you can not hear the sound of your blowing, move the

switch through positions A-G until you can hear a dial tone and the sound of your
blowing. Most phones will use Position A. (Figure 12)

6. Press the mute button on the outside of the receiver to exit the headset set-up mode.

(if you forget, the headset will automatically exit the set-up mode after 10 seconds). A
signal will indicate that you are exiting set-up mode. If the headset exits set-up mode
before you have found the correct setting, you need to enter set-up mode again as
described above. (Figure 11)

7. Put the earplate back in place by mounting it at a 45° angle to the right. Then press

the earplate down and turn it clockwise. (Figure 13)

Figure 10

Figure 11

A

B

C

D E

F

G

Figure 12

A

B

C

D E

F

G

Figure 13

Summary of Contents for ACTIVA

Page 1: ...User Guide ACTIVA...

Page 2: ...Control II Mute Button III Ear Cushion Mounted on Earplate D Flexible Microphone Boom E Microphone with Foam Cover F Battery G Battery Adapter H Quick Disconnect Coil Cord I Clothing Clip J Wall Hook...

Page 3: ...t port Figure 3 3 If you have purchased the optional headset handset switch install by following these steps Figure 4 a Connect the headset to the headset port on the switch b Connect the cord from th...

Page 4: ...ing the plus side of chamber Figure 7 4 Put the battery chamber back into the headset Figure 8 When it is time to replace the battery a warning signal will sound in your headset every 10 seconds 5 The...

Page 5: ...one and listen for a dial tone in your headset 4 If you hear a dial tone blow into the microphone If you can hear the sound of your blowing the setting is correct 5 If there is no dial tone or you can...

Page 6: ...seconds to enter set up mode You will hear a signal when the headset is in the set up mode Figure 14 3 Increase or decrease microphone volume by pressing the upper or lower part of the oval volume con...

Page 7: ...vate from stand by mode To manually reactivate from stand by mode or to reactivate from the sleep mode press the mute or volume buttons Figure 16 Adjusting the receive volume 1 To turn the headset sou...

Page 8: ...lexible microphone boom so the microphone is positioned approximately 1 2 12 mm from your mouth Figure 20 4 To relieve the weight of the cord attach the clip to your shirt or jacket Figure 21 5 The Qu...

Page 9: ...ce Cautionary Notes to Computer Users When using any headset with a computer care should be taken in dry or low humidity environments to protect the user from electrostatic discharge from the monitor...

Page 10: ...that to which the receiver is connected Consult the dealer or an experienced radio TV technician for help IC Notice to Users The Industry Canada label identifies certified equipment This certification...

Page 11: ...rights which vary from state to state Unless otherwise instructed in the User Guide the user may not under any circumstances attempt any service adjustments or repairs on this unit whether in or out...

Page 12: ...77 Northeastern Blvd Nashua NH 03062 USA 1 800 826 4656 www gnnetcom com 54 0022A Printed in USA November 1999...

Reviews: