JA-63 „PROFI“ Alarm System
- 14 -
MGK55401
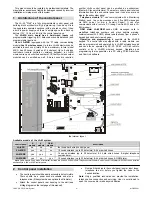
actions' table
a
no splitting
split system
0
no action
no action
1
arm all
arm all
2 disarm
disarm
all
3
partial arming arm A
4
partial arming arm B
5 disarm
disarm
A
6 disarm
disarm
B
where
:
nn =
number of the enrolled controller from 01 to 08 (c1 to
c8)
s =
section: 1 = A, 2 = B
Notes:
•
If the control panel is not split, this setting has no effect
•
For the JA-60F keypad this setting has no effect (its user
codes are determined by 62 nns setting)
•
The JA-60D keypad is effected the same way as RC-40
remote controls (is addressed to a selected section)
Example: to address controller number 5 to section A enter: 63 051
Factory default setting:
all wireless controllers are addressed
to section A
9.33
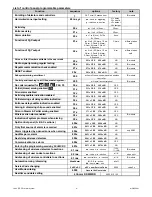
Automatic arming / disarming setting
sequence: 64 nahhmm
The control panel
can automatically arm
and disarm for a
requested period of a
day. Up to ten
instructions (time &
action) can be
programmed in the
period of one day by
entering:
64 nahhmm
where
:
n
= instruction number from 0 to 9
a
= action (see the actions' table)
hh
= hours (from 00 to 23)
mm
= minutes (from 00 to 59)
Notes:
•
If any automatic action is selected, it will be preformed
everyday at the programmed time, following the internal
control panel clock.
•
The automatic arming and disarming can be overridden
manually anytime (by a user code or a remote control)
•
If the control panel is in the requested arming mode before
the action time, performance of the programmed action will
not change the arming
Example: to program an automatic complete arming of the
system at 21:15 everyday enter: 64 0 1 21 15
Factory default setting:
all instructions are set for no action
9.34
New service code setting
sequence: 5 nSC nSC
The Service Code can be used to enter the programming
mode. A new Service Code must be entered twice in a row to
avoid an error. To change the code enter:
5 nSCnSC
where:
nSC
= your new Service Code (four digits)
Example: to change service code to 1276 enter: 5 1276 1276
Factory default setting:
service code is 6060
9.35
User Mode entering
Sequence: 6 9 9 9
This sequence is used to switch from the Programming Mode
to the User Mode, where you can set zones´ bypass (see User’s
manual). You can exit the User Mode by pressing the “N” button.
The bypassed zones will remain active after the leaving the User
Mode.
9.36
Real time and date setting
sequence:
4 hh mm dd MM YY
The control panel has a built in real time clock. All events are
stored to the event memory including the time of the event. The
clock should be set after the installation is completed. Time
Setting:
4 hh mm dd MM YY
where:
hh
= hours (24 hr. cycle)
mm
= minutes
dd
= day
MM
= month
YY
= year
Example: on Jun. 30 2007 at 17:15 enter: 4 17 15 30 06 07
After the control panel is powered, its internal clock’s
default
setting
is: 00 00 01 01 00
Note: detail control panel event history can be viewed with a
connected PC using Comlink software.
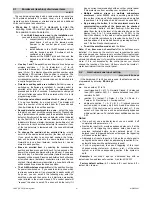
10 System testing
For testing
by installer
, the control panel should be in the
programming mode - "P" indicated on the keypad’s LED (F0
Service Code). Testing can also be done
by a user
in the user
mode (confirmed by “U”). The user mode is accessible with the
Master code. To open the user mode enter F 0 Master Code
when the control panel is disarmed.
No alarm can be triggered in programming or user modes and
any triggering of a detector (wireless or wired) will result in a
“beep” (press F to select a loud “beep” generated by a wired
siren) and the display will briefly show which zone was triggered.
Enrolled wireless controllers, sirens and other items’ signals will
be similarly indicated.
•
Some detectors (JA-60P, JA-60N, JA-60B
etc.) have an
extra testing mode, which is activated for 5 minutes after the
detector’s cover is attached (see manuals of the particular
detectors). If the detector is in testing mode, it will indicate
triggering locally with its LED, and it will also indicate the
triggering on the control panel keypad’s LED. Note that the
JA-60P motion detector in normal mode (after 5 minutes
testing mode) can not send next triggering information until
5 minutes after the previous triggering was sent (this period
can be shortened to 1 minute - see setting of the JA-60P
detector).
•
Triggering of a detector wired
to one of the L1 to L4
inputs is indicated on the control panel keypad’s LED for
about 2 seconds after the triggering. So, if a detector is
permanently triggered for a longer period, it will not be
indicated. If a double balanced input loop (2x 1k1) is used,
then the control panel distinguishes triggering of the
detector from tampering.
•
The best way of testing
is via a connected PC using the
Comlink software (see section 12). In the service events
window you will see a chronological record of all performed
tests, including zone setting, quality of communication etc.
11 Control panel factory default reset
If you forget the control panel codes or you have a control
panel which is currently not under factory default settings,
perform the following:
•
disconnect the AC power and back up battery in the
control panel and wait for 10 seconds.
•
connect (short) the RESET pins on the main board
•
leave the control panel cover open
•
reconnect back up battery and the AC power
•
within 1 minute disconnect the RESET jumper
•
reset is confirmed with a "P" (panel is in programming
mode)
Summary of Contents for JA-63 PROFI"
Page 1: ...JA 63 PROFI Alarm system installation manual...
Page 2: ......


