background image

Warranty 3 years  


Product Warranty 

 valid for Australian customers only 

Officeworks 

L

td warrants that this product will be free from defects and work as 

intended for 3  years from the date of purchase by the original customer.  


If the product has any defects or does not work as intended during the Warranty Period, 

Officeworks will, at its election and at its expense, repair or replace the product. 


This warranty does not apply: 

• 

to cosmetic damage;  

• 

to damage caused by consumables used in connection with the product (such as 

cleaning products);


• 

where the product has not been used in accordance with all provided instructions;  

• 

to damage arising from fair wear and tear;  

• 

where the product has not been subject to reasonable use;  

• 

where the product has been intentionally or negligent ly damaged; and/or 

• 

if the customer has attempted to repair the product.  

To make a claim under this warranty, please return your product with your receipt or 

proof of purchase to your nearest Officeworks store or contact 1300 

6

33 

42

3. 


This warranty is provided in addition to any rights you may be entitled to under the 

Competitions & Consumer Act 2010. 


Our goods come with guarantees that cannot be excluded under the Australian 

Consumer 

L

aw. You are entitled to a replacement or refund for a major failure and 

compensation for any other reasonably foreseeable loss or damage. You are also 

entitled to have the goods repaired or replaced if the goods fail to be of acceptable 

quality and the failure does not amount to a major failure. 

Thank you for your purchase. Please retain your receipt to validate warranty.  

If you would like to know more about our furniture products, please visit 

www.officeworks.com.au


10/10

Summary of Contents for ASHFORD JBASHFMBBK

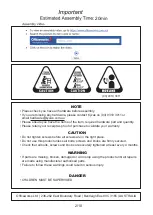
Page 1: ...TN This design and instruction booklet is subject to copyright www officeworks com au For spare parts or hardware call 03 9310 3011 or email hardware kyvas com au ASSEMBLY INSTRUCTIONS ASHFORD MEDIUM...

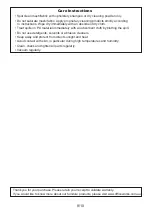
Page 2: ...ten screws before all screws are in the right place Do not use this product unless all bolts screws and knobs are firmly secured Check that all bolts screws and knobs are securely tightened at least e...

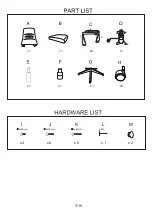
Page 3: ...3 10 H x1 x1 x5 x1 x1 x1 x1 x2 C L R x 1 M6 J x 4 x 2 I 6x20mm K x 6 6x30mm L M x 6 6x40mm...

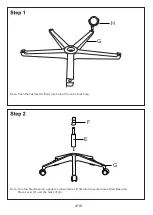
Page 4: ...te Push the castors H firmly into hole at the end of each leg Note Turn the Star Base G upright and insert Gas Lift E into the center hole of Star Base G Place cover F over the Gas Lift E F E H G G 4...

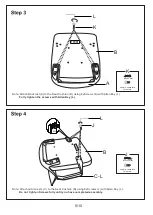
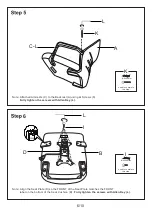
Page 5: ...Screws fully until you have completed assembly Note Attach Backrest A to the Seat Cushion B using 4xScrews K with Allen Key L Fully tighten the screws with Allen Key L J L L K A C L B B 60 5 10 J 6 P...

Page 6: ...Key L Note Align the Seat Plate D so the FRONT of the Seat Plate matches the FRONT label on the bottom of the Seat Cushion B Fully tighten the screws with Allen Key L L K B D A C L L I 100 6 10 6 K 2...

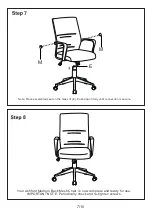
Page 7: ...ford Medium Back Mesh Chair is now complete and ready for use IMPORTANT NOTE Periodically check and re tighten screws 8 Note Place assembled seat on the Gas Lift E Push down firmly until connection is...

Page 8: ...fabric Apply proprietary cleaning products strictly according to instructions Wipe dry immediately with an absorbent dry cloth Treat spills on PU material immediately with an absorbent cloth by blott...

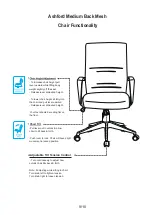
Page 9: ...pull lever upward Release lever at desired height Your feet should be resting flat on the floor Adjustable Tilt Tension Control Turn continuously to adjust how quickly chair tilts back forth Note if a...

Page 10: ...been intentionally or negligent ly damaged and or if the customer has attempted to repair the product To make a claim under this warranty please return your product with your receipt or proof of purch...

Reviews: