background image

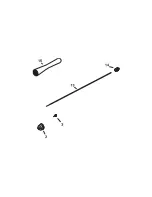
Nozzle (#3) 

In time, the nozzle may wear or be damaged and may need 

to be replaced.

1. Unscrew the handle (#16).

2. Loosen the needle chucking nut (#14).

3. Gently pull the needle (#13) part way back. It doesn’t  

need to be fully pulled out.

4. Unscrew the nozzle cap (#2)

5. Unscrew nozzle counter-clockwise with provided wrench.

6. Screw new nozzle into the airbrush body with your fingers.

7. Slightly tighten the nozzle with the provided wrench.

• DO NOT OVER TIGHTEN!

8. Screw the nozzle cap onto the airbrush body.

9. Push needle all the way forward until it seats with new nozzle.

10. Tighten the needle chucking nut.

11. Screw the handle onto the airbrush body.

TIP: Keep a spare nozzle on hand for unforeseen accidents.

Needle (#13)

Iwata needles are made of precision ground and hardened stainless  

steel that will withstand prolonged usage. They are, however, 

subject to easy physical damage because of the long tapered,  

extremely fine tip.  If the needle point becomes severely bent, 

it must be straightened before pulling it back through the 

nozzle. If not, the bent needle might damage the nozzle as it’s 

pulled through. TIP: Keep a spare needle on hand for unfore-

seen accidents. 

  Quick Disconnect (Optional Accessory)

A quick disconnect joint is screwed onto the airhose and 

a quick disconnect adapter is screwed onto each airbrush.  

When using multiple airbrushes the quick disconnect joint 

facilitates changing airbrushes on the same airhose quickly.

Side-Feed Color Bottles and Cups  

(Optional Accessory)

Several bottle sets and styles are available. From Crystal Clear 

bottles for water-based paints to the solvent-impervious 

High Strength translucent bottles, Iwata-Medea offers a wide 

assortment of bottles for every application. Chrome-plated 

side mounted cups are also available in 1/8 and 1/4 oz sizes.

Color Bottles (Optional Accessory for BCR  

and SAR)

Several bottle sets and styles are available. From Crystal Clear 

bottles for water based paints to the solvent impervious  

High Strength translucent bottles, Iwata-Medea offers a wide 

assortment of bottles for every application.

Pistol Grip Moisture Filter

The Iwata-Medea Pistol Grip Moisture Filter delivers clean, dry 

air to your airbrush.  Miniature in size, the super-fine, 5-micron 

filter element performs like a full-size filter separator.
The clear filter bowl allows visual inspection of built up moisture.  

Release the water by pulling the spring-loaded release valve.

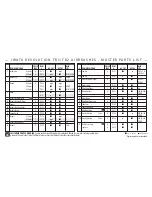
        REPLACEMENT PARTS AND ACCESSORIES  

Summary of Contents for Revolution TR1

Page 1: ...IWATA TR1 TR2 MANUAL PARTS GUIDE...

Page 2: ...RPORATION Yokohama Japan 81 0 45 591 1111 www anest iwata co jp ANEST IWATA U K LTD Neots Cambs England 44 0 1480 474742 www anest iwata co jp ANEST IWATA MOTHERSON LTD Uttar Pradesh India 91 0 120 46...

Page 3: ...demanding professionals Modern precision machining and carefully selected materials used in the manufacturing process ensure consistent high performance and long life Each Iwata airbrush is spray tes...

Page 4: ...moisture Side feed airbrush design allows the use of side feed bottles and cups 25 oz side mounted color cup IWATA REVOLUTION TRIGGER GUNS Comfort combined with ultra smooth performance create an idea...

Page 5: ...easy level spraying Spray pattern 1 5 down to fine lines Replaceable internal PTFE needle packing for use with solvent based paints 5 mm Needle Nozzle Nozzle Cap combination FA450 Iwata Pistol Grip Fi...

Page 6: ...and 1 2 inch is common 3 If using a Power Jet Power Jet Lite or Power Jet Pro compressor adjust the pressure to between 30 and 45 psi 4 Check for any air leaks in the compressor or airhoses 5 Place a...

Page 7: ...erally vary be tween 20 and 60 psi depending on what type of work is being done and what textures are desired A good working pres sure may average around 25 psi The viscosity of the paint and your des...

Page 8: ...er the needle 5 Rotate the needle to gently wipe the residual paint off 6 Carefully insert the needle into the airbrush until it seats fully against the nozzle 3 7 Tighten the needle chucking nut fing...

Page 9: ...nut 8 Screw the handle onto the airbrush body 9 Drip 1 drop of lube into the slot directly behind the main lever and as close to the main lever as possible DO NOT over lube the needle or the main lev...

Page 10: ...logged nozzle Cracked or damaged nozzle Solution Tighten 2 nger tight See nozzle 3 to reseat the nozzle See nozzle 3 to replace the nozzle See cleaning the needle See cleaning the airbrush between col...

Page 11: ...out air valve packing o ring Solution Clean with cotton swab dipped in cleaner See paint preparation See speci c compressor instructions to lower the air pressure See nozzle 3 to reseat the nozzle Se...

Page 12: ...d for unfore seen accidents Quick Disconnect Optional Accessory A quick disconnect joint is screwed onto the airhose and a quick disconnect adapter is screwed onto each airbrush When using multiple ai...

Page 13: ......

Page 14: ...moisture separator The clear filter bowl allows a visual inspection of built up moisture and is evacuated through a spring loaded release valve without taking the filter off the airbrush Ergonomicall...

Page 15: ......

Page 16: ...19 2 n n SAR PRICE ITEM ALSO ITEM DESCRIPTION CODE HP TR1 HP TR2 FITS 18a Cup Lid C I 718 1 n x CR CS C C CH CM C 18b Cup Lid F I 718 2 x n 19 Valve Packing O Ring A I 145 1 n n HP HP HI LINE 24 Trigg...

Page 17: ...arranty does not cover damage caused by negligence or airbrushes which have been altered or abused in any way Call or e mail Iwata Medea before returning an airbrush for the appropriate procedure for...

Page 18: ...part no R 500 rev6 4 16 w w w I W A T A A I R B R U S H c o m...

Reviews: