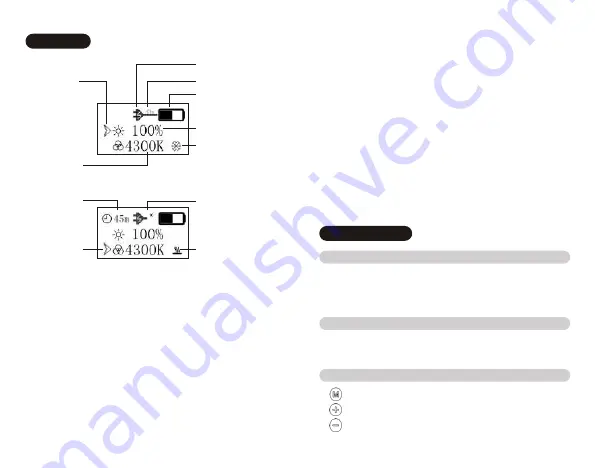
④ This icon shows the remaining battery time with h(hour) and
m(minute).
⑤ The low temperature warning icon appears when ambient
temperature is below the lowest allowable temperature.
Genius Light may not work properly under this
circumstance.
⑥ The high temperature warning icon appears when ambient
temperature is above the highest allowable temperature. If
temperature keeps rising, Genius Light will be
automatically switched off. To eliminate the high
temperature warning icon, please press any button.
Icons
Power Input Icon①
Remaining
Battery Capacity②
Brightness
Control Icon
Low Temperature
Warning⑤
Current Brightness
Current Color
Temperature
Remaining
Battery Time④
Power Shortage③
Color
Temperature
Control Icon
High Temperature
Warning⑥
① The plug icon means the external power source is
connected.
② This icon shows the estimated remaining charge time of
battery with h(hour) and m(minute). The "OK" icon appears
when the battery is fully charged.
③ icon appears in the display, when Genius Light is working,
connected to a 5V/1A charger or a cable of low quality. A
5V/2.1A charger and the original USB charging cable are
recommended, if Genius Light has to work for a long time.
X
Instructions
Press and hold the Power Switch Button until the data
appear on the display screen/disappear from the display
screen.
Press the Power Switch Button once, while Genius Light is
standby.
to switch to the control of Brightness or Color Temperature
Brightness or Color Temperature up
Brightness or Color Temperature down
1. Turing on/off the power
2. Turning on/off the light
3. Brightness and Color Temperature Control
03
04
Summary of Contents for Genius Light
Page 1: ...Quick Start Guide of Iwata Genius Light Model GL 01 15...
Page 7: ...m h OK 5V 1A 5V 2 1A m h X 1 2 3 5 5 100 100K 3000K 5500K 11 12...
Page 8: ...USB 4 GL 01 13 14...
Page 9: ...16 GL 01 IWATA Genius Light 15...
Page 11: ...m h OK 5V 1A 5V 2 1A m h X 5 100K 19 20...
Page 12: ...USB 4 GL 01 21 22...


