background image

- 28 -

4. Consumable parts

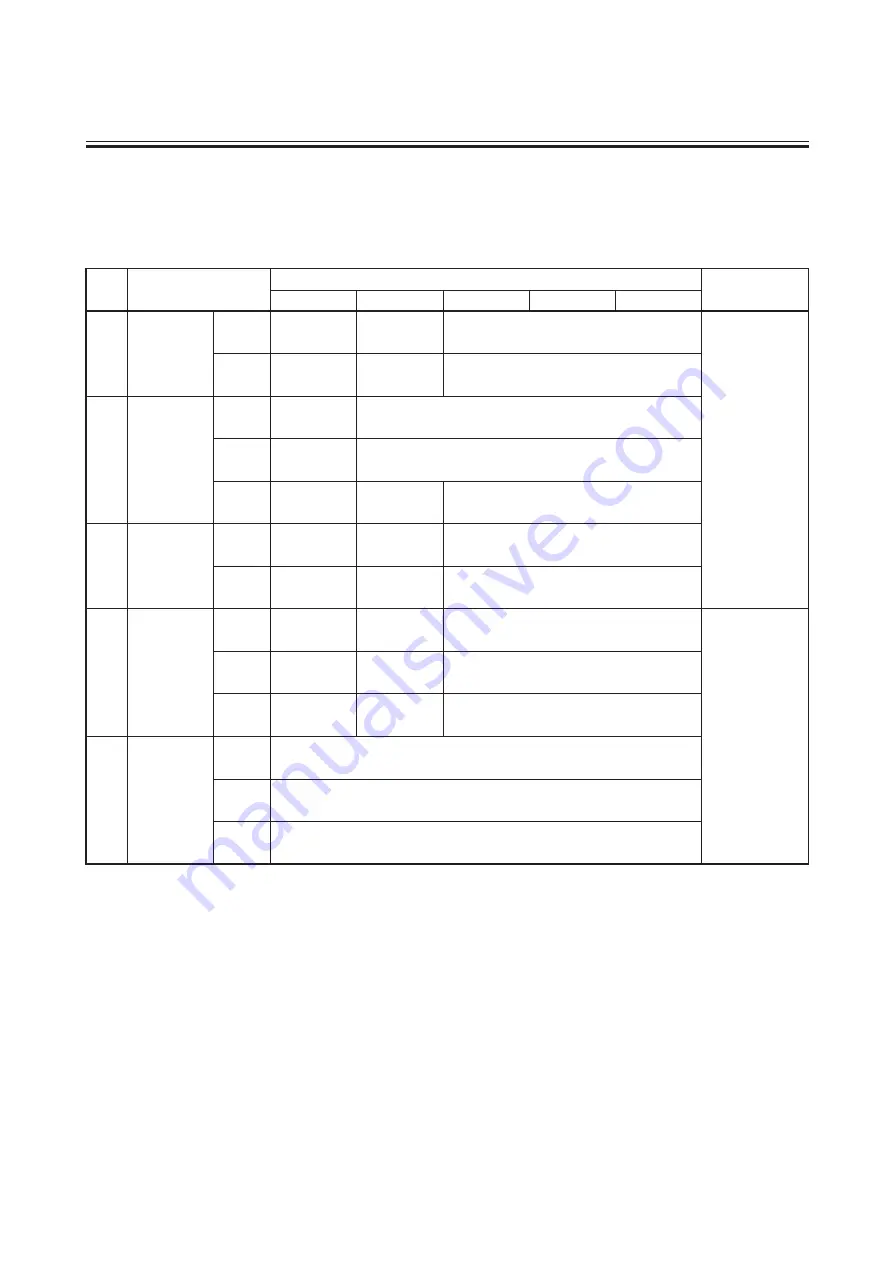
Consumable parts are necessary to be replaced to ensure long, continuous operation of the pump. Replace following

consumable parts according to the time to be replaced and notes shown as below.

See pages 8, 9 and 29 to identify parts number and parts.

Note 1. Time to be replaced mentioned above is based on pumping clear water at ambient temperature and it depends

on the characteristics, temperature and other condition of pumped liquid.

2. Rear casing unit (2+19.1+20), bearing (21) and mouth ring (22) must be replaced when their wear limit comes

as mentioned on page 37 regardless of the time to be replaced shown on above table. 

3. O ring (23) and gasket (24) must be replaced every time when pump is disassembled regardless of the time to

be replaced shown on above table.

4. Parts of KK type of MDF-L401 are replaced as totally assembled pump head unit.

No.

Parts name

Parts code

Time to be

replaced

MDF-L250

MDF-L401

MDF-L422

MDF-L423

MDF-L425

2

+

19.1

+

20

Rear casing

unit

CF

AA

MFL1393

MFL1437

MFL1502

10,000 hours

KK

MFL1394

——

MFL1503

21

Bearing

CF

MFL0565

MFL0580

AA

MFL0567

MFL0582

KK

MFL0568

——

MFL0583

22

Mouth ring

CF

AA

MFL0555

MFL0555

MFL0755

KK

MFL0556

——

MFL0756

23

O ring

FKM

MFL0034

MFL0080

MFL0130

10,000 hours

EPDM

MFL0035

MFL0081

MFL0131

Aflas

MFL0036

MFL0082

MFL0132

24

Gasket

FKM

MFL0031

EPDM

MFL0032

Aflas

MFL0033

Summary of Contents for MDF-L

Page 1: ... Suomi Oy IWAKI Norge AS IWAKI France S A IWAKI PUMPS UK LTD IWAKI Schweiz AG IWAKI Austria GmbH IWAKI Holland B V IWAKI Iberica Pumps S A IWAKI Belgium n v FAX 2154 1028 FAX 02 990 42888 FAX 48 24 2346 FAX 8 511 72922 FAX 9 2742715 FAX 66 81 16 61 FAX 1 64 49 92 73 FAX 1743 366507 FAX 26 674 9302 FAX 2236 33469 FAX 297 273902 FAX 943 628799 FAX 1367 2030 IWAKI America Incorporated IWAKI Pumps Aus...

Page 2: ... the actual operator for quick reference when needed Contents IMPORTANT INSTRUCTIONS 1 3 Safety instructions to prevent personal injuries OUTLINE OF PRODUCT 4 1 Unpacking and inspection 5 2 Description on body and label 5 3 Model code 6 4 Names of parts 8 INSTALLATION 10 1 Installation 11 2 Piping 12 3 Electrical wiring 14 OPERATION 15 1 Precautions on operation 16 2 Operation Starting 17 3 Pump s...

Page 3: ...may brought if the instructions are not observed or if the pump is wrongly used Following two symbols describe the content to be observed SAFETY SECTION Warning Nonobservance or misapplication of the contents of the Warning could lead to a death or heavy injury of person Caution Nonobservance or misapplication of the contents of the Caution could lead to a injury of person or damage of assets Proh...

Page 4: ...attention Wear protectors When piping is removed or pump is disassembled assembled wear protective gear such as safety goggles and protective gloves etc Lifting pump When pump is lifted apply chain or belt to eye bolt and motor to keep the pump motor horizontally No remodeling Remodeling of pump may result in serious personal injury or damage of the pump Do not attempt remodeling pump because it i...

Page 5: ...tion only The use of pump in any application other than those clearly specified may result in the failure or damage of the pump Do not run dry Disposal of used pump Disposal of used or damaged pump must be done in accordance with local laws and regulations Consult a licensed industrial waste products disposing company Ventilate the site When handling the liquid which may generate toxic gas safety ...

Page 6: ... 4 OUTLINE OF PRODUCT 1 Unpacking and inspection 5 2 Description on body and label 5 3 Model code 6 4 Names of parts 8 ...

Page 7: ...ide port Motor nameplate Use only the power voltage specified on the nameplate Follow applicable local power regulations Rotation indicator label The arrow indicates the rotating direction of the motor Always make sure that the motor runs in the direction the arrow indicates Refer to chapter Operation Motor Driver This motor provides power to the pump unit Base Pump should be fixed firmly Discharg...

Page 8: ...amics 99 5 AA Alumina ceramics 99 5 Alumina ceramics 99 5 KK SiC SiC t Material of O ring and gasket V FKM E EPDM A AFLAS FKM AFLAS Fluoro rubber EPDM Ethylene propylene rubber y Code of impeller T V W Standard K L For high head applications u Construction code D Pump can run dry for max one hour E Pump can not run dry i High temp High pressure version No code Standard H For high liquid temperatur...

Page 9: ... specification and operating condition given to us when ordered If the informed specification and condition will be changed ask us for the possibility of usage before you use the pump 4 Influence by temperature Pump itself is not influenced by temperature change but pumped liquid changes its viscosity vapor pressure chemical corrosion characteristics etc according to the change of temperature Ther...

Page 10: ...Front casing Rear casing Impeller Drive magnet unit Hex head bolt Hex head bolt Foot support Cover A Cover C Cover B Magnet capsule Motor Cap Q ty Parts name Remarks JIS B 2401 G 135 Only H type Material CF D AA E KK E CC E CA D PTFE V FKM E EPDM A AFLAS Steel STNLS STL Alumina ceramics 95 Alumina ceramics 99 5 SiC 1 1 1 1 1 1 2 1 1 Liner ring High density carbon Impeller thrust Spindle Bearing Mo...

Page 11: ...ad bolt Hex socket head bolt Foot support Cover A Cover C Cover B Magnet capsule Motor Cap Q ty Parts name Remarks JIS B 2401 G 165 For H1 type For standard type Material KK E AA E CF D PTFE Steel STNLS STL High density carbon Alumina ceramics 99 5 SiC 1 1 1 1 1 1 2 1 1 Liner ring Impeller thrust Spindle Bearing Mouth ring O ring Gasket Eye bolt Rear casing cover 29 1 Retainer ring PTFE 16 17 1 1 ...

Page 12: ... 10 1 Installation 11 2 Piping 12 3 Electrical wiring 14 INSTALLATION ...

Page 13: ... around the pump for the back pull out of motor assembly and disassembly of the pump Foundation area must be larger than pump base plate 2 Location Install the pump as close to the tank as possible and at lower position than the tank flooded suction If the pump is installed at the location that the pump suction port comes higher position than the liquid level of tank suction lift style install the...

Page 14: ...and moment put on the pump should not exceed the figures shown below Pump model MDF L401 422 423 425 Tightening torque 79 N m Z X Y X Z Y Allowable pipe load on pump flange Direction of load Suction flange Fx Fy Pression Tension 0 58 Fz 0 71 Load kN Discharge flange 0 71 0 89 0 58 0 89 0 44 Allowable moment on pump flange Direction of load Suction flange Mx My 0 35 Mz 0 23 Moment kN m Discharge fl...

Page 15: ...centric reducer pipe Connect the eccentric reducer pipe so that upper side is level Residual air may not go out if it is mounted in reverse 7 Gate valve in suction side In case of flooded suction install gate valve in suction piping It is needed when the pump is disassembled and inspected 8 Piping for flushing Install pump flushing piping in case that the dangerous liquid will be handled 9 End of ...

Page 16: ...ditions such as discharge head etc 5 Check valve Check valve must be installed in the following cases Discharge piping is longer than 15 to 20 meters Actual head exceeds 15 meters Height difference between liquid level and discharge pipe end exceeds 9 meters When two pumps are used in parallel 6 Air vent If horizontal discharge piping is longer than 15 to 20 meters install air vent on the way 7 Dr...

Page 17: ... 15 1 Precautions on operation 16 2 Operation Starting 17 3 Pump stopping 17 OPERATION ...

Page 18: ...stop start is not recommended Stop start repetition must be limited to six times an hour Frequent stop run more than six times an hour may cause accelerated damage of parts and lowered durability Temperature change at starting stopping and operating of pump must be within 80 deg C Fully close the discharge valve when pump is started to avoid water hammer If the pump is operated with discharge valv...

Page 19: ...ing fully close the discharge valve Note In case air vent piping is not equipped open the discharge valve to repeat momentary run several times 5 Starting pump Start pump with discharge valve fully closed Maximum one minute Confirm that discharge pressure rises to shut down pressure Gradually open discharge valve to get specified pressure capacity Note Pay attention to over load caused by excessiv...

Page 20: ... 18 1 Troubleshooting 19 2 Maintenance inspection 21 3 Disassembling assembling 25 4 Consumable parts 28 Maintenance ...

Page 21: ...ing or motor Interchange wiring con nection D i s c h a r g e capacity is small Pressure gauge vacuum gauge indi cates normal figure Strainer is clog ged by foreign matters Remove foreign matters Air pocket in suc tion piping Check and remedy suc tion piping Foreign matters are clogged at impeller inlet Remove foreign matters Air is sucked in from suction pipe or gasket Check connection part of pi...

Page 22: ...ge motor wiring Lowered power voltage Check voltage or fre quency Overload Check density and vis cosity of liquid Too high ambient temperature Ventilate D i s c h a r g e capacity is rapidly re duced Vacuum gauge indi cates high figure Foreign matters clog suction piping Remove foreign matters Foundation is not perfect Re install the pump Loosened mount ing bolts Re tighten Cavitation occurs Resol...

Page 23: ... gauge must be opened only when measurement is carried out It must be closed upon the completion of each measurement If the cock remains open during pump operation the meter mechanism may be affected by abnormal pressure caused by water hammer action 4 If a spare pump is available activate it from time to time to keep it ready for use any time 5 Check to be sure there is no liquid leakage in the p...

Page 24: ...c Consult if abnormality is found Replace if abnormality is found Rear casing Rubbed trace in inner surface If there is no cracks Dirt or clog inside impeller Change of dimension If there is no swelling or cracks in gas ket If there is no rubbed trace Spindle If there is no crack Wear against bearing Dirty inside Cleaning Magnet cap sule If there is no rubbed trace If abnormality is found consult ...

Page 25: ... first stages of operation but this not abnormal Wear limit of mouth ring Unit mm Wear limits of bearing and spindle Unit mm The step between the surfaces of the mouth ring and the impeller when shipped is 2 mm The wear limit of the mouth ring is reached when this step is reduced to 0 mm Replace the mouth ring then Model Part MDF L 250 MDF L 401 422 423 425 When shipped Time to be replaced When sh...

Page 26: ...e the rear casing from the foot support and insert the magnet capsule attached to impeller can into the rear casing 2 Rotate the impeller slowly by hand with it positioned on the rear casing Tips are not worn out beyond wear limit The impeller and magnet capsule will continue to rotate smoothly Tips are worn out beyond wear limit The impeller and magnet capsule will not continue to rotate smoothly...

Page 27: ...casing Drain cap Disassembly 1 Disassemble only after thoroughly washing out the liquid inside the pump by use of flushing piping remove the cap to discharge the liquid from the pump Then clean the inside of the pump Warning Wear protectors goggles rubber gloves etc Certain liquids are dangerous They may hurt your eyes and skin 2 Remove the front casing from the foot support Remove the hex socket ...

Page 28: ... impeller is tightly pressed in and disconnection is difficult warm the impeller and magnet capsule in hot water about 90 deg C for 5 minutes prior to striking the impeller with the hammer Note on MDF L 422 423 and 425 The impeller is fixed to the magnet capsule by screwing When removing the impeller from the magnet capsule hold the magnet capsule by hand and rotate the impeller counterclockwise f...

Page 29: ...s difficult warm the magnet capsule in hot water about 90 deg C for 5 minutes before attaching it Note on MDF L 422 423 and 425 1 Attach the impeller to the magnet capsule Rotate the impeller clockwise and tightly screw it in the magnet capsule If it is hard to screw in warm the magnet capsule putting it in hot water of approx 90 deg C for 5 minutes 2 Insert the impeller and the magnet capsule uni...

Page 30: ...ntioned on page 37 regardless of the time to be replaced shown on above table 3 O ring 23 and gasket 24 must be replaced every time when pump is disassembled regardless of the time to be replaced shown on above table 4 Parts of KK type of MDF L401 are replaced as totally assembled pump head unit No Parts name Parts code Time to be replaced MDF L250 MDF L401 MDF L422 MDF L423 MDF L425 2 19 1 20 Rea...

Page 31: ... 29 MDF L422 425 MDF L250 ...

Page 32: ... Suomi Oy IWAKI Norge AS IWAKI France S A IWAKI PUMPS UK LTD IWAKI Schweiz AG IWAKI Austria GmbH IWAKI Holland B V IWAKI Iberica Pumps S A IWAKI Belgium n v FAX 2154 1028 FAX 02 990 42888 FAX 48 24 2346 FAX 8 511 72922 FAX 9 2742715 FAX 66 81 16 61 FAX 1 64 49 92 73 FAX 1743 366507 FAX 26 674 9302 FAX 2236 33469 FAX 297 273902 FAX 943 628799 FAX 1367 2030 IWAKI America Incorporated IWAKI Pumps Aus...

Reviews: