68
Manuale di istruzioni
I
qualificato.
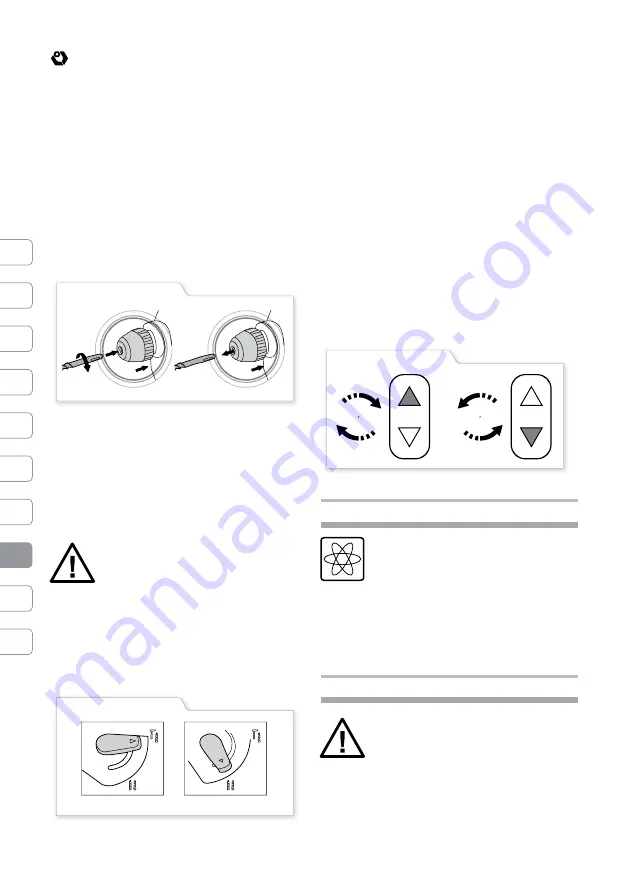
1. Inserire una punta con attacco SDS (fig 1A):
Pulire il terminale della punta e lubrificarlo
•
leggermente.
Inserire la punta e ruotarla fino a quando questa
•
non si blocca in posizione.
Verificate che la punta sia saldamente fissata,
•
provando a tirarla piano.
•
2. Estrarre una punta con attacco SDS (fig 1B):
Tirare il mandrino SDS (2) verso il corpo della
•
macchina, quindi rimuovere la punta.
fig.1A - fig.1B
Modalità di lavoro
1. Selezionare la modalità di lavoro:
Utilizzare
l’interruttore
di
perforazione/
•
scalpellatura (3) a seconda dell’utilizzo desiderato.
Per cambiare, spostare l’interruttore di
•
perforazione/scalpellatura (3) sulla posizione
corrispondente.
NOTA: cambiare modalità di lavoro solo
a macchina spenta!
La figura 2A mostra la posizione di scalpellatura
per laterizi e pietre, la figura 2B mostra la posizione
per trapanare senza percussione su legno, metallo,
ceramiche e plastiche; questa posizione è adatta
anche per avvitare o svitare.
fig.2A - fig.2B
2. Selezionare la direzione di rotazione:
Effettuare questa operazione sul selettore di
•
direzione della rotazione (6) solamente quando
l’utensile è completamente fermo.
Il selettore di direzione della rotazione (6)
•
consente di invertire il senso di rotazione. Questo
non è possibile quando l’interruttore di accensione/
spegnimento (7) è premuto.
Rotazione in senso orario:
Per trapanare e avvitare,
portare il selettore di rotazione (6) completamente a
sinistra. In fase di utilizzo, l’indicatore di rotazione (5)
si illuminerà come mostrato in figura 3A.
Rotazione in senso antiorario:
Per allentare e
svitare viti o bulloni, portare il selettore di rotazione
(6) completamente a destra. In fase di utilizzo,
l’indicatore di rotazione (5) si illuminerà come
mostrato in figura 3B.
fig.3A - fig.3B
Controllo sensibile della velocità
La macchina lavora con una velocità
compresa tra lo 0 e il massimo a seconda
della pressione applicata sull’interruttore
di accensione/spegnimento (7).
Una leggera pressione consentirà una partenza
dolce e una rotazione lenta.
Non sovraccaricare la macchina: trovare sempre una
pressione calibrata.
Manutenzione e stoccaggio
Prima di procedere a qualsiasi
operazione di manutenzione, portare il
selettore di direzione della rotazione (6)
in posizione centrale, al fine di evitare accensioni
accidentali.
Tenere sempre la macchina e le fessure di
•
Summary of Contents for CRHM-14.4L
Page 22: ...8 7 6 5 4 3 2 1 a d c b e 22 RUS CRHM 14 4L 1 SDS 2 3 4 5 6 7 8 a b 5 c PZ1 PZ2 d SDS e...
Page 24: ...24 RUS off 85 A...
Page 25: ...25 RUS 30 RCD RCD RCD 10 30...
Page 26: ...26 RUS OFF...
Page 27: ...27 RUS IVT 6 7...
Page 29: ...29 RUS 7 6 5 3A 6 5 3B fig 3A fig 3B 7 6 IVT...
Page 30: ...8 7 6 5 4 3 2 1 a d c b e 30 KZ CRHM 14 4L 1 SDS 2 3 4 5 6 7 b 5 PZ1 PZ2 d SDS e...
Page 32: ...32 KZ off 85 A...
Page 33: ...33 KZ 30 RCD RCD RCD 10 30...
Page 34: ...34 KZ OFF...
Page 35: ...35 KZ IVT 6...
Page 37: ...37 KZ 7 6 5 3 6 5 3 fig 3A fig 3B 7 6 IVT...
Page 46: ...8 7 6 5 4 3 2 1 a d c b e 46 BY CRHM 14 4L 1 SDS 2 3 4 5 6 7 8 a b 5 c PZ1 PZ2 d SDS e...
Page 48: ...48 BY off 85 A...
Page 49: ...49 BY 30 RCD RCD RCD 10 30...
Page 50: ...50 BY OFF...
Page 51: ...51 BY IVT 6 7 8 4...
Page 53: ...53 BY 6 5 3B fig 3A fig 3B 7 6 IVT...
Page 54: ...8 7 6 5 4 3 2 1 a d c b e 54 UA CRHM 14 4L 1 SDS 2 3 4 5 6 7 8 a b 5 c PZ1 PZ2 d SDS e...
Page 56: ...56 UA off 85 A...
Page 57: ...57 UA UA 30 RCD RCD RCD 10 30...
Page 58: ...58 UA OFF...
Page 59: ...59 UA UA IVT 6 7 8 4 4 7 7 4 SDS...
Page 61: ...61 UA UA 7 6 IVT...
Page 77: ...8 7 6 5 4 3 2 1 a d c b e 77 BG CRHM 14 4L 1 SDS 2 3 4 5 6 7 8 a b 5 mm c PZ1 PZ2 d SDS e...
Page 79: ...79 BG off 8 85 dB A...
Page 80: ...80 BG 30 mA RCD RCD RCD 10 30...
Page 81: ...81 BG OFF...
Page 82: ...82 BG HE IVT 6 7 8 4 4 7...
Page 84: ...84 BG 6 5 3A 6 5 3B fig 3A fig 3B 7 6 IVT...
Page 85: ...Notes Bemerkung Annotazioni Uwagi Pozn mka...
Page 86: ...Notes Bemerkung Annotazioni Uwagi Pozn mka...