13
6. SCREEN OPERATION INSTRUCTIONS
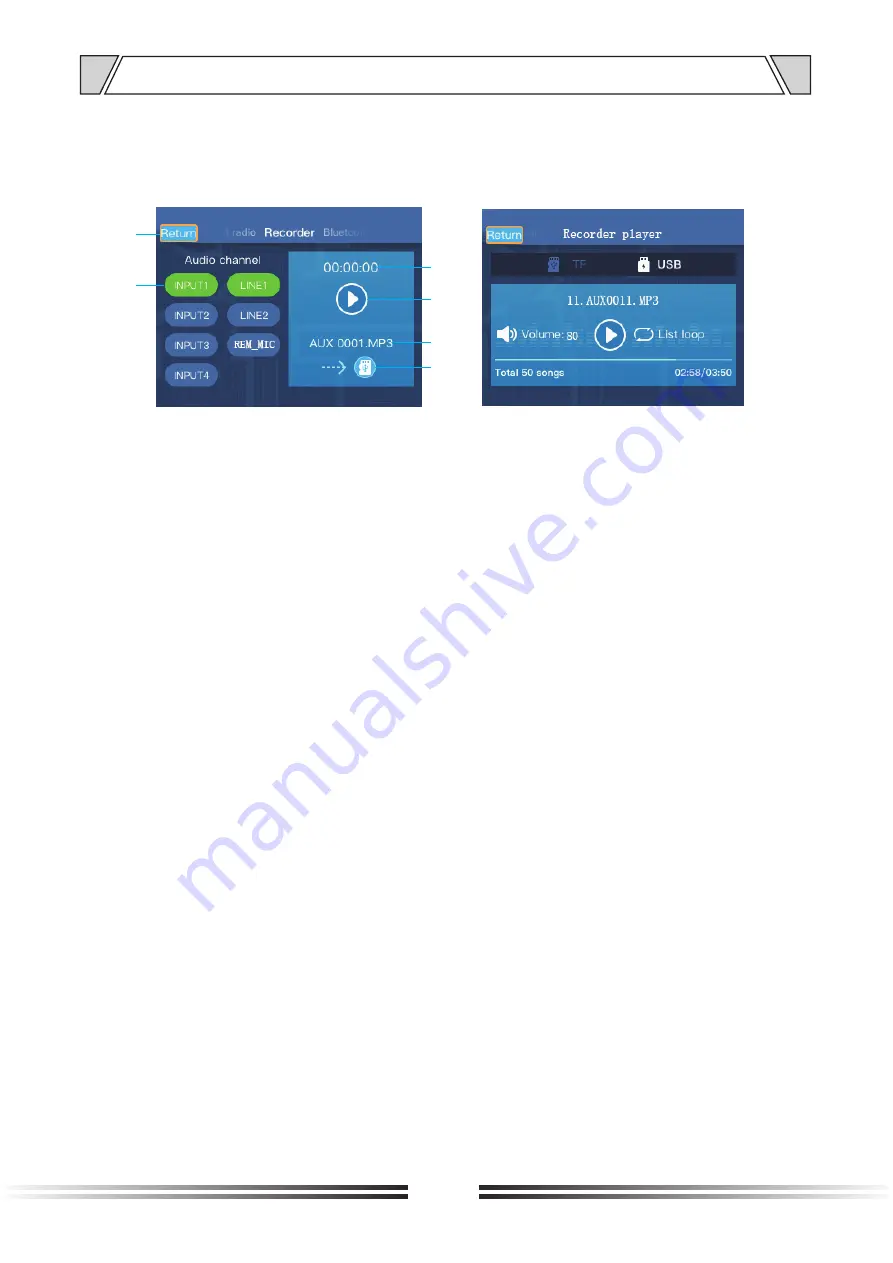
3.3 Recorder
The
audio
recorder
interface
is
shown
in
the
figure
below. It
can
be
used
to
record
the
audio
of
some
audio
input
channels
and
store
it
in
the
form
of
MP3
files
to
USB
or
TF
.
Left: Recorder interface
Right: Recorder player interface
1. Return button;
2. Audio channel, can
select
some channels for recording;
3. Recording time;
4. Start/End recording button;
5. Recording storage file name;
6. Storage medium type: TF or USB.
Start recording
Short
press
the
“Play/Pause”
button
or
turn
the
“MENU”
knob
to
switch
the
cursor
to
the
Start/
End
recording
button (label
4
in
the
figure)
to
start
or
end
recording. After
recording
is
turned
on, the
audio
matrix
will
open
the
selected
audio
channel
and
output, and
the
unselected
channel
will
be
closed
.
End recording
After
finishing
recording, it
will
automatically
jump
to
the
recorder player interface (as
shown)
to
play
the
audio
just
recorded, and
automatically
turn
on
the
Multimedia
input
channel
and
CHx
channel
switch
configured
in
the
audio
matrix
interface
.
Recorder player
To
enter
the
recorder player
interface, in
addition
to
automatically
entering
when
ending
recording,
you can
also
long
press
the
“
Last song”
or
“
Next song”
button
to
enter
the
recorder player
interface
when
recording
is
not
started
.
In
the
recorder player
interface, “Recorder player” will
be
additionally
displayed
in
green
below
to
indicate
that
this
is
not
a
music
center, but
a
recording
file
playback
interface. In
this
interface,
the
audio
matrix
will
only
turn
on
the
Multimedia
input
channel
and
CHx
channel
switch
configured
in
the
“Audio
matrix”
interface, and
other
channels
will
be
turned
off
.
To
exit
the
recorder player
interface, press
the
label
1 (Return
button)
to
directly
return
to
the
recorder
interface, or
press
the
“MODE”
button
to
return
to
the
recorder
interface
and
restore
the
audio
matrix
switch
state
.
1
3
2
4
5
6


