background image

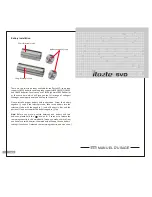
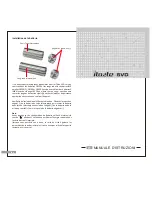
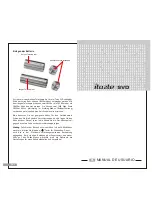
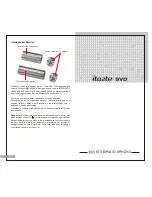
There are two telescopic tubes available for the iTaste SVD; short tube 

supports 18350 batteries and long tube supports IMR 18350(2), 18500 

and 18650 batteries. You also can use 2 IMR high drain 18350 batteries 

at  the  same  time,  which  will  give  you  the  full  arrange  of  voltages/ 

Wattages and proper power needed to use the device.

Please  install  a  proper  battery  before  operation.  Screw  the  battery 

negative  (-)  cap  off  the  telescopic  tube,  then  insert  battery  into  the 

telescopic  tube  with  the  negative  (-)  end  of  battery  in  first  and  the 

positive (+) end out towards the battery negative (-) Cap.

Note:

  Before  you  make  a  switch  between  one  battery  and  two 

batteries,  please  hold  the  “      ”  button  for  5  seconds  to  release  the 

remaining capacity in the mainboard. (when you make a switch from 

one battery to two batteries, the mainboard will keep the one battery’ 

settings if you haven’t released the remaining capacity; and vice versa.)

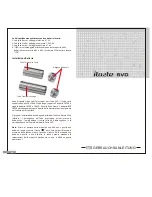
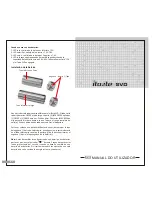
Battery negative (-) cap 

Battery Installation

Long Telescopic tube

Short Telescopic tube

EN-5

MANUEL D'USAGE

FR

Summary of Contents for SVD

Page 1: ...USER MANUAL iTaste SVD 8 70 127mm 80g 2013 7 1...

Page 2: ...ENGLISH FRAN AISE ITALIANO DEUTSCH ESPA OL PORTUGU S DANSK CONTENTS Home of iTaste Vapers Check the security code...

Page 3: ...iTaste SVD is not waterproof please keep it dry 10 Keep your iTaste SVD from sources of excessive heat 11 Please don t drop hit or beat iTaste SVD or you may cause damage to outer shell or Inner compo...

Page 4: ...U0 Voltage can be adjusted from 3 0 6 0 volts in 1 volt increments by pressing button EN 3 Variable Wattage Mode P0 Holding and button simultaneously for 3 seconds the iTaste SVD will enter variable w...

Page 5: ...cap o the telescopic tube then insert battery into the telescopic tube with the negative end of battery in rst and the positive end out towards the battery negative Cap Note Before you make a switch b...

Page 6: ...tanche veuillez la garder au sec 10 Gardez votre iTaste SVD hors des sources de chaleur excessive 11 Veuillez ne pas laisser tomber lancer ou malmener votre iTaste SVD vous risquez de causer des domm...

Page 7: ...iable du mode voltage L cran num rique a che U0 La tension peut tre r gl e de 3 0 6 0 volts 0 1 volts par incr ments en appuyant sur les touches et bouton FR 3 Variation du mode Watt et P0 Appuyez sur...

Page 8: ...capuchon n gatif de la batterie du tube t lescopique puis ins rer la batterie dans le tube t lescopique avec le bout n gatif de la batterie d abord et le bout positif vers la capsule de la batterie n...

Page 9: ...no dall acqua 10 Mantenete il vostro iTaste SVD lontano da fonti di calore eccessivo 11 Si prega di non lasciar cadere o far urtare il dispositivo per non arrecare danni alla scocca ed ai componenti i...

Page 10: ...display digitale mostra l impostazione corrente i valori possono essere impostati premendo il tasto o IT 3 Modalit Voltaggio Variabile U0 Premendo simultaneamente i Pulsanti e per tre secondi iTaste S...

Page 11: ...della iTaste SVD Nota Prima di passare dalla modalit una batteria a quella due batterie tenere premuto il tasto per 5 secondi per sbloccare la memoria della scheda madre quando si passa dalla modalit...

Page 12: ...e iTaste SVD ist nicht wasserdicht bitte achten Sie darauf dass sie trocken bleibt 10 Setzen Sie die iTaste SVD niemals grosser Hitze aus 11 Lassen Sie die iTaste SVD nicht fallen starke Schl ge k nne...

Page 13: ...s die Akkuspannung auf 4 6 6 5 Volt f llt blinkt die LED 8mal hintereinander rot auf dem Display erscheint LOV und das Ger t schaltet sich aus Wird ein Akku eingelegt und das Geh use zugeschraubt leuc...

Page 14: ...ie die Akkufach Verschlusskappe ab und legen Sie den Akku mit dem Pluspol voran in die Akkur hre ein Der Minuspol soll gegen das untere Ende mit der Verschlusskappe zeigen Wichtig Falls Sie vom Betrie...

Page 15: ...ealice un mal uso de su iTaste SVD puede causar da os al cuerpo externo o a los componentes internos 12 Por favor no introduzca la bater a al rev s no producir vapor 13 Innokin no se responsabiliza po...

Page 16: ...trar en el modo de desbloqueo hasta que la pantalla muestre la potencia del voltaje o wattaje actual y se ppdra ajustar con el bot n y ES 3 Modo voltaje variable y U0 Presionando el pulsador y simult...

Page 17: ...tapa negativo de la bater a Nota Antes de cambiar la con guraci n de una bater a a dos bater as por favor presionar el pulsador durante 5 segundos para vaciar la energ a restante del circuito cuando s...

Page 18: ...ste SVD n o se destina a ser comercializado como um auxilio a deixar de fumar 2 Esta unidade pode conter pe as pequenas por favor mantenha afastado de crian as ou animais 3 N o abuse do iTaste SVD mes...

Page 19: ...LOV e o iTaste SVD ir parar de funcionar PO 4 Quando a bateria colocada e o circuito ligado o LED vai come ar a piscar entre vermelho amarelo e verde e o display digital vai mostrar 888 em seguida va...

Page 20: ...ia para dentro do tubo telesc pico com o negativo virado para tampa O positivo ir car virado para cima na zona da tela digital bot es de opera o Nota Antes de fazer uma troca entre uma bateria e duas...

Page 21: ...30 CE4 CE5 eGo T2 T3 VIVI NOVA 510 VV VW Ohms meter Volts Watts Atomizer voltage output 2 iTaste SVD 1 iTaste SVD iTaste SVD 2 3 iTaste SVD 4 5 IMR high drain 18650 IMR high drain 18500 IMR high drain...

Page 22: ...N 3S 3S B V mod OFF Mod LED LED mod 3 2V 4 5V 4 6V 9V 1 LED 3 6V 2 LED 3 6V 3 8V 3 LED 3 8V 4 6V 4 LED 8 3 3V LOV mod 5 LED 5 err 4 LED 888 Z mod ON OFF mod mod LED iTaste SVD VV VW VV VW to mod LED L...

Page 23: ...DA BRUGERVEJLEDNING 5 iTaste SVD 18350 IMR 18350 2 18500 18650 2 IMR high drain Mod 5 1 LED 7 2V 2 LED 7 2V 7 6V 3 LED 7 6V 4 LED 8 7 2V LOV mod...

Page 24: ...iTaste SVD er hverken beregnet til eller markedsf res som et redskab til rygestop 2 Denne enhed kan indeholde sm dele og skal holdes utilg ngeligt for b rn og k ledyr 3 Du m ikke mishandle din iTaste...

Page 25: ...VD en slukker DA 4 N r et batteri er indsat vil LED lys blinke fra r d til gul til gr n og det digitale Display viser 888 Sk rmen vil derefter vise den forrige sp nding eller e ekt indstilling og iTas...

Page 26: ...s t derefter batteriet i teleskopr ret med den negative ende af batteriet i f rste og den positive ende ud mod batteriet negative Cap Bem rk F r du skifter mellem det ene batteri og to batterier kon...

Reviews: