When battery installed and circuit connected, the LED light will enter a
blinking cycle from red, yellow to green and the digital display will show
888, and then show the previous parameter setting, and then will be in
off mode.
“ ” button: ON/OFF battery switch
Quickly clicking it three times will enable or disable the battery. Once
enabled, holding down the button will activate the battery.
Battery Capacity Display
The LED lights will show green, yellow or red to indicate whether there
is full battery life, half capacity or charging needed.
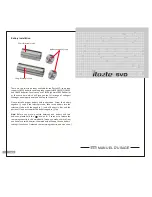
There are three main buttons on the iTaste SVD: “ ” button, "+"
button and "-" button; all the functions can be activated by using those
three buttons in one step and show on the digital screen.
“ + ” button: VV/VW+
“ - ” button: VV/VW-
ON Mode
Quickly clicking “ ” button three times will enable or disable the
battery; LED light will enter a blinking cycle from red, yellow to green;
LCD display is ON. Then holding down the button will activate the
battery.
Lock the selected Voltage or Wattage (Hold both the + and - buttons
for five seconds)
After setting your voltage or wattage you can lock the setting to prevent
accidental changes to your wattage or voltage. Press and hold both the
+ and - buttons for five seconds to lock your settings. The digital screen
will show “ LOC ” and current setting parameter of voltage or wattage
,Press and hold the + and - button for five seconds a second time to
unlock. Please note that all other functions (such as ohm check and
battery check) are still functional while you have the voltage or wattage
settings locked.
Variable Voltage Mode
( “ ” + “-”=U0 )
Holding “ ” and “-” button simultaneously for 3 seconds, the iTaste
SVD will enter variable voltage status and digit screen shows U0;
Voltage can be adjusted from 3.0 – 6.0 volts in .1 volt increments by
pressing “+” + “-” button.
EN-3
Variable Wattage Mode
( “ ” + “+”=P0 )
Holding “ ” and “+” button simultaneously for 3 seconds, the iTaste
SVD will enter variable wattage status and digit screen shows P0;
Wattage can be adjusted from 3.0W – 15.0W in .5 watts increments by
pressing “+” + “-” button.
Load Ohms Meter
( “+” + “-”=R )
Holding “+” and “-” button simultaneously for 2 seconds, the digit
screen will display load Ohms if there is any connection load in this
product; the load Ohms range will be 0-9.9. The digit screen will display
"NON" if no load has been detected.
Battery Voltage Memory
( “+”-3S/“-”-3S =B.V )
Holding either button “+” or button “-” for 3 seconds, the digit screen
will display the current voltage of the battery.
OFF Mode
Quickly clicking “ ” button three times, the digit screen will show
“OFF” and the battery will turn off.
LED Light Blinking Mode:
The LED light will blink in different colors to indicate the current
voltage. When installed with a single battery, the default voltage of
iTaste SVD is 3.2V-4.5V; when installed with two batteries, the default
voltage of iTaste SVD is 4.6V-9V.
When installed with a single battery
:
1. Red LED light = voltage lower than 3.6V
2. Yellow LED light = voltage 3.6V-3.8V
3. Green LED light = voltage 3.8V-4.6V
4. Red LED will keep blinking for 8 seconds when battery capacity is
lower than 3.3V, the digit LCD screen will show "LOV", Nixie tube
and LED cut off and then no vapor will be produced.
5. Red LED light will stay for 5 seconds when load short circuit detects,
then no vapor will be produced and the digit screen show “err”.
When installed with two batteries
:
1. Red LED light = voltage lower than 7.2V
2. Yellow LED light = voltage 7.2V-7.6V
3. Green LED light = voltage above 7.6V
4. Red LED will keep blinking for 8 seconds when battery capacity is
4.6V-6.5V, the digit LCD screen will show "LOV", Nixie tube and LED
cut off and then no vapor will be produced.
EN-4


