background image

ClayPower Online UPS


1.5. Maintenance, service and faults 

The UPS system operates with hazardous voltages. Repairs may be carried out only
by qualified maintenance personnel.

Caution - 

risk of electric shock. Even after the unit is disconnected from the mains

(building wiring outlet), components inside the UPS system are still connected to the
battery and electrically live and dangerous.
Before carrying out any kind of service and/or maintenance, disconnect the batteries
and verify that no current is present and no hazardous voltage exists in the terminals
of high capability capacitor such as BUS-capacitors.

Only persons are adequately familiar with batteries and with the required

precautionary measures may replace batteries and supervise operations.
Unauthorized persons must be kept well away from the batteries.

Caution -

 risk of electric shock. The battery circuit is not isolated from the input

voltage. Hazardous voltages may occur between the battery terminals and the
ground. Before touching, please verify that no voltage is present!
When changing batteries, install the same number and same type of batteries.
Do not attempt to dispose of batteries by burning them. This could cause battery
explosion.

Do not open or destroy batteries. Escaping electrolyte can cause injury to the skin
and eyes. It may be toxic.
Please replace the fuse only with the same type and amperage in order to avoid fire
hazards.

Do not dismantle the UPS system.

A battery can present a risk of electrical shock and high short-circuit current. The

following precautions should be observed when working on batteries:

a) Remove watches, rings, or other metal objects
b) Use tools with insulated handles.

c) Wear rubber gloves and boots.
d) Do not lay tools or metal parts on top of batteries.

e) Disconnect  charging  source  prior  to  connecting  or  disconnecting  battery

terminals. 

Summary of Contents for ClayPower

Page 1: ...ClayPower Rack Tower On Line UPS USER MANUAL...

Page 2: ...rating principle 4 2 3 Installing the UPS 4 2 4 Setup the UPS 6 2 5 Battery replacement 8 2 6 Battery kit assembly optional 9 3 Operations 11 3 1 Button operation 11 3 2 LCD panel 11 3 3 Audible Alarm...

Page 3: ...erated by any individuals with no previous experience The UPS can be operated in TN TT power distribution Connect the UPS system only to an earthed shockproof outlet which must be easily accessible an...

Page 4: ...tion risk of electric shock The battery circuit is not isolated from the input voltage Hazardous voltages may occur between the battery terminals and the ground Before touching please verify that no v...

Page 5: ...rent types of online UPS standard and long run models Please refer to the following model table Model No Type Model No Type CP 900W 2U Standard Model CP 900W L 2U Long Run time Model CP 1350W 2U CP 13...

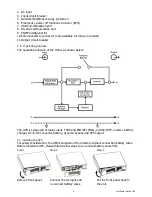
Page 6: ...he operating principle of the UPS is as shown below The UPS is composed of mains input TVSS and EMI RFI filters rectifier PFC inverter battery charger DC to DC converter battery dynamic bypass and UPS...

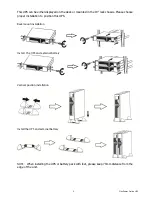
Page 7: ...hassis Please choose proper installation to position this UPS Install the UPS and external battery Install the UPS and external battery NOTE When installing the UPS or battery pack with feet please ke...

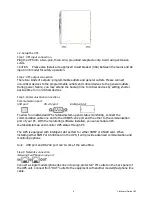
Page 8: ...tions Communication port USB port RS 232 port Intelligent slot To allow for unattended UPS shutdown start up and status monitoring connect the communication cable one end to the USB RS 232 port and th...

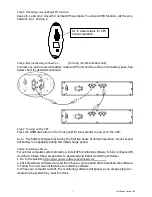
Page 9: ...during the first five hours of normal operation Do not expect full battery run capability during this initial charge period Step 8 Installing software For optimal computer system protection install U...

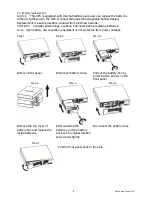
Page 10: ...ons and notes before replacing batteries Note Upon battery disconnection equipment is not protected from power outages Step 1 Step 2 Ste p 3 Remove front panel Disconnect battery wires Pull out the ba...

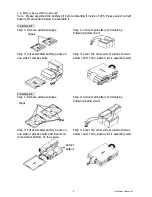
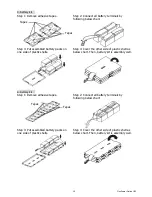
Page 11: ...ep 3 Put assembled battery packs on one side of plastic shells Step 4 Cover the other side of plastic shell as below chart Then battery kit is assembly well 3 battery kit Step 1 Remove adhesive tapes...

Page 12: ...hells Step 4 Cover the other side of plastic shell as below chart Then battery kit is assembly well 6 battery kit Step 1 Remove adhesive tapes Step 2 Connect all battery terminals by following below c...

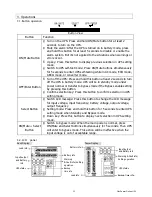
Page 13: ...bypass mode if the Bypass enable setting by pressing this button Confirm selection key Press this button to confirm selection in UPS setting mode Select Button Switch LCD message Press this button to...

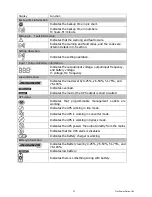
Page 14: ...voltage V voltage Hz frequency Load information Indicates the load level by 0 25 26 50 51 75 and 76 100 Indicates overload Indicates the load or the UPS output is short circuited UPS status Indicates...

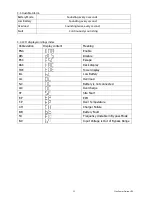
Page 15: ...ding 3 4 LCD display wordings index Abbreviation Display content Meaning ENA Enable DIS Disable ESC Escape RAC Rack display TOE Tower display B L Low Battery O L Overload N C Battery is not connected...

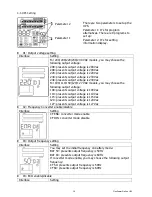
Page 16: ...odels you may choose the following output voltage 100 presents output voltage is 100Vac 110 presents output voltage is 110Vac 115 presents output voltage is 115Vac 120 presents output voltage is 120Va...

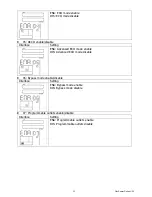
Page 17: ...erface Setting ENA Advanced ECO mode enable DIS Advanced ECO mode disable 06 Bypass mode enable disable Interface Setting ENA Bypass mode enable DIS Bypass mode disable 07 Programmable outlets enable...

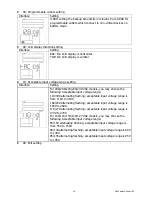
Page 18: ...may choose the following Acceptable input voltage range 110 300 alternating flashing acceptable input voltage range is from 110V to 300V 160 260 alternating flashing acceptable input voltage range is...

Page 19: ...ut voltage is within setting range 3 V o max UPS will bypass voltage to output for energy saving PFC and INVERTER are off at this mode Frequency Converter mode When input frequency is within 40 Hz to...

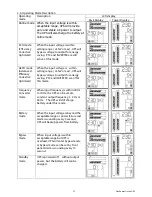
Page 20: ...27 x Bus unbalance 04 x Battery voltage too low 28 Inverter soft start fail 11 x Over temperature 41 x High Inverter voltage 12 x Overload 43 3 8 Warning indicator Warning Icon flashing Code Alarm Lo...

Page 21: ...n and flashing on LCD display and alarm is sounding every second The external or internal battery is incorrectly connected Check if all batteries are connected well Fault code is shown as 27 and the i...

Page 22: ...output wiring and if connected devices are in short circuit status Fault code is shown as 01 02 03 04 11 12 13 and 41 on LCD display and alarm is continuously sounding A UPS internal fault has occurr...

Page 23: ...your dealer Storage Before storing charge the UPS 5 hours Store the UPS covered and upright in a cool dry location During storage recharge the battery in accordance with the following table Storage T...

Page 24: ...h Depending on application 12V 9Ah Depending on application 12V 9Ah Depending on application Quantity 2 3 4 6 Typical Recharge Time 4 hours recover to 90 capacity for standard model only Charging Curr...

Page 25: ...Blank Page...
Reviews: