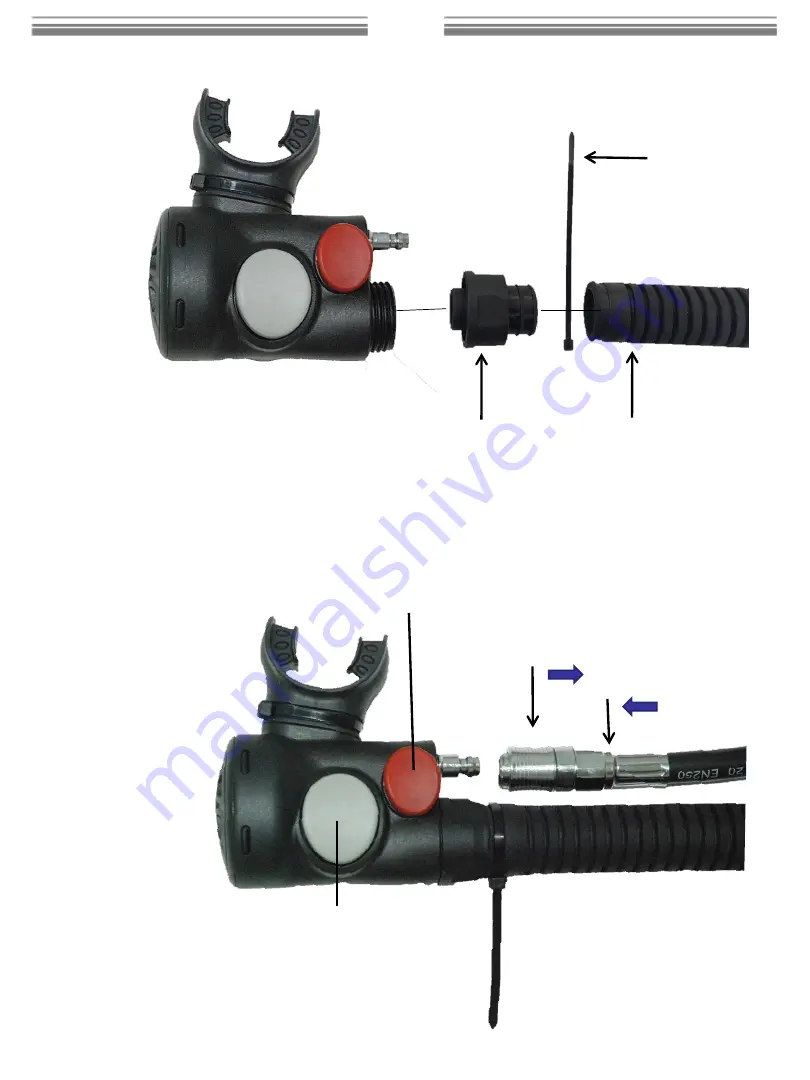
push connect
pull sleeve to disconnect
Power inflation
button
Oral inflation/
deflation button
corrugated hose
3
/4
〞
or 1
Hose adapter assembly
cable tie
IST
2
Page 1: ...IF O Owner s Manual...
Page 2: ...mperatures as this may cause a second stage freeze up Max Intermediate Pressure is 1 103 kPa 155 psi Using the IF O with first stages exceeding this intermediate pressure may cause air leakage from th...
Page 3: ...push connect pull sleeve to disconnect Power inflation button Oral inflation deflation button corrugated hose 3 4 or 1 Hose adapter assembly cable tie IST 2...
Page 4: ...plastic parts slip the threaded sleeve over the barbed end of the adapter before connecting the cable or installing into the corrugated hose Adapters If your BCD has a cable attached to the inflator...
Page 5: ...ke any conventional second stage Clear the IF O of water by first exhaling or using the purge button front cover then breathe normally through the mouthpiece 1 Power inflation is done by depressing th...
Page 6: ...F O must only be performed by an authorized factory trained scuba repair technician or by the factory Warning DO NOT USE silicone grease on the diaphragm and or the exhaust valve it may cause damage t...
Page 7: ...ilicone Rubber Spring Stainless Steel Demand Valve Brass Chrome Plated Weight 150 grams 5 3 oz W O quick disconnect and hose Average Flow Rates 340 liters minute Demand Valve Design Downstream Venturi...
Page 8: ...IF O Installation 1 Tools IST 2 Remove the original power inflator 2 1 Cut the zip tie on the corrugated rubber hose with a pliers or a knife 7...
Page 9: ...Installation 2 2 Pull and remove the power inflator from the rubber hose IST 2 3 If there is a pull dump wire connected use a sharp cone to push and remove the pin on the inflator and disconnect the w...
Page 10: ...IF O Installation IST 9...
Page 11: ...IF O Installation 3 Install the IF O inflator Octopus 3 1 Insert the pin to the IF O and make sure the pin goes through the loop of the pull dump wire to connect the pull dump valve properly IST 10...
Page 12: ...IF O Installation 3 2 Assemble the IF O with the corrugated rubber hose of the BCD and secure with a zip tie IST 11...
Page 13: ...IF O Installation 3 3 Cut and discard the extra zip tie IST 3 4 Remove the dust cover of the IF O 12...
Page 14: ...IF O Installation 3 5 Connect the IF O to the regulator with a low pressure BC hose IST 4 Finish 13...
Page 15: ...SERVICE INSPECTION RECORD Serial No Purchase Date Store name IST 14...
Page 16: ...IST Sports Corp Address Room A 6th Floor No 6 Lane 345 Yangkuang St Neihu Taipei Taiwan 11491 Tel 886 2 26272516 Fax 886 2 26599056 Email diving istsports com Web www istsports com Printed in Taiwan...