
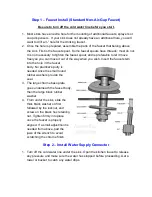


Step 1 – Faucet Install
(Standard Non-Air-Gap Faucet)
Be sure to turn off the cold water line before you start.
1. Most sinks have an extra hole for the mounting of additional faucets, sprayers or
soap dispensers. If your sink does not already have an additional hole, you will
want to drill a ½” hole for the drinking faucet.
2. Once the hole is prepared, assemble the parts of the faucet that belong above
the sink. First is the faucet spout. Some faucet spouts have threads; most do not.
It is not necessary to tighten the faucet spout, and is preferable to let it move
freely so you can move it out of the way when you wish. Insert the faucet stem
into the hole in the faucet
body. No plumber's putty is
needed since the small round
rubber washers provide the
seal.
3. The large chrome base plate
goes underneath the faucet body,
then the large black rubber
washer.
4. From under the sink, slide the
thick black washer on first
followed by the locknut, and
screw on the brass hex retaining
nut. Tighten firmly into place
once the faucet is properly
aligned. If a small adjustment is
needed from above, pad the
jaws of the wrench to avoid
scratching the chrome finish.
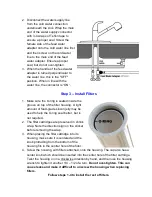
Step 2 – Install Water Supply Connector
1. Turn off the cold water line under the sink. Open the kitchen faucet to release
any pressure and make sure the water has stopped before proceeding. Get a
towel or bucket to catch any water drips.


