background image

9


6.4.4


CALIBRATION


Menu


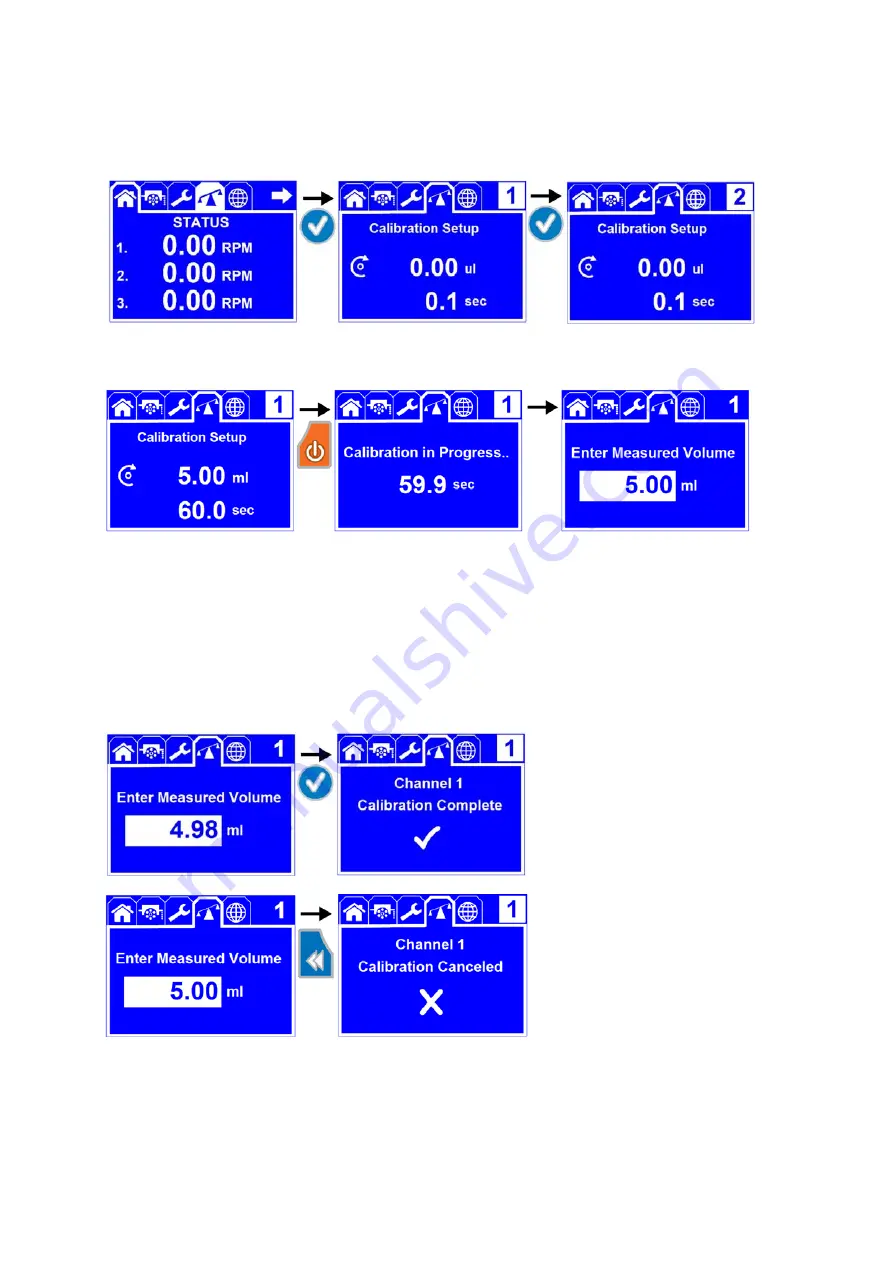
In


the


CALIBRATION


Menu


each


channel


can


be


calibrated


independently.


The


channel


being


calibrated


is


listed


in


the


upper


right


hand


corner.


The


Reglo


ICC


allows


each


channel


to


be


set


up


and


calibrated.


This


allows


for


maximum


flexibility


and


optimum


channel


to


channel


precision.


Prior


to


the


calibration


each


channel


must


be


configured


for


tubing


ID,


the


number


of


backsteps


that


are


desired


for


drip


free


dispensing,


and


calibration


of


that


channel.


The


Reglo


ICC


allows


you


to


enter


the


volume


of


fluid


to


dispense


for


calibration,


dispense


time


for


the


specified


volume,


and


pumping


direction.


Once


you


have


entered


those


values,


dispense


desired


volume


into


a


container.


Measure


the


actual


amount


of


the


fluid


by


weight


or


volume


and


enter


that


value


on


the


last


screen


to


adjust


the


pump


for


your


application.


The


calibration


can


be


interrupted


by


pressing


Run/Stop


button


which


will


cancel


the


existing


progress.


New


uninterrupted


calibration


run


will


be


required


in


order


to


calibrate


the


channel


properly.


When


adjusting


the


dispense


time


for


calibration,


if


requested


time


is


shorter


than


the


pump’s


physical


capabilities


the


dispense


time


will


automatically


default


to


minimum


achievable


dispense


time.


You


can


complete


the


calibration


by


pressing


Ok/Enter


button


following


your


measurement


input.


You


will


receive


a


message


and


checkmark


once


your


calibration


is


successful.


You


can


cancel


the


calibration


after


the


calibration


run


by


pressing


the


Reset


button.


You


will


receive


the


message


displaying


that


the


calibration


has


been


canceled.


Summary of Contents for Reglo ICC

Page 1: ...zards cannot be excluded IDEX Health and Science LLC is not liable for any damage resulting from the use of an ISMATEC pump IDEX Health and Science LLC is not responsible for the unsafe handling of chemicals IDEX Health and Science Home of Upchurch Scientific and Ismatec Products 619 Oak Street Oak Harbor WA 360 679 2528 ...

Page 2: ... 6 4 2 PUMPING Menu 6 6 4 3 SETUP Menu 8 6 4 4 CALIBRATION Menu 9 6 4 5 GLOBAL SETTINGS Menu 10 6 5 Installing Tubing 10 6 6 Information Screens 10 6 7 Differential Pressure 10 6 8 When the Pump is Idle 11 7 Over Current Protection 11 8 Cassettes 11 9 Repair 12 10 Cleaning 12 11 Disposal 12 12 Technical Specifications 13 13 Tubing Size and Flow Rate Chart 14 14 IDEX Reglo ICC Serial Command Protoc...

Page 3: ...ation The necessary safety measures based on the specific situation must be taken When pumping corrosive media we recommend placing the pump in a collecting basin The pump should not come in contact with liquid Do not open or remove the housing while the pump is operating Service and repairs carried out by the customer or by third party companies voids all warranties Appliance coupler of the power...

Page 4: ...eglo ICC pump DO NOT use any other substitutes or damage may occur The power supply is designed to provide DC voltage for your Reglo ICC pump It has built in circuit over current protection in the event the pump is overloaded or a malfunction occurs The power supply is connected to the pump by a 4 pin power DIN snap and lock plug Appliance coupler of the power supply is used to disconnect the devi...

Page 5: ...r will then highlight the entire value exiting the edit mode When highlighting pumping modes tubing ID and language the OK Enter button will allow the parameter to be changed by toggling through a list using the directional arrows Once the selection has been made pressing the OK Enter button will save the selection and exit the editing mode The Run Stop button is used to start or stop all the chan...

Page 6: ...gh the three status screens 6 4 2 PUMPING Menu The PUMPING Menu allows you to set up the pumping parameters for all of the available channels The channel number that is being programmed is indicated in the upper right hand corner You can select the rotation direction pumping mode and values for each channel in the PUMPING menu 6 4 2 1 Flow Rate Mode Flow Rate Mode provides a continuous operation a...

Page 7: ...Selectable volume units are µl ml and L Only flow rate can be changed during pumping or when the operation is paused Dispensing program can be reset during operation by pressing the Reset button after pumping is paused 6 4 2 4 Time Mode Time Mode allows the user to dispense for a set time duration with a set flow rate Adjustable parameters are rotation direction flow rate flow rate units time and ...

Page 8: ... units are RPM µl min ml min and L min Selectable time units are sec min and hours Selectable pause time units are sec min and hours Only flow rate can be changed during pumping or when the operation is paused Dispensing program can be reset during operation by pressing the Reset button after pumping is paused 6 4 2 7 Disabled Mode Disabled Mode disables the selected channel for pumping The channe...

Page 9: ...a container Measure the actual amount of the fluid by weight or volume and enter that value on the last screen to adjust the pump for your application The calibration can be interrupted by pressing Run Stop button which will cancel the existing progress New uninterrupted calibration run will be required in order to calibrate the channel properly When adjusting the dispense time for calibration if ...

Page 10: ...ned and aligned well between dedicated segments on the bars 8 Turn the pump on 9 When the pump is idle release all cassettes to maximize tubing life beware of siphoning or back flow 6 6 Information Screens Indicates that the pump is being remotely controlled by a PC via USB connection Indicates that the internal temperature has exceeded a safe threshold and pumping will stop automatically to prote...

Page 11: ...tive immediately 8 Cassettes Your Reglo ICC can use the Click n Go cassettes or the pressure lever cassettes When using new tubing for the first time it may occur that depending on the tubing used hardness and diameter the pump cannot be primed and hence does not deliver the liquid If that is the case we recommend you wet the tubing and run the pump with the tubing inserted for about 15 to 30 minu...

Page 12: ...the beginning of the operation yet the individual flow rates may increasingly diverge at a later stage For an optimum long term flow rate stability and channel to channel conformity we suggest using the Click n Go cassettes 9 Repair The Reglo ICC is designed for many years of trouble free service The Reglo ICC does not have any fuses or adjustments inside the pump If you wish to attempt any repair...

Page 13: ...of any queries Specifica Motor l min steps of 0 01 digital interfac on 60 Hz C 41 to 104 normal labora mm 8 1x5x6 CE comp This Prod second e incorpor Pinch po General you observe please conta ations P rpm ces 4 F atory conditio 7inch patibility appr duct has been edition includi rating the sam oint warning warning our Warranty act your local Patent Pe ns oved accordin n tested to the ing amendme m...

Page 14: ...3 0 017 1 7 0 57 SC0054 0 021 2 1 0 64 SC0055 0 026 2 6 0 76 SC0056 0 036 3 6 0 89 SC0057 0 049 4 9 0 95 SC0058 0 056 5 6 1 02 SC0059 0 063 6 3 1 09 SC0060 0 072 7 2 1 14 SC0061 0 078 7 8 1 22 SC0062 0 088 8 8 1 3 SC0063 0 10 10 1 42 SC0064 0 11 11 1 52 SC0065 0 13 13 1 65 SC0066 0 15 15 1 75 SC0067 0 16 16 1 85 SC0068 0 17 17 2 06 SC0069 0 20 20 2 29 SC0070 0 24 24 2 54 SC0071 0 27 27 2 79 SC0072...

Page 15: ...acter Definitions The following symbols are used in the message definitions in this document SP space 0x20 CR carriage return 0x0d LF line feed 0x0a Definitions default command response message Set Address Command Direction PC to pump This is a specially formatted command used to set the address of each pump By default each pump uses address 1 The character ASCII 0x40 Addr The new pump address 1 8...

Page 16: ...nds is described in the Direct Addressed Command List below Addr The address of a pump to send a command to 1 8 Command Individual commands with an optional argument as defined in the Direct Addressed Command List below CR A carriage return character ASCII 13 Direct Addressed Command List Ref Command Argument Function Op Response General Information 1 Reset an overload condition Set Drive Control ...

Page 17: ... time too short Parameter Control 18 E Returns whether the pump is currently running or not Get running stopped 19 Returns the following fields each separated by a space Pump model description variable length A text field describing the model of pump This description may contain spaces Pump software version 3 digits The version of software currently running in the pump Pump head model type code 3 ...

Page 18: ...current setting for pump time in minutes 0 999 Format is 0HTU Set 30 VH 3 time setting Set the current setting for pump time in hours 0 999 Format is 0HTU Set 31 U Get the current setting for volume to pump in roller steps Get 100 CR LF 32 U 5 roller steps Set the current setting for volume to pump in roller steps 0 65535 Set 33 u 4 5 high order roller steps Use to set the current setting for volu...

Page 19: ...48 4 Set the current setting for pump cycles Format is THUT Set 49 Get the total trip volume pumped since the last reset in ul ml or liters Get 4 983 SP ml CR LF 50 W Reset the total trip volume count Set 51 Force the pump to save its current pump settings values time pause time speed backsteps cycle count etc to non volatile memory They will be available after device power down Set 52 0 Sets all ...

Page 20: ...iameter to 3 45 mm Get current pump time setting The current pump time setting is 10 5 seconds Set the current flow rate setting to 0 012 ml min 1200E 2 CR LF Response 1f1200 2 CR Command 105 CR LF Response 1T CR Command Response 1 0345 CR Command Response 3 0412 CR Command ...

Reviews: