background image

11
f

11
d

11
e

15

8a

V3

8b

11

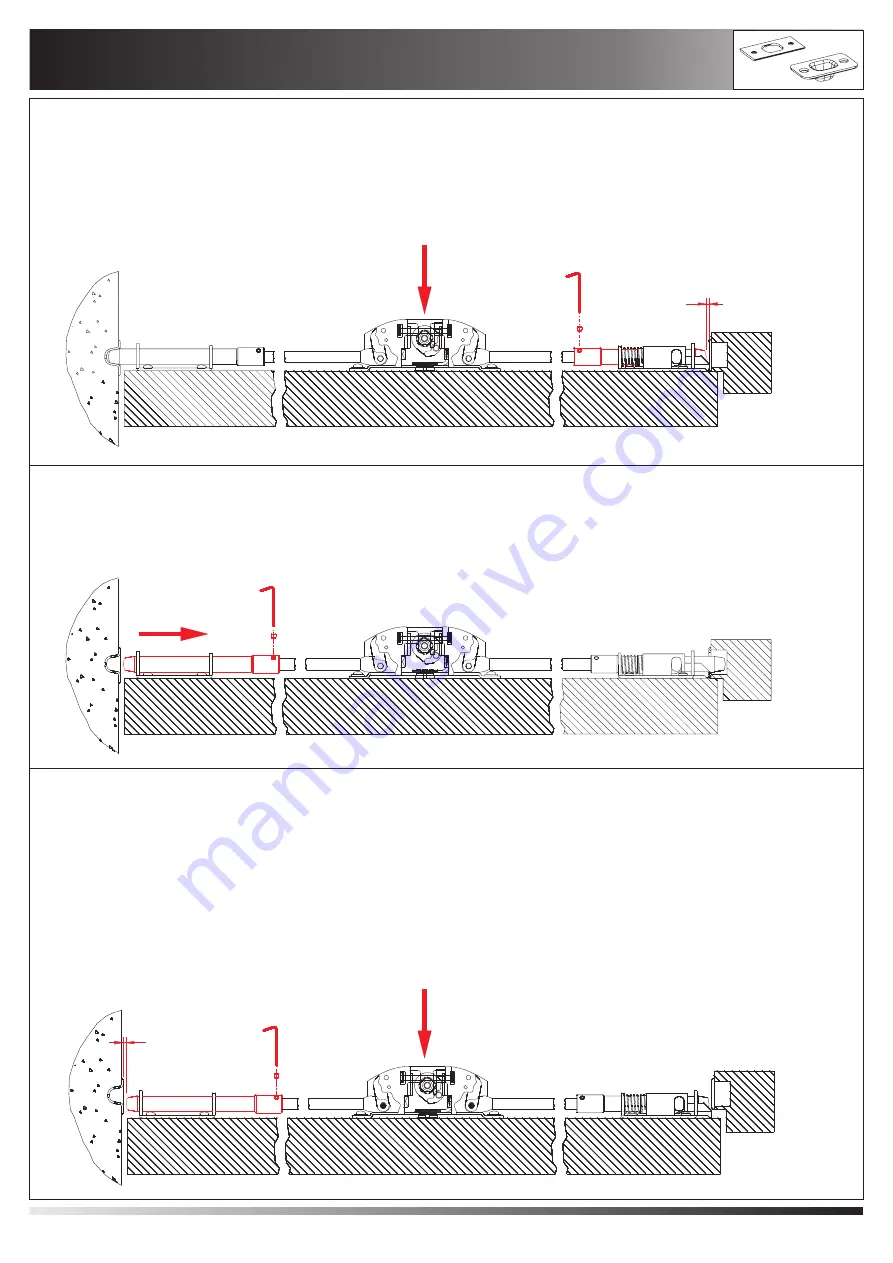
Fasi di montaggio -

Assembling phases

-

Phases d'assemblage

Einbauphasen

Fases de montaje

V3

1

7b

7a

V3

3

9b

9a

Premere a fondo la barra di spinta (7a) e mantenendola completamente premuta fissare con il grano il puntale superiore (7b) ad 1 mm dal filo della bocchetta superiore, quindi
rilasciare la barra.

Press the push-bar (7a) all the way down and holding it completely pushed down, use the grub screw to fix it to the upper top rod (7b) at 1 mm. from the edge of the upper keeper
and then release the bar.

Presser à fond la barre d'actionnement (7a) et, en la maintenant entièrement pressée, fixer l'embout supérieur (7b) à 1 mm du bord de la gâche supérieure au moyen de l'écrou et
ensuite laisser la barre.

Die Betätigungsstange (7a) ganz drücken, gedrückt halten und den oberen Spitzriegel (7b) in 1 mm Abstand zum Rand des oberen Schließblechs mit dem Stift befestigen, die
Stange loslassen.

Empujar a fondo la barra de accionamiento (7a) y manteniéndola completamente apretada, fijar con la espiga la virola superior (7b) a 1 mm del borde de la boquilla superior,
entonces soltar la barra.

Retrarre il puntale inferiore dalla bocchetta (8a) e fissarlo provvisoriamente con il grano all'asta (8b).

Retreat the lower top rod from the keeper (8a) and fix it temporarily with the grub screw to the rod (8b).

Faire reculer l'embout inférieur de la gâche (8a) et, au moyen de l'écrou, le fixer temporairement à la tige (8b).

Den unteren Spitzriegel aus dem Schließblech nehmen (8a) und ihn vorübergehend mit dem Stift an der Stange befestigen (8b).

Retraer la virola inferior de la boquilla (8a) y fijarla temporalmente con la espiga a la barra (8b).

Premere lentamente la barra (9a) solo lo stretto necessario per ottenere l'apertura della porta, scostare leggermente l'anta (circa 1 cm), rilasciare la barra, svitare il grano (9b),
riposizionare e fissare il puntale (9b) a 3 mm dal filo della bocchetta. Premere lentamente la barra solo lo stretto necessario per ottenere l'apertura dell'anta, verificare che il gioco
minimo tra puntale inferiore e pavimento, in un qualsiasi punto della rotazione, non sia inferiore a 3 mm.

Slowly press the bar (9a) only by the strict amount to open the door, slightly open the same (around 1 cm.), release the bar, unscrew the grub screw (9b), re-position and fix the top
rod (9b) at 3 mm. from the edge of the keeper. Slowly press the bar by the strict amount necessary to obtain door opening, check that the minimum play between the lower top rod
and the floor is no less than 3 mm. at any point.

Appuyer doucement sur la barre (9a) pour que la porte puisse s'ouvrir, éloigner le battant (de 1 cm environ), laisser la barre, dévisser l'écrou (9b), remettre en place et fixer
l'embout (9b) à 3 mm du bord de la gâche. Appuyer doucement sur la barre pour que le battant puisse s'ouvrir, vérifier que le jeu minimum entre l'embout inférieur et le sol n'est pas
inférieur à 3 mm en tous les points de rotation.

Die Betätigungsstange (9a) langsam und nur soweit drücken, bis die Tür öffnet, den Flügel leicht öffnen (zirka 1 cm), die Betätigungsstange loslassen, den Stift (9b) abschrauben,
den Spitzriegel (9b) in 3 mm Abstand zum Schließblechrand neu positionieren und befestigen. Die Betätigungsstange langsam und nur soweit drücken, dass die Tür öffnet,
prüfen, dass das Mindestspiel zwischen dem unteren Spitzriegel und dem Boden in allen Drehpunkten oberhalb von 3 mm bleibt.

Empujar lentamente la barra (9a) lo estrictamente necesario para obtener la apertura de la puerta, apartar ligeramente la hoja (aprox. 1 cm), soltar la barra, destornillar la espiga
(9b), volver a colocar la virola y fijarla (9b) a 3 mm del borde de la boquilla. Empujar lentamente la barra lo estrictamente necesario para obtener la apertura de la hoja, comprobar
que el juego mínimo entre la virola inferior y el suelo, en cualquier punto de la rotación, no sea inferior a 3 mm.

Summary of Contents for Push-Bolt

Page 1: ...a l l m ä h l i c h freigegeben werden und die Bildung von Viren und Bakterien verhindern Die antibakterielle Wirkung ist wissenschaftlich nachgewiesen AntiGerm ist absolut unbedenklich für den Menschen und eliminiert innerhalb weniger Minuten 650 Bakterienspezies Es werden 99 99 derErregerabgetötet außerVersion Inox Pvd PROTECCIÓNANTIBACTERIAL I s e o a p l i c a e n s u g a m a d e dispositivos ...

Page 2: ...e la largeur efficace de la porte cote Y à laquelle le fermeture anti panique est destinée etjamaisinférieureà60 voirFig 1 DieBefestigungdesPanikverschlussesanderTürmussaufMaterialerfolgen daseineZugfestigkeitvon 1 5 proSchraubegewährleistet KN Die Türflügel und Rahmen müssen aus einem ausreichend steifen Material gefertigt sein um eine eventuelle Verbiegung während der Betätigung auf max 5 mm in ...

Page 3: ...t toute autre information sont disponibles en format dans le site EN PDF ousurdemandedirecteàIseoSerrature www iseo com Die Eignung dieser Produkte mit Feuer Rauchschutztüren wurde auf der Basis einer Prüfung nach der Norm 1634 1 zertifiziert Die Prüfberichte mit Angaben zur Feuerbeständigkeit Türmaterialien und eventuellen weiteren Informationen sind im Format erhältlich auf der Seite oder auf di...

Page 4: ...aschiefemmine 9 Idispositiviperleusciteantipanicononsonoprevistiperl usosuporteadoppiaazione doppiaoscillazione senonespressamenteprogettatidalproduttore 10 Durantel installazionedevonoessereseguitescrupolosamenteleistruzionidifissaggio Taliistruzionietutteleistruzionidimanutenzionedevonoessereconsegnate dall installatoreall utilizzatore 11 Normalmentelabarraorizzontaledeveessereinstallataaun alte...

Page 5: ...diquant pousserlabarrepourouvrir ouunpictogrammesurlafaceintérieuredelaporte immédiatementau dessusdelabarrehorizontaleousurlabarrelorsqu elleprésenteunesurfaceplanesuffisantesurlaquelleilestpossibled inscrirelasignalétiquerequise Ilconvient quelasurfacedelazonedupictogrammenesoitpasêtreinférieureà8000mm etilconvientqu ilsoitdecouleurblanchesurunfondvert Ilconvientqu ilsoitconçu demanièreàcequelaf...

Page 6: ...16 Encasodequeparavolveraponerlapuertaenposicióndecierresedebautilizaruncierrapuertas sedeberíaprestaratenciónanodificultarelusodelapuertapor partedeniños ancianosy enfermos 17 Todosloscerraderosolasplacasdeprotecciónsuministradasdebensermontadasdemaneraquegaranticenlaconformidadconlanormaeuropea 1125 2008 EN D 1 VorderMontagedesVerschlussesanderTüre mußdieTüreaufeinwandfreieFunktionundLeichtgängi...

Page 7: ...iuscita b verificarechela econtrobocchetta enonsia sianoostruita e c verificarecheildispositivoperleusciteantipanicosialubrificatocomeindicatoalpunto19delparagrafo3 d verificarechenonsianostatiaggiuntidispositividibloccaggioaggiuntiviallaportadallasuainstallazioneoriginale e verificareperiodicamentechetuttiicomponentidelsistemasianoancoracorrettiinconformitàall elencodeicomponenticertificati forni...

Page 8: ...fournies avec les commandes extèrieures Utiliser les instructions serie 941 INSTRUCTIONS DE MONTAGE DE LA BEQUILLE EXTERIEURE AVEC IDEA Die Montageanleitung ist der Aussensteuerung beigefügt Die Anweisungen verwenden serie 941 MONTAGEANLEITUNGEN DER ÄUSSEREN KLINKE MIT Las instrucciones de montaje se suministran junto a los mandos exteriores U tilizar las instrucciones serie 941 INSTRUCCIONES DE M...

Page 9: ... La est disponible pour verifier graphiquement la possibilié d installation delafermeturesurdesportesdetypeetdimensionsdefinis Pourunjustefonctionnementdusystèmeauto blocageladistanceentrelelançantetlagâchedoitêtrereduitàmm0 coteG ISEO Mass D nach der Montage muss zwischen 9mm und 12 mm liegen Fuer einen einwandfreien Betrieb der Riegelsicherung muss der Abstand zwischen Schliessblech und Riegel a...

Page 10: ...10 8 Taglioamisura Cuttingtosize Coupesurmesure MabgenauesSchnitt Cortealamedida 15 3 8 10 L T 9 9 T L 9 L 115 L 155 40 min 0 16 16 17 2 1 2 6 7 4 5 12 11 14 13 ...

Page 11: ...11 H H 16 H 70 H1 9 H1 70 H1 9 Tagliobarra asteecoperture Bar connecting rodsandcoversshortening KuerzungStange VerbindungstangeundHaube Coupebarre tringlesetcouvertures Cortebarra varillay cubierta ...

Page 12: ...inferior dentro de la guía dejándola caer dentro de la boquilla en el suelo 5 Inserire completamente il puntale superiore nella guida 6a orientare l asta come indicato in figura 6b ed infilarla completamente nel puntale quindi agganciare l asta alla serraturacentrale 6c Inserirel astainferiorecompletamentenelpuntale 7a quindiagganciarel astaallaserraturacentrale 7b Completely insert the upper top ...

Page 13: ...ionare e fissare il puntale 10b a 3 mm dal filo della bocchetta Premere lentamente la barra solo lo stretto necessario per ottenere l apertura dell anta verificare che il giocominimotrapuntaleinferioreepavimento inunqualsiasipuntodellarotazione nonsiainferiorea3mm Slowly press the bar a only by the strict amount to open the door slightly open the same around 1 cm release the bar unscrew the grub s...

Page 14: ...nte il puntale superiore nella guida 5a orientare l asta come indicato in figura 5b ed infilarla completamente nel puntale quindi agganciare l asta alla serraturacentrale 5c Inserirel astainferiorecompletamentenelpuntale 6a quindiagganciarel astaallaserraturacentrale 6b Completely insert the upper top rod into the guide 5a turn the rod as indicated in the figure 5b and slide it completely into the...

Page 15: ...sizionare e fissare il puntale 9b a 3 mm dal filo della bocchetta Premere lentamente la barra solo lo stretto necessario per ottenere l apertura dell anta verificare che il gioco minimotrapuntaleinferioreepavimento inunqualsiasipuntodellarotazione nonsiainferiorea3mm Slowly press the bar 9a only by the strict amount to open the door slightly open the same around 1 cm release the bar unscrew the gr...

Page 16: ...areSperrvorrichtung Dispositivo sujetadoravista DX 1 2 Obbligatorio per il corretto funzionamento del comando esterno The operation is compulsory for the good functioning of the external loocking control Obligatoire pour le bon fonctionnement du dispositif exterieur Obbligatorisch für die korrekte Funktion des Aussengriffes Obligatorio para el funcionamiento correcto del comando externo OFF ON 45 ...

Page 17: ... peint Schließblechabdeckung aus lackiertem Zamak Copertura boquilla de zamac pintado Base da ancorare al telaio fisso Plate to be fastened to the fixed frame Base d ancrage au cadre fixe Am festen Rahmen zu verankernde Unterlegscheibe Base para anclar al bastidor fijo Accessorio regolabile per serramenti complanari e con sormonto da 0 fino a 11 mm Adjustable element for coplanar doors and rebated...

Page 18: ...18 Notes ...

Page 19: ...19 Notes ...

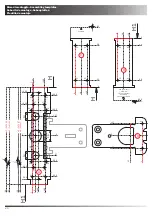
Page 20: ...a 1 D 9 23 a 1 D 12 23 32 35 V7 V7 a V7 V7 43 5 43 5 2 16 5 5 0 17 0 0 17 17 b V1 V1 Dimedi montaggio Assemblingtemplates Gabaritsdemontage Anbauplatten Plantillademontaje 10 58 0 H 8 0 16 Filo telaio 83 V1 V1 V1 V1 c Filo pavimento Floor line Ligne du plancher Bodenlinie Linea del pavimento 85 5 58 10 0 8 0 16 H1 V1 V1 V1 V1 d ...

Reviews: