

You should have:
• 1 Radiator
• 4 x 0.5” bushes
• 1 Manual Airvent
• 1 Blanking Plug
• Wall ties (if specified)
You will need:
• Tape measure
• Electric drill and bits
• Spirit level
• Airvent key
• Wall Ties (if not specified)
• Spanner for valves and vents
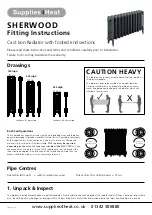
2. Contents
Technical Specifications
Materials
Cast Iron
Connections
½" flow and return.
Test pressure
10.3 Bar
Testing authority
EN442
Maximum operating pressure
6 Bar
Maximum working temperature
110 ºC
Packaging
Paper pulp channels, corrugated
cardboard & polythene sleeve
All products must be inspected once removed
from the packaging and your point of purchase
notified within 28 days of delivery of any
scratches, blemishes or other damage. Your point
of purchase will then agree appropriate action.
Imperfect radiators should therefore not be
fitted and we will not accept responsibility for
replacement of scratched or damaged radiators
once they have been fitted. This includes any
consequential loss or cost of fitting.
If we are not notified within 28 days of the date
on the signed delivery note then it will be deemed
that we have fully complied with our obligations
and claims will not be considered.
Failure to comply with any of the above may
invalidate any claims. We recommend that after
you check the product on delivery that it is stored
in its packaging to prevent damage prior to
installation, we cannot accept responsibility for
items damaged after delivery.
For full details of our Terms and Conditions
please visit www.supplies4heat.co.uk or call us
on 01342 306880.
Terms & Conditions
This product is guaranteed for 10 years. As we are not the manufacturers of this
product we will take all reasonable endeavours to make over to you the benefit
of any warranty or guarantee given by the manufacturer.
The guarantees in all cases are subject to the products being installed in accordance
with British and or European standards as well as these fitting instructions. The
guarantees in all cases are restricted to the free of charge replacement or repair
of the failed product only. Our liability will under no circumstances extend beyond
the repair or replacement of the product supplied by us. Claims for either labour
in replacement or damage to property are not admissible. Any goods that are
returned, in the event of a problem, will belong to us.
Guarantees & Liabilities
3. Installing
Please Note: In accordance with Part L1 2006 of
the Building Regulations and BS7593:1992 code
of practice for the treatment of hot water and
central heating systems, we strongly recommend
flushing the heating system post installation
of new radiators and then adding the correct
quantity and type of inhibitor for use with your
radiator and system to prevent corrosion. Damage
caused to systems not protected by a suitable
inhibitor will not be covered by manufacturer’s
guarantee.
4. Commission Radiator
When placing the radiator in place for installation, consideration
needs to be taken for the width of the feet as this will affect how
far the radiator will sit from the wall/skirting board.
www.supplies4heat.co.uk 01342 306880
A brand of ; Italy’s leading manufacturer of design led radiators.
Wall Tie Installation
With the radiator in place, mark
the positions for the wall ties,
which can be placed on the second
section in from the side (shown
below)
= Wall Tie Positions
Double check the markings then move the radiator out of
the way, then using a suitable drill bit and plugs, fix the wall
ties to the wall.


